
Working with Captions
Working with Captions
Captivate does not permit you to add text directly to a slide. Instead you enter text into a caption and then place the caption on the slide.
Captivate captions are extremely robust. There are four types of captions and 31 caption styles which are installed with the application. The caption types are as follows:
- Regular: Use these to “talk” to the viewer about features on the screen. These are automatically generated when you capture a screen or perform an action like a mouse click or text input.
- Success: A success caption is generated when you create a simulation or training presentation requiring the participation of the viewer. For example, you might ask “Which option is chosen to upload files to a server?” The answer could be “FTP.” If the viewer selects that option, a caption automatically appears that says “That is correct.”
- Failure: The opposite of success. In this case the caption would read “Try again.”
- Hint: Hint captions help the viewer make decisions. You might, for example, decide to provide a hint when a user rolls over a menu item. If the viewer rolls over the FTP item in a pop-up menu, the hint caption would appear and read “File Transfer Protocol.”
Here are some tips for creating captions:
- If the caption is to be used strictly as text on the slide, use the Transparent caption style.
- If you are using text input boxes, don’t use fonts that are not installed on the user’s computer. For example, if you use FF Confidential for the text input box and the user doesn’t have it on the local computer, the font will be substituted with something else.
- Create a style sheet by formatting a caption and selecting the Apply Properties to All Captions in the Movie check box in the Text Caption dialog box. All captions in the SWF file or captions you create will use the font, alignment, and caption style you set.
- Captions can be used as a script for narrations. When you click the Audio button on the main toolbar to open the Record Audio dialog box, click the Captions option. If a caption is attached to the slide, you will see it in the Record Audio dialog box as a script. Narrating a caption actually adds an extra degree of accessibility to the demo.
- When setting the size of the text in a caption, be aware that Captivate makes your text appear larger and overpowers the text in the slide. To get around this issue, use a font size that is a couple of points smaller than you would normally use.
- Text in Captivate is rasterized and aliased. This is a known issue and can be avoided by not placing light text in a transparent background in a slide containing a solid dark background color.
Editing a Caption
To edit a caption, follow these steps:
- Double-click the first slide with a caption—in this example, Slide 4—to open the slide in the Edit view.
-
Double-click the caption to open the Text Caption dialog box (see Figure 9). Click the Text Caption tab to see the text used for the caption.
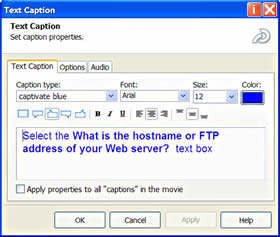

Figure 9. Edit captions in the Text Caption dialog box
- Click the Caption Type pop-up menu and select Captivate Green. Click the Apply button to see the style in the slide.
- Select the text in the caption and set the size to 10 points.
- With the text still selected, click the color swatch. When the color picker opens, select black as the color. Click OK to close the color picker and click the Apply button to preview the changes.
-
Click the Align Left button in the alignment area and the Position Center button to the right of the text-alignment choices.
Tip: The positioning choices determine where the block of text is positioned in the caption. I am not a big fan of the Top or Bottom positions because I prefer not to have the text touch the top or bottom edge of the caption graphic.
-
Select the Apply Properties to All “Captions” in the Movie check box and click OK.
By clicking the Apply Properties check box, you have created a global style. These changes are applied to all captions in the SWF file and will be applied to any new captions you create.
- Click OK to close the Text Caption dialog box.
Now let’s make some local changes to a caption:
-
To adjust the length of the caption, drag one of the caption’s selection handles inwards or outwards to expand or contract the caption. If the caption seems to be too close to the top or bottom edge of the caption, drag the top or bottom handle downwards or upwards.
Tip: When contracting or expanding a caption, be aware that text will shift position. If text is shifted below the bottom edge of a caption, you will not see a slider appear to indicate more (hidden) text.
- Double-click the caption to open the Text Caption dialog box.
- Select the bold text in the caption and click the color swatch to open the color picker. Select the “mid-red” color (Red 128, Green 0, Blue 0) which is the third swatch from the bottom on the left side of the color picker.
- Click OK to apply the color to the text.
-
Click OK to close the Text Caption dialog box. The change will be visible in the caption on the slide (see Figure 10).
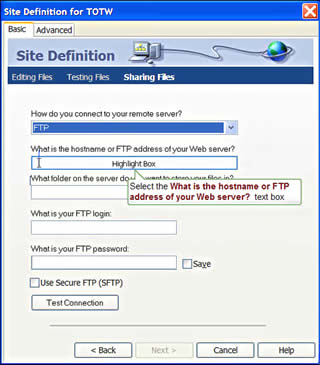
Figure 10. Formatting the caption
Tip: Color is a great way of drawing the viewer’s attention to the important words in a caption. Although bold text stands out, adding a color other than black really adds contrast to the text. I usually use this technique to highlight the names of objects in the slide.
Comments