
Wintery Christmas Text
May 4, 2006 | 0 comments
In This tutorial you will be able to create a wintery Christmas text in adobe photoshop.
1. Create a new document (400×400 pixels, Transparent) and fill the background with a soft blue (#3886d6). Then, choose a white font (Arial Black, size 48) and type “MERRY CHRISTMAS” in the middle of the image.

2. Copy the Text layer (Layer > Duplicate Layer). On the top layer (we’ll call this the “MERRY” layer), using the Text Tool, highlight and delete “CHRISTMAS”. On the bottom layer (we’ll call this the “CHRISTMAS” layer), using the Text Tool, highlight and delete “MERRY”. This will leave you with the same text setup, but you can now make the words different colors. Finally, resize the “MERRY” text to 42 pt.

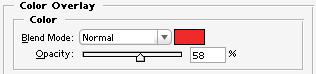
3. Right click the “MERRY” layer, select Blending Options, then Color Overlay. Use the following settings…
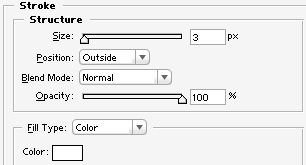
Now go to the Stroke section and use these settings…
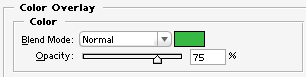
Right click the “CHRISTMAS” layer, select Blending Options, then Color Overlay. Use the following settings…
Now go to the Stroke section and use these settings…
This should leave you with an image similar to the following…

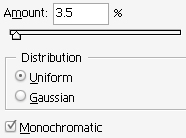
4. To make the background snow (the smaller flakes), make a new layer, fill it with black, and Add Noise (Filter > Add Noise), using these settings…
Now go to Image > Adjustments > Threshold, and type in 9. After that, add a Gaussian Blur (Filter > Blur > Gaussian Blur), using a 0.6 px radius. Change the layer mode from Normal to Screen, and you should get something like this…

5. To make the foreground snow (the bigger flakes), save this image to your hard drive (snowflake.jpg), open it in Photoshop, and set it as a brush (Edit > Define Brush). Using the Brush Tool, brush on different sized snowflakes. Your final image should look like this…


Comments