Valentines Heart
Valentines Heart
Author Name: TDW
URL: http://www.thedesignworld.com
1. Create a new document, for this tutorial we’ll use 460 x 660 & 300 DPI, I’m not sure if changing DPI when the image is finished is a good idea, so start it off with 300 “Resolution”/DPI
2. Fill the background with a nice dark purple color (#961D9A) Now set your foreground color to #D738D9 and use a soft brush to feather the top and bottom of the background

Now with a lower opacity, use the brush tool and the same color to make a big blob in the middle of the top and bottom, its not necessary, its just a nice little detail

3. Use the pen tool to make a wavy selection like so

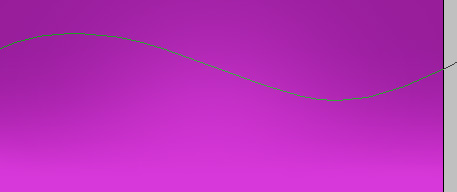
After you’ve create the path, turn it into a selection by right clicking the path and going to “Make selection,” use the default options.

Get the gradient tool and set the options to “Foreground to Transparent” then make sure your Foreground color is set to White, press D then X to set your Foreground color to white.
Apply the gradient from the top to near the middle, then erase some parts on the left site

Set the layer mode for this layer to Overlay and leave the opacity as is. Duplicate this layer and flip it vertically (Edit > Transform > Flip Vertically) After it’s been flipped move it upwards

Another background detail: Make a new layer and use a large soft brush to brush around the middle area of the image, lower the opacity and change the blending mode to Overlay

4. Create a new layer and get to the Custom Shape Tool
Near the top of Photoshop you can go into the custom shapes that you have, possibly only the default ones which should be alright, as I think Photoshop comes with a Heart
img10
OK.. so make sure your foreground is set to a lighter purple than the background is, I’m using #C244C6, now hold SHIFT and create a perfect heart
(note the pen tool options)

Align the heart to the middle
(CTRL+A, CTRL+C, CTRL+V, Delete old layer)

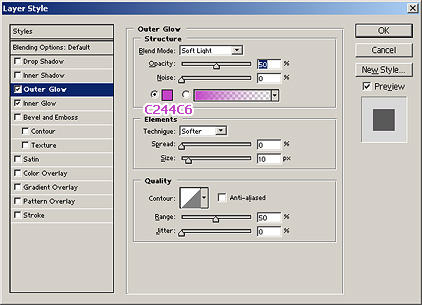
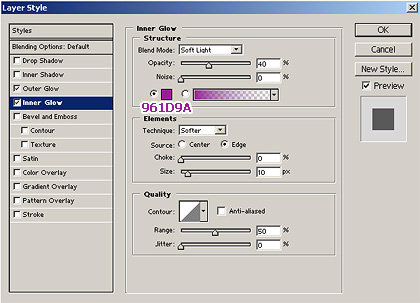
Apply these Blending Options for the heart layer:
Outer Glow:
Inner Glow:
Duplicate the heart layer and clear the Layer Style (Right click layer > Clear Layer Style)
Hold CTRL and click the 2nd heart layer, hold SHIFT and press the up arrow key, that will move the selection up 10 pixels
Now on the 2nd heart layer, use the Dodge tool to lighten up the bottom part of the heart (inside of the selection)

Then do the top, except don’t move the selection

5. CTRL+Click the main heart layer again and move the selection down 10 pixels down, make a new layer and use the Gradient tool to make a nice shiny effect (Note: Change the layer mode to Overlay

OK, now again with the bottom, if you want to keep the same selection, move it up 20 pixels, do the shiny effect

r effect, except outside of the heart and a much darker gradient

6. Finish it off by adding some small details (And the big detail – text of course,) & a more interesting background (little hearts)


Comments