
Using the Timeline
Using the Timeline
A major addition to Captivate is the Timeline. In many respects, you can regard the Timeline as a visual timing editor. Each object on the Timeline is placed on its own layer. The width of that object is its duration in the slide. Its location in the layer shows you when that object appears and disappears while the slide plays. Every object in the Timeline can have its duration increased or decreased. Double-clicking an object in the Timeline opens that object’s Properties dialog box.
Do not assume that the Timeline in Captivate is similar to the Timeline in Flash or Director. It isn’t even close. If you are a Flash or Director user, the best way to think of the Timeline in Captivate is to imagine it as a “zoomed-in” view of a Flash or Director frame.
Here is how you use the Captivate Timeline:
- Open the slide you have just edited in the Edit view.
-
Select View > Show Timeline to display the Timeline (see Figure 11).
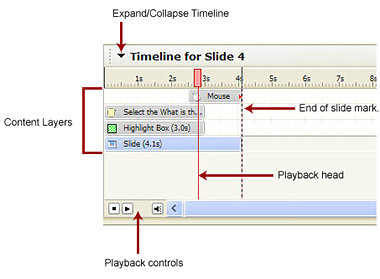
Figure 11. Anatomy of the Timeline in Captivate

Tip: You don’t have to use the menu to open the Timeline. You can also press Control+Alt+T, or click the “splitter” button—it looks like a white down-arrow in a gray box along the edge of the workspace—to open and close the Timeline.
- Roll the cursor to the end of the Slide object at the bottom of the Timeline. The cursor changes to a resize pointer.
-
Drag the cursor to the 7s (7.0 second) mark on the Timeline and release the cursor. The Mouse object also moves when you drag the edge of the slide to lengthen its duration, because objects that touch the End of Slide mark (the dashed line) are attached to it as indicated by the red arrow. If you want to detach these objects, simply drag them to the left on the Timeline; the red arrow will disappear.
Note: If you drag an object to the end point of a slide, don’t be terribly surprised if it “bumps” the end point out and increases the duration of the slide.
- Double-click the Slide object on the Timeline to open the Slide Properties dialog box.
-
Change the display time to 8.0 seconds and click OK. The Timeline will expand to that mark.
Tip: When changing the time of an object in Captivate, the smallest increment you can use is 1/10th second.
-
Double-click the Mouse object on the Timeline to open the Mouse Properties dialog box. Click the Timing tab to open the Timing panel. Set the Display Time value to 2 .0 seconds and change the Appear After value to 6.0 seconds (see Figure 12).
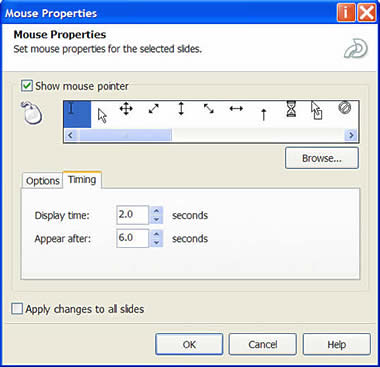
Figure 12. Setting the timing of the mouse action on the Timeline in the Mouse Properties dialog box
-
Click OK to close the Mouse Properties dialog box and return to the Timeline. The Mouse object’s duration has now increased and it ends right at the 8.0-second mark.
Tip: If you are a control freak, always set the timing by the numbers. Every object on the Timeline will have a timing option somewhere in its Properties dialog box. In the case of the Mouse object, we slowed it down. Use the timing options to increase or decrease the speed of the mouse by increasing or decreasing its duration on the Timeline.
- Click once in the middle of the Highlight Box object and drag it until the end point of the object sits over the 6.5-second mark on the Timeline. Alternatively, using a by-the-numbers approach, you could double-click the Highlight Box object to open the Highlight Box Properties dialog box. Click the Options tab and change the Display Time value to 3.0 seconds and the Appear After value to 3.5 seconds. Click OK to apply the changes and return to the Timeline.
- Drag the end of the Caption object to the 4.0-second mark on the Timeline and release the mouse.
- Double-click the Caption object to open the Caption Properties dialog box.
- Click the Options tab.
-
In the Transitions area of the Options panel, set the In value to 1.5 seconds. This means the caption will fade in over 1.5 seconds when it first appears on the screen. Click OK to apply the change and return to the Timeline. Your Timeline should now resemble Figure 13.
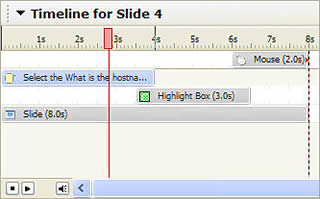
Figure 13. The timing of all the objects in Slide 4 and the duration of the slide has been changed (compare this to what you started with in Figure 11)
Comments