
Using Palettes – Navigator
When you magnify your image’s view by a percentage higher than 100%, you can use the Navigator palette to show the hidden areas of the image. There are three ways you can do this: One, use the buttons at the bottom of the palette; two, use the Hand tool inside the view box (it’s visible only if the magnification is higher than 100%) to drag the hidden areas into view; three, click the area you wish to center in the image window.
Although denigrated by many, the Navigator palette is actually quite useful when you work at large magnifications and your document view fills either the whole screen or almost the entire screen.With its aid, you can locate the section of the image that you wish to work on very easily.
If you like, you can enlarge the palette by dragging from the lower-right corner. To return the palette to the default size, click the radio button in the title bar marked with the plus sign. Furthermore, just in case the view border in the Navigator proxy window clashes with image content, you can change it to a color of your choice. To do so, choose Palette Options from the palette menu and then either select a preset color from the pop-up menu or click the color box and select a color in the Color Picker (Figure 3-36).
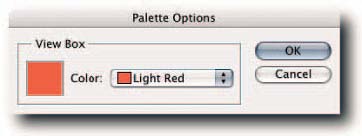
FIGURE 3-36: The Palette Options dialog box for the Navigator palette.
Comments