
Using Palettes – Levels
When people first start to use Photoshop and want to lighten or darken an image manually, most people gravitate toward the Levels command. Nothing wrong with that; the design of the Levels dialog box is simple and elegant, and you don’t need to stock up with a supply of “Whoops!” before going to work in it . . . or so you thought! It’s only when you hack the Levels dialog box that you realize the damage that you have been doing unknowingly to your images by moving those seductive sliders first this way and then that way.
The dialog box is divided into four broad sections. At the top, you have the means to change the Input levels. In the middle, you have a histogram for charting the number of levels (0 to 255, left to right) and the pixels contained at each level (bottom to top). At the bottom, you have the means to change the Output levels.To the right are the various buttons for loading saved settings, saving the settings, applying auto commands, and setting the options for the auto command; additionally, there are three eyedropper tools for setting the black, gray, and white points, respectively (Figure 3-32). The next part of the chapter looks at each section in more detail.
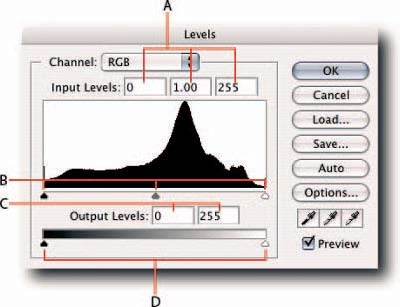
FIGURE 3-32: The Levels dialog box showing a healthy histogram. A—Input Levels text fields; corresponding to the three Input sliders (B). B—Input Levels sliders: Black Point (Shadows), Gamma (Midtones), and White Point (Highlights), respectively. C—Output Levels text fields; corresponding to the two Output Levels sliders (D). D—Output Levels sliders.
Input Controls
The Input Levels controls let you change the tonal range of the image without affecting the color balance. However, if severe moves are made to the sliders because data is clipped and thrown away, posterization may occur and the image may print with visible banding. You can change the values for the black, gamma, and white sliders by moving the sliders or inputting the values into the corresponding text boxes.
Black Input Levels

When you move the black Input Levels slider to the right, you are telling Photoshop to make the level where the slider comes to rest the new black point and to clip all the levels below that point. For example, if you move the black Input Levels slider to level 10, any pixels below level 10 will be clipped and level 10 will become the new level 0. The other levels, 10–255, will expand to fill the entire range of 0–255 levels. The color balance is not affected because the corresponding pixels are adjusted proportionately (Figure 3-33).
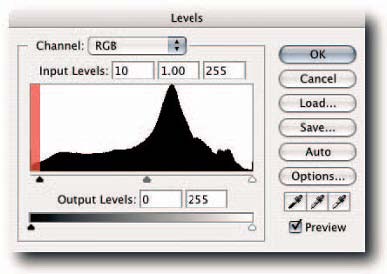
FIGURE 3-33: In the figure, the black Input Levels slider has been moved to level 10; consequently, any pixels within the red overlay range will be clipped and level 10 will become the new level 0 after you click the OK button.
White Input Levels
When you move the white Input Levels slider to the left, you are telling Photoshop to make the level where the slider comes to rest the new white point and to clip all the levels above the point. For example, if you move the white Input slider to level 245, any pixels above level 245 will be clipped, and level 245 will become the new level 255. The other levels, 0–245, will expand to fill the entire range of 0–255 levels (Figure 3-34).
Gamma Input
When you move the Gamma Input slider (the middle Input slider) to the left, you are telling Photoshop to set the value where the slider comes to rest as the new midtone gray (50% gray or level 128). For example, if you move the Gamma Input slider to the left, the image will become lighter, the shadows will stretch and the highlights compress. The image will become lighter because you have told Photoshop to make darker pixels the new level 128.When you move the Gamma Input slider, the highlight and shadow end points are not affected. The moves don’t seem intuitive because you half expect the opposite to happen: moving the slider toward the shadows will make the image go darker, and vice versa. Fortunately or unfortunately, depending on your point of view, the sliders provide a truer picture of what is happening behind the scenes. Furthermore, the Gamma slider reads in a Gamma scale from 0.10 to 9.99, where 1.00 = midtone gray, unlike the other sliders that read in incremental levels from 0–255.
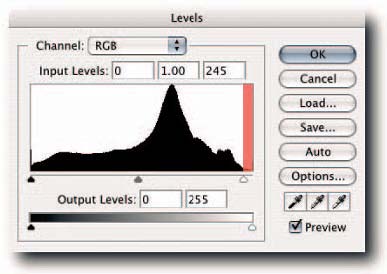
FIGURE 3-34: In the figure, the white Input Levels slider has been moved to level 245; consequently, any pixels within the red overlay range will be clipped and level 245 will become the new level 255 after you click the OK button.
Output Controls
The Output Levels sliders are mainly used to set the maximum shadow and minimum highlight dots of an image before it’s output to print. For example, if your image contains important information at either end of the range from 0–255 levels and you know the press cannot produce the full range of levels, you can compress the data into a smaller range that the press can handle (see Chapter 16 for more information on outputting to print). In contrast to the Input Levels sliders, which clip levels, these controls compress the levels into a printable range. The following sections describe, in a nutshell, how the sliders work.
Black Output Levels
When you move the black Output Levels slider to the right, you are telling Photoshop to make all the pixels where the slider comes to rest the new black end point and to shunt all the levels toward white by applying compression. For example, if you move the black Levels Input slider to level 10, any pixels that were at level 0 will move to level 10, and at level 1 to level 11, and so forth.
White Output Levels
When you move the white Output Levels slider to the left, you are telling Photoshop to make all the pixels where the slider comes to rest the new white end point and to shunt all the levels toward black by applying compression. For example, if you move the white Levels Input slider to level 245, any pixels that were at level 255 will move to level 245, and at level 254 to level 244, and so forth.
Clipping Display
The Levels dialog box has one very useful, rather hidden feature for identifying the darkest and lightest areas in an image, thus making it easier to set the black and white end points.When you hold down Alt (Windows), Opt (Mac OS) and move the Input Levels sliders, a high-contrast image is displayed, which makes it easier to identify the darkest and lightest part of the image (Figure 3-35).
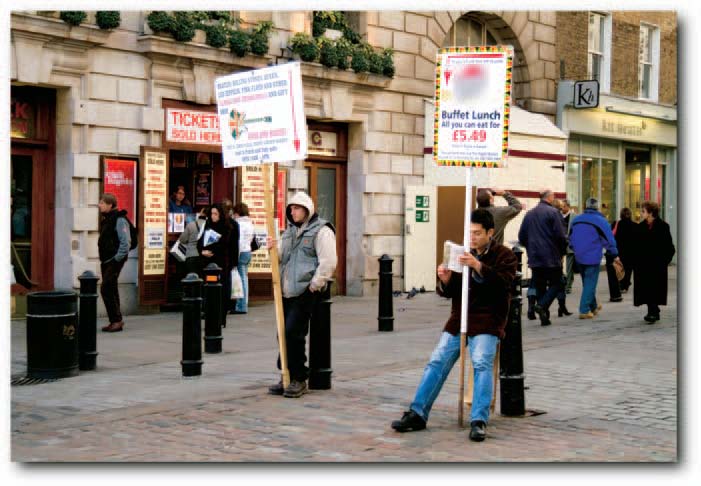
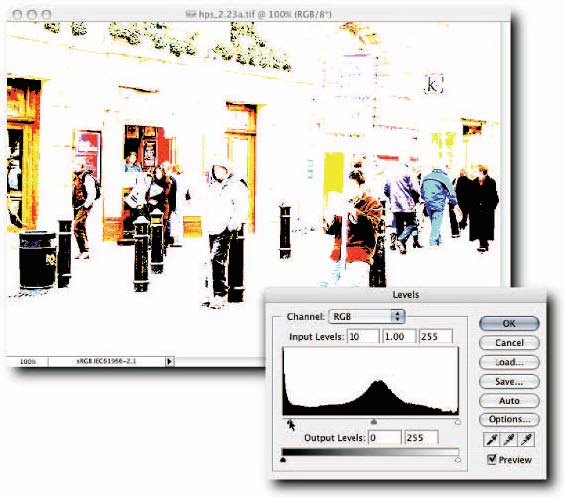
FIGURE 3-35: Top—Image being viewed in normal mode. Bottom—Same image viewed in Threshold mode in order to identify shadow data.
Here’s how it works:When you move the black Input Levels slider to the right, the darkest parts of the image are made visible first and, as you move the slider up the scale, the lighter parts of the image become progressively visible until only the very lightest remain visible. The reverse happens when you move the white Input Levels slider to the left. You can also use Threshold mode to find the threshold levels in individual channels. To do so, simply select the channel from the Channels pop-up menu in the Levels dialog box and then proceed as previously described.
Comments