
Using Palettes – Channels
The Channels palette acts as a sort of container for the pixels in a layer. Each time you activate a layer; the channels associated with the layer automatically come into play. That means that if you make any edits in the Layers palette, they are reflected in the Channels palette, and vice versa. Knowing this can be very helpful when you make editing decisions.
The Channels palette can hold a maximum of 56 channels, including spot and alpha channels. Spot channels are used to overprint specially mixed inks and varnishes. Alpha channels are used to store selections and data that can be used by filters, such as Lighting Effects, or commands, such as Apply Image. In contrast to using default color channels, you can move alpha channels up and down the stack, though their order has no effect on the image. On the other hand, the order of the spot channels is important; spot channels overprint in the same order as they appear in the Channels palette.
Creating Alpha Channels
Alpha channels are very important in the scheme of things. They are used to hold selections and masks. You can also use alpha channels to create intricate selections by using painting tools, editing tools, or filters and, by the same token, to modify existing selections and resave them. By painting with black-and-white and shades thereof, you can also create some very interesting bevels and contours if you then use the Lighting Effects filter and select the alpha channel as the source for the texture channel (see Chapter 18). Before the advent of Layer Styles, this was the way they were created. Some people still swear by them—although others swear at them from the sanctuary of the Layer Style dialog box! Alpha channels resemble the default color channels in more ways than they differ from them. They differ only in that they cannot be interchanged with the default color channels and are always addendums to the default channels; otherwise, they hold the information in the same way as the default color channels: as grayscale images (Figure 3-5).
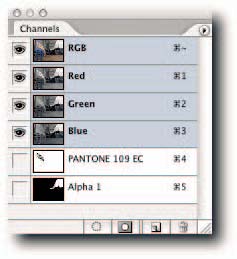
FIGURE 3-5: Showing the Channels palette containing the default color channels, a spot channel, and an alpha channel.
To create an alpha channel, choose New Channel from the Channels palette menu or click the Create New Channel button.

Creating Spot Channels
When you need to print a specific color that cannot be printed by using process inks, such as a corporate logo, you can use spot channels to create additional plates that are then used to overprint the process colors. Spot colors can also be used to create a two- or three-color job, which may work out cheaper than using four colors. You can create up to 52 spot channels, but unless you have an unlimited printing budget, you’re unlikely to use more than one or two at the most.
To create a spot channel, take the following steps:
1. Load the elements to which you want to apply the spot color as a selection. For example, if it’s type, Ctrl-click (Windows),Ф-click (Mac OS) on the type layer’s thumbnail.
2. Choose New Spot Channel from the Channels palette menu.
3. In the New Spot Channel dialog box (Figure 3-6), click the color box and specify a spot color from the Color Libraries in the Color Picker. Note: You can also specify the Solidity in the New Spot Channel dialog box, but the setting will affect only the preview and not the separations. However, the setting is applied when the file is output to a composite printer, such as a deskjet.
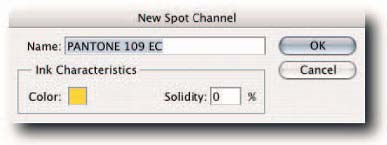
FIGURE 3-6: The New Spot Channel dialog box.
4. Click the OK button.
5. Save the file in the DCS 2.0 format or as a PDF. You don’t have to load the elements as a selection before you create the spot channel. If you like, you can do it after the channel has been “filled” with the spot color. You can also create spot channels from existing alpha channels. To do so, select the alpha channel and then choose Channel Options from the palette menu. In the Channel Options dialog box, select Spot Color and then either enter the spot color’s name, if you know it, or choose it from the Color Libraries in the Color Picker by clicking the color box.
Saving Selections
If you have spent considerable time creating a selection, you owe it to yourself to save it. You never know when the gremlins are going to huff and puff and crash Photoshop to the ground! Just make sure that the selection is active, of course, and then choose Save Selection from the Select menu or click the “Save selection as channel” icon at the bottom of the palette (Figure 3-7).
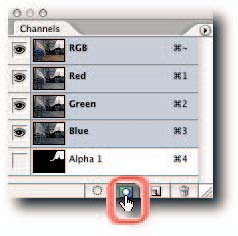
FIGURE 3-7: Saving a selection in the Channels palette for future use.
Saving a selection is a painless procedure that can help you avoid wrist ache and cussing further down the line when you have to recreate the selection and the clock is racing toward the inevitable deadline. It really is a good idea to get into the habit of saving selections that take longer than a few seconds to make.
Combining Selections
The Channels palette is also the place to combine selections manually. You can combine any active selection with one saved as an alpha channel.To do so, take the following steps:
1. Save your selections in alpha channels by clicking the “Save selection as channel” button in the Channels palette (Figure 3-7).
2. Ctrl-click (Windows),Ф-click (Mac OS) on one of the alpha channels to load selection.
3. Use the following modifier keys while you click the second alpha channel:
■ To add, press the Shift key.
■ To subtract, press Alt (Windows), Opt (Mac OS).
■ To intersect, press both of the modifier keys.
At Step 2, you can also use the Select>Load Selection command and then make your choices in the Load Selection dialog box. The dialog box also gives you the choice of loading a second selection from another open document. Saving selections as alpha channels gives you more flexibility than having to make decisions as you create the selections. Furthermore, you can tweak and twine them all you want.
Splitting and Merging Channels
The Channels palette lets you split your image into a multichannel image (not to be confused with converting to a Multichannel mode) and recompile it by merging the channels. You can also merge grayscale images into single-color mode images, provided that they have the same pixel dimensions and color depth. Splitting and combining channels has rare uses. If your need warrants it, take the following actions:
– To split channels, choose Split Channels from the palette menu. This will result in separate documents in Grayscale mode being created from each channel.
– To merge channels, open the grayscale images that you want to combine; then choose Merge Channels from the palette menu. You will be prompted for a color mode and then asked to assign one image to each channel.
Comments