
Using PageMaker 6.5 (to create professional-looking documents)
Using PageMaker 6.5 (to create professional-looking documents)
While individual applications allow you to enter and format text or create graphics, few applications can be used to easily integrate graphics and text. Desktop publication (DTP) applications can be used to put together professional-looking documents from separate graphics and text files. By the same token, DTP applications are not very useful for actually typing in the text (use a word-processor) or for creating graphics (use a drawing or a paint application).
The two main steps in creating a document are designing the master page, and laying out text and graphics. A master page contains items that appear on all pages: page numbers, titles and sub-titles, and graphic elements to provide visual structure. It is very important that documents have a consistent look; a well-designed master page can do that. Text and graphics must also be laid out in a consistent manner. Graphics should appear in approximately the same location and the same manner on each page; text should relate to graphics in similar ways on different pages. There must be adequate but not too much clearance between the different parts of the page: too little clearance reduces the impact the parts; too much clearance makes the page appear disjointed.
Initial steps
- To start working on a new document once the Aldus title window disappears, choose File|New and in the resulting dialog box set the Orientation, Start Page number, # of Pages, Options (for this exercise do not use double sided), and Margins. These need only be temporary decisions because all these can be changed later. Once this step is complete, a page is displayed on a desk top. (If any items are placed on the desk top, they will remain there even if the page is changed. Use this feature to move items between pages.)
- If the Tools window is not visible, choose Window|Show Tools. Choosing Window|Hide Tools will hide the window.


- To move to another page in the document, click on the new page number in the graphic index,
 , that is at the left-hand end of the horizontal scrollbar. The current page is displayed in reverse colors. The pages marked ‘L’ and ‘R’ are the left and right master pages of a double-sided document. If the document is not double-sided, only a right master page will be displayed:
Designing and creating the master page:
For the purposes of the class exercise, create a master page with the following appearance:
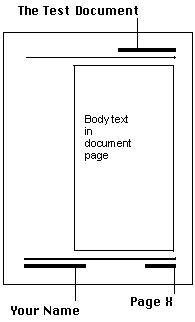
- To work on the master page, click on the master page icon in the graphic index. A very common novice mistake is to design the master page on a document page.
- If the margins–depicted by a magenta rectangle–are not visible, choose View|Show Guides. Choosing this if the margins are visible will hide them.
- To reset page margins, use File|Document Setup. Set page margins to provide a gap between body text and header and footer, and between header and footer and the page edge.
- The default is one column the same width as the margins. To change this, drag one of the vertical edges of the margin box. A blue line will indicate the new location of the column’s edge.
- To change the number of columns, choose Layout|Column Guides, and enter the relevant information into the resulting dialog box. Column widths do not have to be equal; column edges can be dragged to create new widths. The above master page is just one column (about 2/3 page width) and not two columns.
- Adding graphics to the master page. This will appear on all subsequent pages.
- To draw a single straight line, use either one of the
 tools. Click at the start of the line and drag to the end of the line. The second tool draws either a vertical or horizontal line.
 - To draw various rectangles and ellipses, use one of the
 tools. Click at one corner of the object and drag to the opposite corner. Holding the shift key down while drawing constrains the shape to a square or a circle.
 - Changing the appearance of graphics:
- To change the appearance of a graphic entity, it must first be selected. To select an entity, use the
 tool. Click on the object, and it is selected if “handles”–small black rectangles–appear at its corners. Select multiple entities by holding the shift key down while selecting, or click at one corner of an imaginary rectangle enclosing all the entities and drag to its opposite corner.
 - To deselect one entity, hold the shift key down while selecting it. To deselect all entities, click anywhere in the window except on an entity.
- To delete a selected entity, press the delete key.
- To move a selected entity, drag it with the mouse inside it to the new location.
- To resize a selected entity, drag the appropriate handle to the new size.
- To change the appearance of a selected entity, choose the appropriate appearance from Element|Line and Element|Fill.
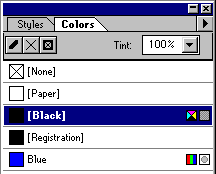
- If the Colors window is not visible, choose Windows|Show colors. Select the graphic and choose appropriate color from the color window. [Registration] is the color of special printer’s marks. Select the
 button to set the outline color. Select the
  button to set the fill color. Select the
  button to set both colors at one time.
- To assign default characteristics for graphics yet to be drawn, set the characteristics without any graphics selected.
- Adding text to the master page. This will appear on all subsequent pages.
- To type in text, use the
 tool. Click at the desired vertical location of the text, and start typing at blinking cursor. The text will line up with the left hand edge of the column, and may appear as a gray bar.
 - To view the actual size of the text, choose View|Actual Size or whatever magnification is desired. (Viewing text as gray bars can be useful in evaluating page composition.) To zoom in to a section of the page, choose
 tool from the tool box. Click on the desired area or click and drag to enclose the desired you want to zoom in. To zoom out, hold down the Alt key while clicking with this tool.
 - To have the page number automatically on each page, use the tool, click at the desired vertical location of the page number, and hold the option and command keys (Ctrl and Alt in PCs) down and type the letter ‘P’. The code for the page number, ‘RM,’ will appear. (You can make the current page number part of regular text; type “You are now at page ” and insert the page number code.)
- Editing the layout and appearance of text. PageMaker uses the metaphor of a scroll in dealing with text. When selected, text is contained within a scroll consisting of two horizontal lines with “tabs” on them:
 and
and  . A scroll can be split into several sub-scrolls, at the same time maintaining the link between the text in the sub-scrolls. (In working with this section, type in 8 or 9 lines of text.)
 - To change the location and size of a scroll, the scroll has to be selected using the tool. To select a scroll, click on it.
- To delete the selected scroll, press the delete key.
- To move the selected scroll, drag with the mouse inside the scroll to the new location.
- To resize the selected scroll, drag one of the handles at its corners to a new location.
- To change the appearance–font, size, style–of text, the text must be selected using the tool. Then, choose Type and the desired appearance from one of Font, Size, Type Style, and Alignment.
- To assign default characteristics to text yet to be entered, set the characteristics while the tool is in use.
Placing text and graphics in the body of the document. To place these elements on a page, move to that page by clicking on the appropriate page number in the graphic index. While you can paste text and graphics into your document from the clipboard, you can also place text or graphics contained in files created in other applications. These files will have to be in a format recognized by PageMaker. Make sure that the page in the document to be numbered page 1 is the first in the document. That means front and inside covers must be located in a separate document or at the end of a document (after hiding the page number).
- Placing a text file. (For this exercise place the Microsoft word file TheText in the UP212 folder located in the MAC volume.)
- To make sure that text flows continuously from one page to the next, and that additional pages are created automatically, choose Layout|Autoflow. This menu item will now be checked, and text will flow automatically. To flow text manually, choose Layout|Autoflow once again.
- To select the file to be placed, choose File|Place. In the resulting dialog box, identify the file to be placed. If it is a text file that PageMaker can handle, the radio button next to “As new story” will be selected. Double-click on the file name.
- To place the text, click the cursor at the point where the text is to begin. The text is fitted to the width of the column, and whatever length is necessary.
- To roll up a selected scroll, drag the lower tab upwards. A red arrow now appears in the tab–
 –indicating that the scroll is rolled up.
 - To split the selected scroll into sub-scrolls, roll up a scroll until it contains only the text desired in the first sub-scroll, click on the tab that has the red arrow. The cursor changes to
 . Click at the desired location of the second sub-scroll. A ‘+’ appears in the lower tab of the first sub-scroll and the upper tab of the second sub-scroll:
  . This indicates that there is further text in that direction. If a sub-scroll is rolled up or down, it will affect the text visible in all subsequent sub-scrolls because the text in the sub-scrolls are linked. Text that is hidden by scrolling up the lower tab will appear in the next sub-scroll
 - To delete a sub-scroll, roll it up so that the top and bottom ends touch each other and no text is visible. With the rolled up sub-scroll selected, press the Delete key. If the sub-scroll is not completely rolled up, all text in it will be deleted also.
- To edit text, you can do so directly on the page. If the text requires lots of edit, select your text by clicking on it and then choose Edit|Edit Story. This works like any word editing software.
- To add extra pages to your document, choose Layout|Insert pages.
- To delete pagesfrom your document, choose Layout|delete pages.
- Placing a graphic file. Some of the acceptable graphic file formats are GIF, EPS, PICT, and TIFF. (For this exercise place the PICT image file TheGraphic located in the UP212 folder in the MAC volume.)
- To select the way the graphic will relate to text, choose Element|Text Wrap. In the resulting dialog box, select the desired wrap option and text flow. If appropriate, enter the clearance between text and graphic in the standoff fields.
- To select the file to be placed, choose File|Place. In the resulting dialog box, identify the file to be placed. If it is a graphic file that PageMaker can handle, the radio button next to “As independent graphic” will be selected. Double-click on the file name.
- To place the graphic, click the cursor at the top left edge of the location of the graphic.
- To crop a graphic image–reduce the size of the frame without reducing the size of the image–choose the
 tool. Select the image to be cropped. Drag to a new location the edge or corner to be cropped. The image is cropped to the extent of the new frame.
 - To adjust an image within a cropped frame, if the image has been cropped in more than one direction, click with the tool inside the frame and drag the image around until it is located as desired within the frame.
- To edit a black and white TIFF image, choose Element|Image|Image Control.
- To increase the resolution of your graphic, choose File|Preferences. In the resulting dialog box, select High Resolution Graphics Display.
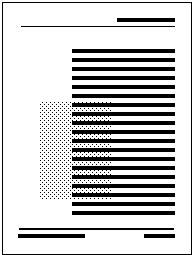
For this exercise, place the TIFF graphic Watermark located in the UP212 folder in the MAC volume, so that it appears on every page as a watermark (very light texture) behind the text. It should appear thus:
- To maintain links to the files placed in your document, rather than storing the entire contents of the files, choose File|Links. In the resulting dialog box, highlight the desired item, and choose Options. In the next dialog box, unselect Store copy in publication. This will result in smaller publication files, but you must be certain that the various files will be available everytime you want to work with the document. (It may not be a good idea in the context of the classroom exercise.)
If you do not want a certain page of your document to display items in the master page, open the Master Page window using the Window|Show Master Page menu item. Move to the desired page and click on [None] in the Master Page window. To display master page items, click on [Document Master]. You can also create multiple master pages for a document and apply them as desired, but this is an advanced topic (as is the topic of using layers).
Comments