Using FLV Playback Custom UI Components
Using FLV Playback Custom UI Components
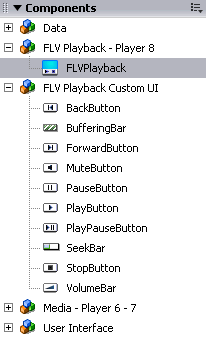
Another cool new feature of the FLVPlayback component is the addition of the supporting FLV Playback Custom UI components. You probably noticed the two new categories in the Components panel (see Figure 2).

Figure 2. The Components panel in Flash Professional 8 contains two new categories: FLV Playback – Player 8 and FLV Playback Custom UI.
The FLV Playback Custom UI components are a collection of individual video controls that can be associated with an FLVPlayback instance. The custom UI components can be used in any combination, placed anywhere on the screen, and edited like standard movie clip symbols.
Flash 8 provide the following controls:
Buttons:
- Back
- Forward
- Mute
- PlayPause (or Play and Pause as individual buttons)
- Stop
Bars:
- Buffering
- Seek
- Volume
The general process involved in using the Custom UI components is to add an instance to the Stage, name the instance, and associate the instance name with an assignment property on the video component. After the custom UI component is associated with an FLVPlayback instance, the component automatically assumes the functionality its name implies. There is no additional coding necessary.
Adding a Custom UI Component to an FLVPlayback Instance
To add a custom UI component to an FLVPlayback instance, follow these steps:
- Create an FLA file in Flash Professional 8 and drag an instance of the FLVPlayback component from the Components panel to the Stage. Select the FLVPlayback instance and give it an instance name in the Property inspector (flvPlayback, for example).
- Save the file and export the SWF file.
- Select the component and check to make sure that the
skinproperty is set toNonein the Component inspector (the skin parameter in the Component inspector is described in the following section). You may assign a skin SWF file and custom UI components but you should only do this if you’re intending to. - Now you’re set up to start adding custom UI components to the Stage alongside the FLVPlayback instance. You can position the components in any way you like. Name the instance (mySeekBar, for example).
-
As an applied sample, let’s say you want to add a seek bar to an FLVPlayback instance with its
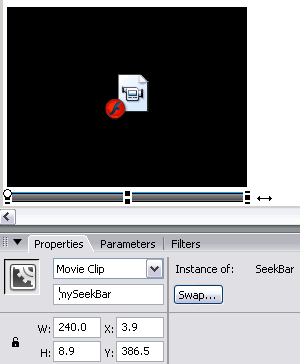
skinproperty set toNone. To do this, drag a SeekBar component from the Components panel to the Stage. Position the component as desired. In general the custom UI components are not designed to be scaled on the Stage; try to avoid scaling the component instances. Instead, change the size of the graphics inside the component movie clip symbols in the library. However, the seek bar will look OK if scaled horizontally. Use the Free Transform tool or the match command in the Align panel to match the width of the FLVPlayback instance (see Figure 3).
Figure 3. This is a view of the SeekBar instance on the Stage. Notice the instance is named mySeekBar in the Property inspector. The instance name is associated with the FLVPlayback component in the following steps.
-
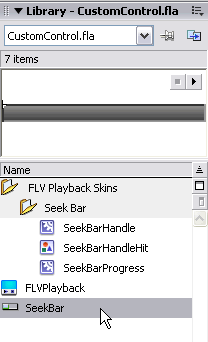
Open the Library panel. Notice that the SeekBar instance brought several skin symbols along with it, which it stores in a folder named FLV Playback Skins. You can enter the editing mode for each of these movie clips either through their instances on the Stage or the symbols in the library (see Figure 4).

Figure 4. This is the view of the Library panel containing the SeekBar custom UI component and component skins.
-
The last step is to associate the SeekBar instance with the FLVPlayback instance. To do this, add a new layer named actions to the Timeline that contains the video components. Select the actions layer and open the Actions panel. Enter the following code and replace
flvPlaybackwith the FLVPlayback instance name you’re using, and replacemySeekBarwith the instance name of your seek bar:// Assign the mySeekBar instance to the flvPlayback instance
flvPlayback.seekBar = mySeekBar; - Export the SWF to see the results.
Tip: If you’re using a SeekBar component with an older FLV file, it’s possible that the FLV file does not contain the metadata needed to power the SeekBar component and percentage functionality. If this is the case, you can resolve the issue by manually entering a totalTime value into the FLVPlayback parameters.
Modifying Custom UI Component Graphics
The graphics contained in the custom UI components can be edited as you would normally edit any movie clip symbol. Enter the movie clip’s Timeline, find the graphics that you want to adjust, and edit from there. The key is that you don’t want to change the supplied instance names or the file structure.
Following on the steps of the previous exercise, here’s how you can modify the seek bar graphics:
- Double-click the SeekBar instance on the Stage to enter its editing mode.
- Lock all the layers except for the progress layer and double-click the progress bar to enter its editing mode. Select the gradient fill on the Stage and change the color using the Fill Color swatch on the tool bar (for example, you could change it to a solid blue or a different colored gradient fill).
-
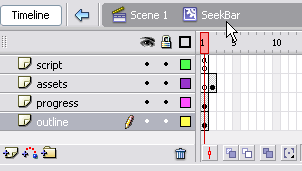
Click the SeekBar button on the edit bar to return to the SeekBar Timeline (see Figure 5).

Figure 5. You can click the SeekBar button on the edit bar to return to its Timeline.
- Notice in Figure 5 that there is a single keyframe at Frame 2 of the Timeline. The Timeline never actually plays to Frame 2, but graphics are stored there in some cases to ensure that the symbols are exported with the file and available for ActionScript. Unlock the assets layer, move to Frame 2, and edit the handle graphic on the Stage. Double-click the graphic to enter its editing mode. Change the graphic on Layer 1 as desired. Note that there is an invisible graphic on the hitBG layer which creates a “hit state” (active area) for the handle.
- Click the SeekBar button on the edit bar to return to the SeekBar Timeline. You can continue to edit from here if you like. Notice that the script layer contains code that adjusts the settings for the control in relation to the FLVPlayback instance. You do not need to adjust this code unless you change the size and shape of the graphics.
This same process can be applied to all the custom UI components. For more complex customizations, read the Help documentation listed below.
Custom UI Component Details
As you enter the movie clip for each component, you’ll notice that they are all set up a bit differently. Refer to the following section of the Flash 8 Help documentation for full details of each type of component:
Component Language Reference > FLVPlayback Component > Customizing the FLVPlayback Component > Skin Custom FLVPlayback UI Components Individually
Additional FLVPlayback ActionScript Properties for Skinning
The following code example shows all the available skin assignment properties included in the FLVPlayback component. In this sample the instance name of the component is flvPlayback and the values appearing after the assignment operator (=) are the instance names of the custom UI components on the Stage:
flvPlayback.playButton = playbtn;
 flvPlayback.pauseButton = pausebtn;
 flvPlayback.playPauseButton = playpausebtn;
  flvPlayback.stopButton = stopbtn;
 flvPlayback.muteButton = mutebtn;
 flvPlayback.backButton = backbtn;
 flvPlayback.forwardButton = forbtn;
 flvPlayback.volumeBar = volbar;
 flvPlayback.seekBar = seekbar;
 flvPlayback.bufferingBar = bufbar;
Note that you will use the PlayPauseButton component or a PlayButton and a PauseButton component. The PlayPauseButton component toggles the two states whereas the PlayButton and the PauseButton components are separate buttons. The code sample above is simply showing all the skin properties together for reference.
You can also use the bufferingBarHidesAndDisablesOthers property to modify how the component handles the skins in relation to the buffering bar:
flvPlayback.bufferingBarHidesAndDisablesOthers = true;
This can be handy if you are using a large buffer and need the controls to be disabled while the video downloads (most likely when streaming video from a Flash Media Server server). This property is set to false by default.
Note that the autoSkinHide property is another skins-related property but it does not affect FLV Playback Custom UI component instances.


Comments