
Using Flash Filters
Using Flash Filters
Filters let you add interesting visual effects to text, buttons, and movie clips. They are most often associated with applying drop shadows, blurs, glows, and bevels to graphic elements. A feature unique to Flash is that you can animate the filters you apply using motion tweens. For example, if you create a ball (or sphere) with a drop shadow, you can simulate the look of the light source moving from one side of the object to another by changing the position of the drop shadow from its beginning and ending frames in the Timeline.
After you apply a filter, you can change its options at any time or rearrange the order of filters to experiment with a combined effect. You can enable or disable filters or delete them in the Property inspector. When you remove a filter, the object returns to its previous appearance. You can view the filters applied to an object by selecting it; doing so automatically updates the filters list in the Property inspector for the selected object.
Applying Filters
You can apply one or more filters to selected objects using the Property inspector. Each time you add a new filter to an object, it is added to the list of applied filters for that object in the Property inspector. You can apply multiple filters to an object, as well as remove filters that have been previously applied. Figure 1 illustrates how different filters affect the appearance of a movie clip instance.
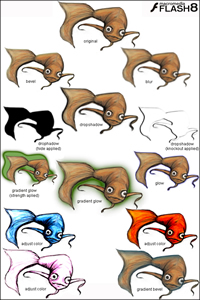
Figure 1. Examples of filter effects
To apply a filter:
- Select a movie clip, button, or text object on the Stage to which you want to apply a filter. You can apply filters only to text, button, and movie clip objects.
- Select the Filter tab in the Property inspector.
-
Click the Add Filter (+) button and select a filter from the Filters pop-up menu (see Figure 2). The filter you select is applied to the object and the controls for the filter settings appear in the Property inspector.


Figure 2. Add Filter menu in the Property inspector
-
Experiment with the settings until you get the look you want:
- Applying a Drop Shadow (Using Flash > Using Filters and Blends > Applying Filters > Applying a Drop Shadow)
- Applying a Blur (Using Flash > Using Filters and Blends > Applying Filters > Applying a Blur)
- Applying a Glow (Using Flash > Using Filters and Blends > Applying Filters > Applying a Glow)
- Applying a Bevel (Using Flash > Using Filters and Blends > Applying Filters > Applying a Bevel)
- Applying a Gradient Glow (Using Flash > Using Filters and Blends > Applying Filters > Applying a Gradient Glow)
- Applying a Gradient Bevel (Using Flash > Using Filters and Blends > Applying Filters > Applying a Gradient Bevel)
- Applying the Adjust Color Filter (Using Flash > Using Filters and Blends > Applying Filters > Applying the Adjust Color Filter)
To remove a filter:
- Select the movie clip, button, or text object that you want to remove a filter from.
- Select the Filter tab in the Property inspector.
- Select the filter you want to remove in the list of applied filters.
- Click the Remove Filter (–) button to remove the filter.
You can create a filter settings library that lets you easily apply the same filter or sets of filters to an object. Flash stores the filter presets you create in the Property inspector on the Filters tab in the Filters > Presets menu.
You can delete or rename any presets.
To enable or disable a filter applied to an object:
-
Click the enable or disable icon next to the filter name in the Filter list in the Property inspector.
Note: Alt-click the enable icon in the Filter list to toggle the enable state of the other filters in the list. If you Alt-click the disable icon, the selected filter is enabled and all others filters in the list are disabled.
To enable or disable all filters applied to an object:
-
Click the Add Filter (+) button in the Property inspector and then select Enable All or Disable All from the pop-up menu.
Note: You can Control-click the enable or disable icon in the Filter list to enable or disable all the filters in the list.
At this point, you may want to try applying a basic filter effect yourself. There are many examples (see above) in the Flash documentation. However, an easy example to start out with is applying a drop shadow, so try it out by using the following steps.
To apply a preset filter to an object:
- Select the movie clip, button, or text object that you want to apply a filter preset to.
- Select the Filter tab in the Property inspector.
- Click the Add Filter (+) button and select Presets from the Filters pop-up menu.
- Select the filter preset you want to apply from the list of available presets at the bottom of the preset menu.
Note: When you apply a filter preset to an object, Flash replaces any filters currently applied to the selected object(s) with the filter(s) used in the preset.
Creating a Skewed Drop Shadow
Use the Drop Shadow filter’s Hide object option to create a more realistic look by skewing the shadow of an object (see Figure 3). To achieve this effect, you need to create a duplicate movie clip, button, or text object, apply a drop shadow to the duplicate, and use the Free Transform tool to skew the duplicate object’s shadow.

Figure 3. Skewing the Drop Shadow filter to create a more realistic-looking shadow
To create a skewed drop shadow:
- Select the movie clip or text object whose shadow you want to skew.
- Duplicate (select Edit > Duplicate) the source movie clip or text object.
- Select the duplicated object, and skew it using the Free Transform tool (Modify > Transform > Rotate and Skew).
- Apply the Drop Shadow filter to the duplicated movie clip or text object, and select the Hide Object check box. The duplicated object is hidden from view, leaving only the skewed shadow.
- Adjust the Drop Shadow filter settings and the angle of the skewed drop shadow until you achieve the look you want.
Comments