Using Flash: Creating a Button
Macromedia Flash – Creating a Button
When you create a banner, you need to let your user click anywhere in the banner area and open a new browser window. You can create buttons very easily in Flash. Your button can either have a graphic with rollover graphics, sounds, and even animations of their own. Or you can create an invisible button. Invisible buttons are useful when you want to create “hot spots” on your website or make the entire banner clickable without obscuring your graphics. In the following exercise, you’ll add an invisible button over your banner graphics.
Tip: For more information on creating visible buttons with graphics and rollover effects, search “creating buttons” (with quotes) in the Flash Help panel (F1).
- Select Insert > Timeline > Layer to create a new layer and rename the new layer as button.
- Select the Rectangle tool in the Tools panel (the button’s icon looks like a square).
- Find the Colors section of the Tools panel and click the pencil icon to select the Stroke color control.
-
Select No Color, as shown in Figure 10. Doing so disables the rectangle’s outline.

Figure 10. Select No Color for the stroke color control.
-
Click and drag the mouse diagonally across the Stage to create a rectangle.
The size of the rectangle does not matter—you will resize it later using the Property inspector.
-
Click the Selection tool in the Tools panel and then click the rectangle on the Stage to select it.
A cross-hatch pattern appears over the rectangle when you select it.
-
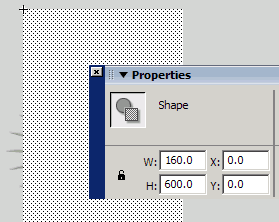
Open the Property inspector (Window > Properties > Properties). Change the value in the W (width) text box to 160 and the H (height) text box to 600. Then change the X text box and the Y text box both to 0 (see Figure 11).

Figure 11. Change the width and height of the rectangle and then set the location of the rectangle to cover the Stage.
- With the rectangle still selected on the Stage, press F8 to change the rectangle into a symbol.
- In the Convert to Symbol dialog box, type inv btn in the Name text box, select Button, and then click OK.
-
Double-click the new button on the Stage to enter the symbol-editing mode.
The rectangle is currently on the first Up frame of the button you created. This is the Up state of the button—what users see when the button sits on the Stage. Instead, you want the button not to have anything visible on the Stage. Therefore, you need to move the rectangle to the Hit frame, which is the hit area of the button (the active region that a user can click to activate the button’s actions).
-
Click the keyframe at the Up frame and hold down the mouse button while you drag the keyframe to the Hit frame (see Figure 12).

Figure 12. Click and drag the rectangle keyframe from the Up frame to the Hit frame on the Timeline.
Now even though the entire area of the banner is clickable, there is no visual appearance of the button on your banner.
- Click Scene 1 to return to the main Timeline. Now there is a teal rectangle over the banner area. This refers to the invisible button’s Hit area. If it’s distracting to you, you can hide the button layer in the authoring environment. On the Timeline, click the dot that’s under the Eye icon on the button layer to hide the contents of that layer.


Comments