
Using Blend Modes
Using Blend Modes
Blend modes let you create composite images. Compositing is the process of varying the transparency or color interaction of two or more overlapping objects. Blending lets you create unique effects by blending the colors in overlapping movie clips, and also add a dimension of control to the opacity of objects and images. You can use Flash blending modes to create highlights or shadows that let details from an underlying image show through, or to colorize a desaturated image.
A blending mode contains these elements:
- Blend color is the color applied to the blend mode
- Opacity is the degree of transparency applied to the blend mode
- Base color is the color of pixels underneath the blend color
- Result color is the result of the blend’s effect on the base color
Blend Modes in Flash
Because blend modes depend on both the color of the object to which you’re applying the blend and the underlying color, you must experiment with different colors to see what the result will be. Experiment with the different blend modes to achieve the effect you want.
Flash provides the following blend modes:
- Normal applies color normally, with no interaction with the base colors.
- Layer blends colors normally but pre-composites the blend object at 100% opacity prior to blending. This prevents subclips of the blend object from bleeding through one another.
- Darken replaces only the areas that are lighter than the blend color. Areas darker than the blend color don’t change.
- Multiply multiplies the base color by the blend color, resulting in darker colors.
- Lighten replaces only pixels that are darker than the blend color. Areas lighter than the blend color don’t change.
- Screen multiplies the inverse of the blend color by the base color, resulting in a bleaching effect.
- Overlay multiplies or screens the colors, depending on the base colors.
- Hard light multiplies or screens the colors, depending on the blend mode color. The effect is similar to shining a spotlight on the object.
- Difference subtracts either the blend color from the base color or the base color from the blend color, depending on which has the greater brightness value. The effect is similar to a color negative.
- Invert inverts the base color.
- Alpha applies an alpha mask.
- Erase removes all base color pixels, including those in the background image.
Note: The Erase and Alpha blend mode require that a blend mode other than Normal be applied to the parent movie clip.
Blend Mode Examples
Figure 4 illustrates how different blend modes affect the appearance of an image. Be aware that the resulting effect of a blend mode may be considerably different, depending on the color of the underlying image and type of blend mode you apply.

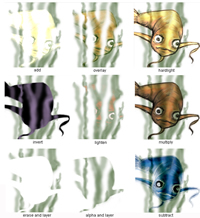
Figure 4. Examples of blend modes
Applying a Blend Mode
You use the Property inspector for movie clips to apply blends to selected movie clips.
To apply a blend mode to a movie clip:
- Select the movie clip instance (on the Stage) to which you want to apply a blend mode.
- Adjust the color and transparency of the movie clip instance using the Color pop-up menu in the Property inspector.
- Select a blend mode from the Blend pop-up menu in the Property inspector for movie clips. The blend mode is applied to the selected movie clip instance.
- Verify that the blend mode you selected is appropriate to the effect you’re trying to achieve.
You might need to experiment with both the color and transparency settings of the movie clip and the different blend modes to achieve the effect you want.
Applying a Blend Mode Using ActionScript
You can also apply blend modes to instances using ActionScript code in Flash Basic 8 and Flash Professional 8. For example, you can apply the difference blend mode using the following code.
Type the following ActionScript on Frame 1 of the Timeline:
createEmptyMovieClip("img_mc", 10);
 var img_mcl:MovieClipLoader = new MovieClipLoader();
 var mclListener:Object = new Object();
 img_mcl.loadClip(
 "http://www.helpexamples.com/flash/images/image1.jpg", img_mc);
 mclListener.onLoadInit = function(img_mc:MovieClip) {
     img_mc.blendMode = "difference";
 };
 img_mcl.addListener(mclListener);
Then select Control > Test Movie to test the document.
To see how different blend modes are applied to an image, use the next example. The following example loads a dynamic image and lets you apply different blending modes to the image by selecting a blending mode from a combo box on the Stage.
To apply blend modes to an image using ActionScript:
- Create a new Flash document and save it as blendmodes.fla.
- Drag a ComboBox component instance onto the Stage and give it an instance name of blendMode_cb.
-
Add the following ActionScript to Frame 1 of the Timeline:
var blendMode_dp:Array = new Array();
 blendMode_dp.push({data:"add", label:"add"});
 blendMode_dp.push({data:"alpha", label:"alpha"});
 blendMode_dp.push({data:"darken", label:"darken"});
 blendMode_dp.push({data:"difference",
                       label:"difference"});
 blendMode_dp.push({data:"erase", label:"erase"});
 blendMode_dp.push({data:"hardlight", label:"hardlight"});
blendMode_dp.push({data:"invert", label:"invert"});
 blendMode_dp.push({data:"layer", label:"layer"});
 blendMode_dp.push({data:"lighten", label:"lighten"});
 blendMode_dp.push({data:"multiply", label:"multiply"});
 blendMode_dp.push({data:"normal", label:"normal"});
 blendMode_dp.push({data:"overlay", label:"overlay"});
 blendMode_dp.push({data:"screen", label:"screen"});
 blendMode_dp.push({data:"subtract", label:"subtract"});
 blendMode_cb.dataProvider = blendMode_dp;

  var mclListener:Object = new Object();
 mclListener.onLoadInit =
   function(target_mc:MovieClip) {
     var blendModeClip:MovieClip =
      target_mc.createEmptyMovieClip("blendModeType_mc", 20);
     with (blendModeClip) {
         beginFill(0x999999);
         moveTo(0, 0);
         lineTo(target_mc._width / 2, 0);
         lineTo(target_mc._width / 2, target_mc._height);
        lineTo(0, target_mc._height);
         lineTo(0, 0);
         endFill();
     }
     target_mc._x = (Stage.width - target_mc._width) / 2;
     target_mc._y = (Stage.height - target_mc._height) / 2;
    blendModeClip.blendMode = blendMode_cb.value;
 };
 createEmptyMovieClip("img_mc", 10);
 var img_mcl:MovieClipLoader = new MovieClipLoader();

img_mcl.addListener(mclListener);
 img_mcl.loadClip("
  http://www.helpexamples.com/flash/images/image1.jpg", img_mc);

  function cbListener(eventObj:Object):Void {
     img_mc.blendModeType_mc.blendMode = eventObj.target.value;
 }
 blendMode_cb.addEventListener("change", cbListener);
This ActionScript code populates the combo box with each type of blending mode, so the user can view each effect on the dynamically loaded image. A listener object is created, which is used with a MovieClipLoader instance. The listener object defines a single event listener,
onLoadInit, which is invoked when the image has completely downloaded and been initialized by Flash. The event listener creates a new movie clip namedblendModeType_mcand uses the Drawing API to draw a rectangular shape over the left half of the image. The currently selected blending mode in the ComboBox instance is then applied to theblendModeType_mcmovie clip.The rest of the code sets up the MovieClipLoader instance, which is responsible for loading the specified image into a movie clip on the Stage. Finally, a listener is defined for the
blendMode_cbComboBox instance, which applies the selected blending mode whenever a new item is selected from the ComboBox instance. - Select Control > Test Movie to test the document.
Comments