
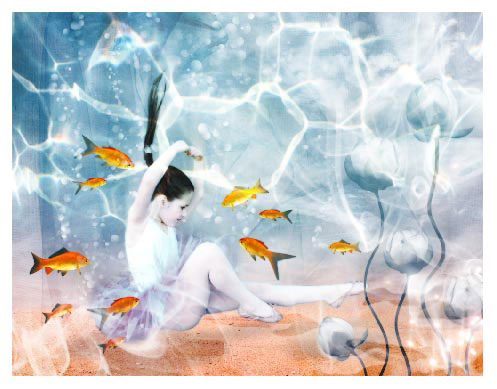
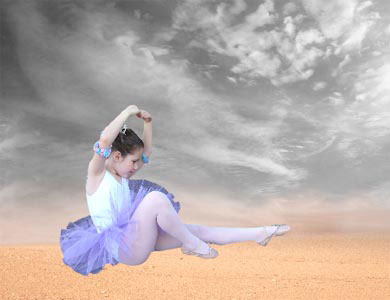
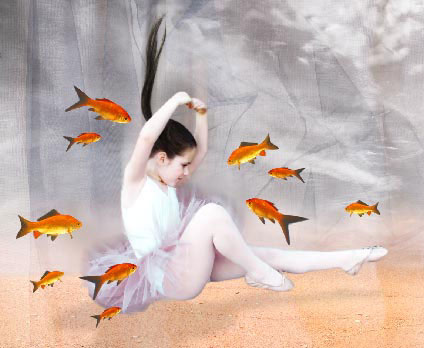
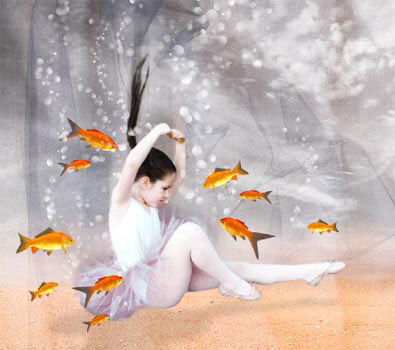
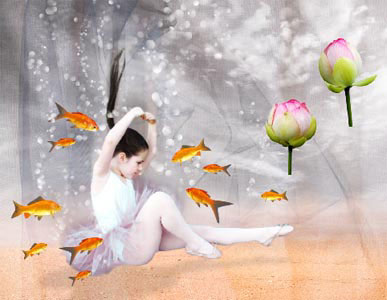
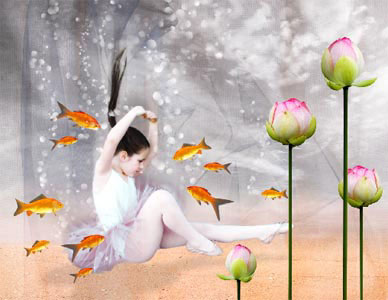
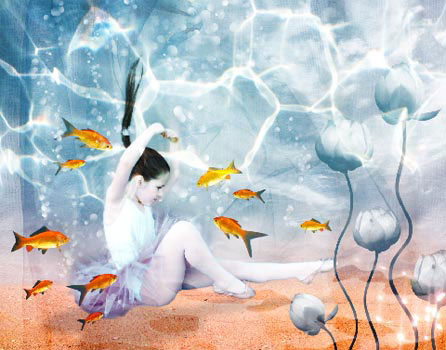
Underwater Dance Effects
In this tutorial we’ll learn
to combine different photos, correct the colors, create drifting
distorts, move off the unnecessary objects of the pictures, change the
coiffure of the model, represent the hand out of the bubbles, use
different textures, create the effect of a motioning object and smooth
out little the picture.
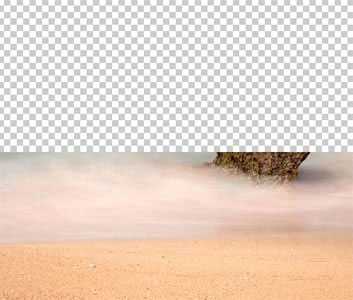
For the beginning we have to open in a
new window the picture representing the sand on it: File – Open
(ctrl+o), I like this one:

Now we should copy this layer to make possible working with it
(move it on the icon new Layer on the Layers
window). The previous layer must be deleted (by moving it on the icon Delete
Layer on the Layers window also). Now we
should mark out a part of the picture, representing the stone and the
sky (Rectangular Marquee Tool) and erase it. We should
enlarge a little the picture in its highness, selecting the Crop
Tool.
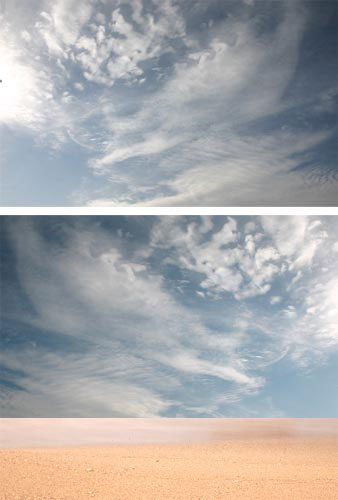
Open in a new window the picture of the sky, which will be
inserted later in our picture (ctrl+o). Mark it out and make a copy of
it: Edit – Copy (ctrl+c). Get back to the previous
window and insert it on a new layer: Edit – Paste
(ctrl+v). Represent its reflection now horizontally: Edit –
Transform – Flip Horizontal and then make the necessary
corrections on its size, using the next command: Edit – Free
Transform (ctrl+t).

Create now a mask out of this layer (sky’s layer): Layer
– Add Layer Mask – Reveal All. Then select the Gradient
Tool of black color and hide the sharp line between the sky
and the land.
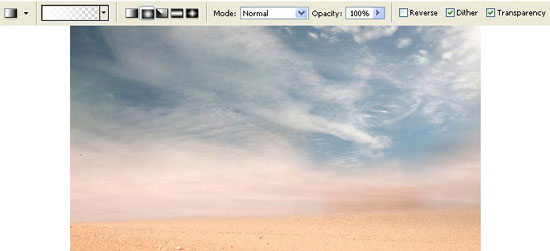
Make use of the next command Layer
– Remove Layer Mask – Apply and then decolorize the sky: Image
– Adjustments – Desaturate (shift+ctrl+u). Open in a new
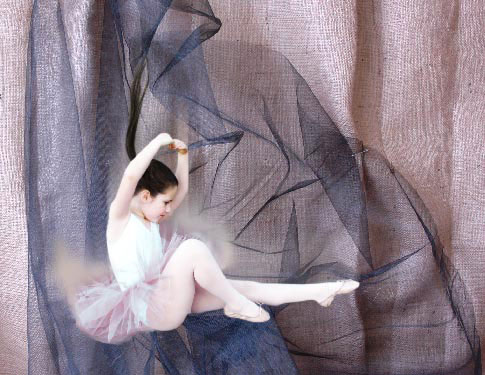
window the picture of a ballet-dancer (ctrl+o).

Mark out her contours, using the instrument from here: Polygonal
Lasso Tool.
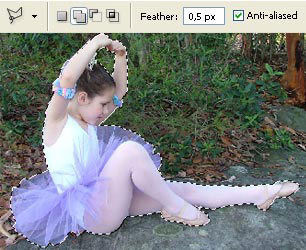
Make a copy of the picture (ctrl+c) and insert it on a new
layer, above the sky’s layer (ctrl+v). Make the necessary corrections on
the picture’s size if that is necessary (ctrl+t).
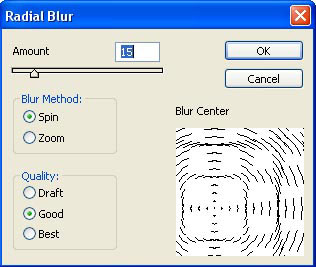
Now we should copy the layer containing the ballet-dancer
(ctrl+j) and blur it out on its radial direction, selecting Filter
– Blur – Radial Blur, setting the center approximately on the
place the girl is situated on.
Create a mask out of the layer: Layer – Add Layer Mask –
Hide All and make visible the layer only along the girl’s
dress’s edges, using the Brush Tool with smooth edges
of white color.
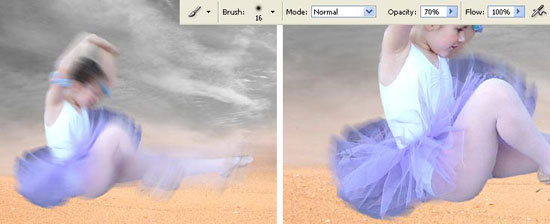
Combine this layer with that one the girl
is situated on: Layer – Merge Down (ctrl+e). It’s
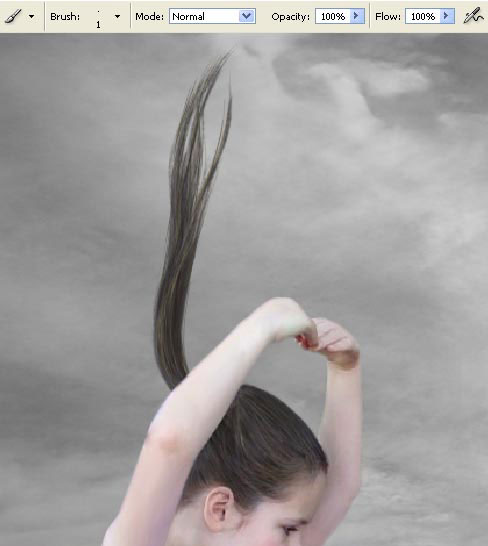
necessary to move off the crown of her head. For the beginning we should
move off a part of the crown, situated on her hair, marking it
preliminary with Polygonal Lasso Tool. After that we
should select the Clone Stamp Tool to paint very
accurately the rest of the crown by copying the hair near the processing
place.
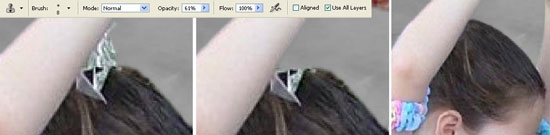
Move off the same way the band from the girl’s hand.
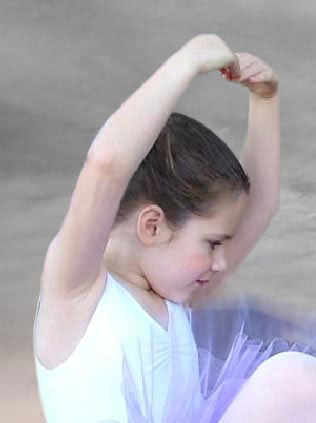
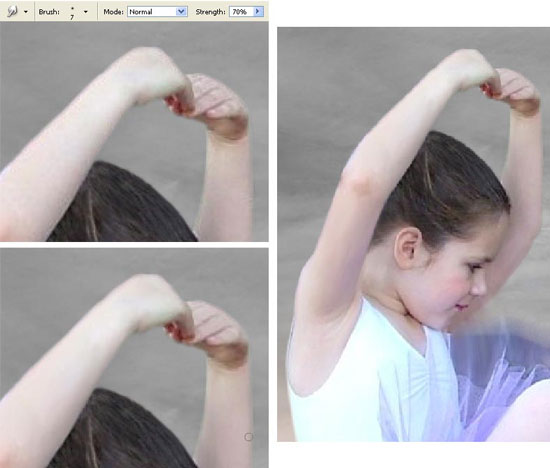
Because we have several visible patches on the picture and the
photo is of bad quality, we must use very accurately the Smudge
Tool and smooth out the dancer’s skin. The size of the
instrument may be changed, depending on the processed zone.
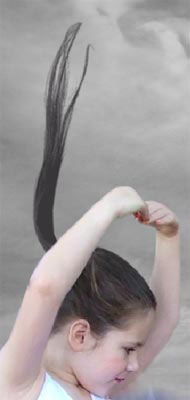
Copy now the most neutral hair’s nuance with the Eyedropper
Tool and start using the set of prepared brushes that may be
downloaded here: http://www.deviantart.com/deviation/25147133/.
Use them on a new layer to add a hair tail (insert it on the layer
situated under the girl’s layer and then use Free Transform option to
turn it around and merge down the layers).
Select after that the Brush Tool of 1
px and make use of several colors (the light one, the
neutral and the dark one) to make the girl’s hair livelier.
Merge down the girl’s layer and the
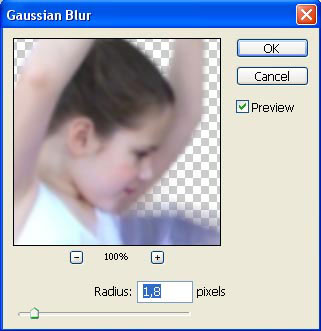
tail’s layer: Layer – Merge Down (ctrl+e). Make a copy
of this layer (ctrl+j) and blur out the copy, using the Filter –
Blur – Gaussian Blur.
Change the layer’s type on Overlay and combine
after that the layers.
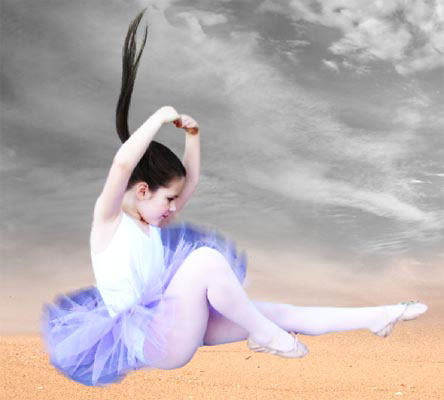
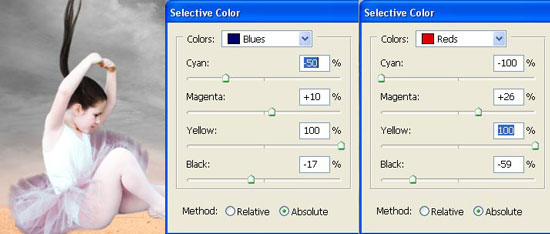
Make the corrections on this layer’s colors: Image –
Adjustments – Selective Color.
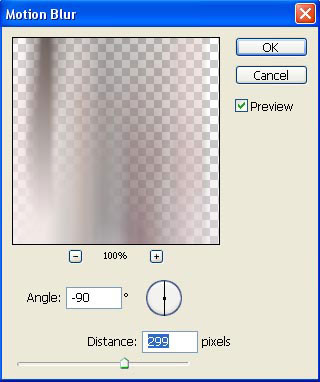
Copy this layer and situate the copy lower than the main girl’s
layer and blur it out on its vertical direction, applying the filter
shown here: Filter – Blur – Motion Blur.
Then mark out and delete that part of the layer that gets
outside the lowest girl’s contour.
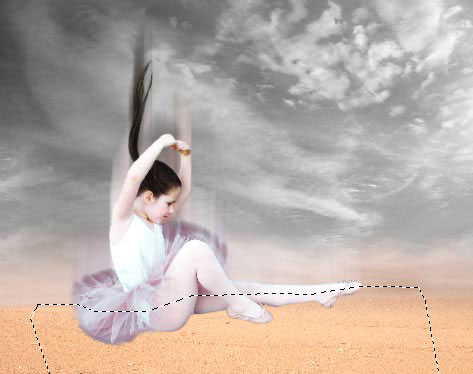
Minimize the layer’s Opacity till 60%.
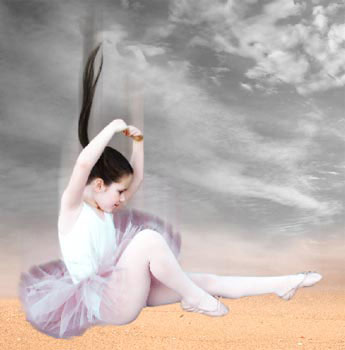
Adding the girl’s shadow means in this
case copying the girl’s layer and show it vertically: Edit –
Transform – Flip Vertical. Then distort it a little, applying
next option: Edit – Transform – Distort.
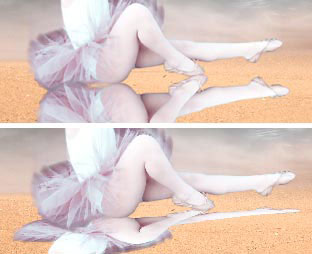
Make this picture totally black by using the next selection: Image
– Adjustments – Channel Mixer.
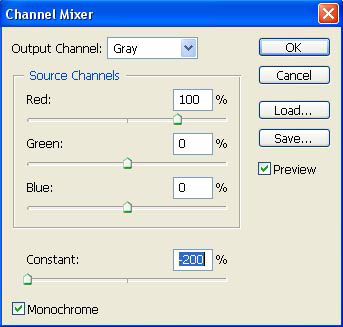
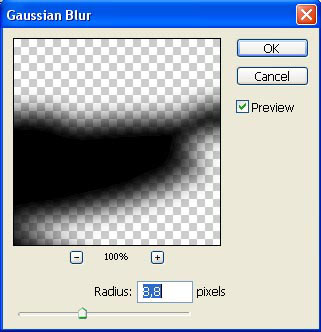
Then blur it out (Gaussian Blur).
And minimize the layer’s Opacity till 15%.

Start using the Clone Stamp Tool
with smooth edges on a new layer, above the girl’s layer, to make the
skirt’s edges more blurred, by copying turn by turn the skirt’s part and
the sky’s ones.
Blur
out the layer (Gaussian Blur).
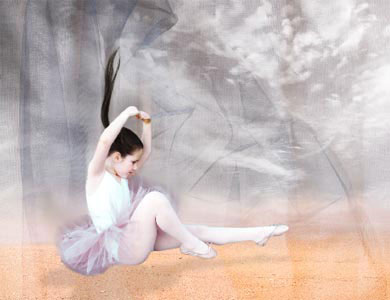
Insert
now a textile’s texture, above the background’s layer.
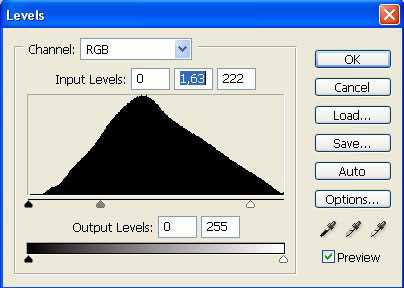
Make
the necessary corrections on the brightness and the
contrast,
applying Image – Adjustments –
Levels.
Change
the layer’s type on Overlay and
minimize the Opacity
of the layer till 50%.
Cut
out several gold fishes from a
certain picture and insert each of
them on a new layer:
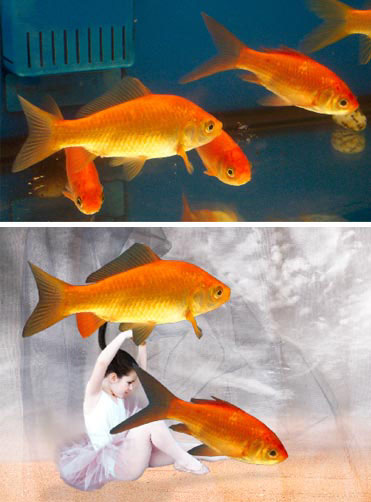
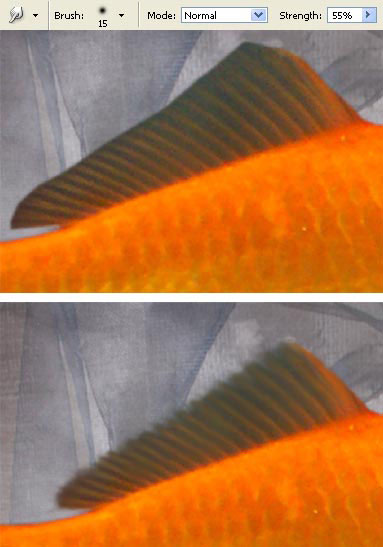
Blur
out the edges of the fishes’ fins and the tails, using the
Smudge Tool.
Then
make many copies of the fishes’ layer. Correct their sizes
and
placement, selecting the Free
Transform option and
Flip Horizontal selection. Then we should also
change
the distort level of several fishes, using the Distort
option.
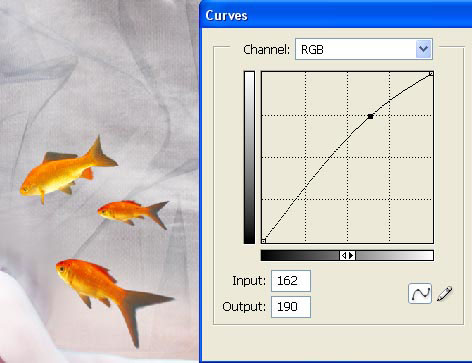
Merge
down the layers with the fishes and correct the layer’s
brightness,
making use of the next selection: Image
–
Adjustments – Curves
(ctrl+m).
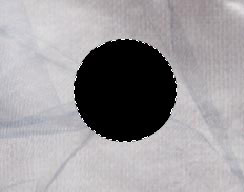
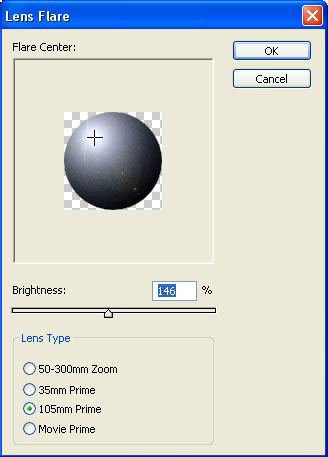
Create
a kind of marking on a new layer, having the circle’s
shapes, using
the Elliptical Marquee Tool and clicking
on the shift
button. Paint it in black, using the Paint
Bucket
Tool.
Select
the next filter: Filter –
Render – Lens Flare.
Using
the Gradient Tool, it’s possible to add
more
light on it:
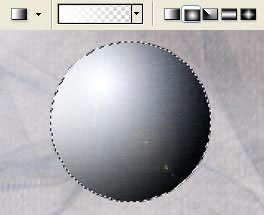
After
that we should cut out the sphere
and insert it on a new layer: File – New
(ctrl+n).
Decolorize it (shift+ctrl+u) and invert the colors
(because the brush’s
preset recognizes only the black color). Apply
also the next command: Edit
–
Define Brush Preset
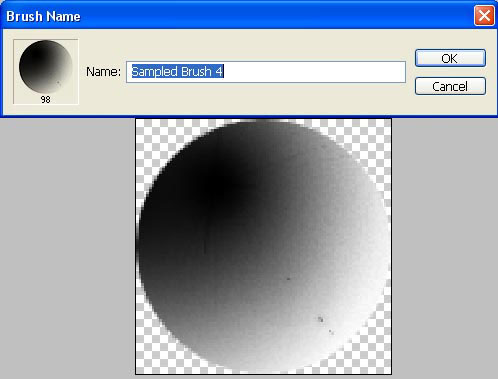
Get
back to the window with the processed picture and choose
from the
brush’s list our new created brush, select the white color and
change
the brush’s adjustments on the Brushes’ window,
like you may see in
the tables below:

Then
change the brush’s size and insert on a new layer several
bubbles
above the fishes and above the girl.
Open
in several new windows the images with not blossom out
lilies.
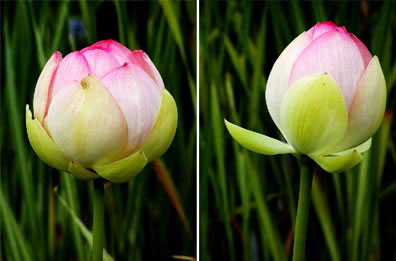
Mark
them out, copy them and insert each of them on a new
layer, above
all the layers:
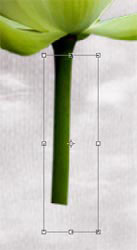
Mark
out the stems of all the flowers and extend them,
selecting the Free Transform option.
Copy
several times the layers containing the lilies and combine
them the
way we want to.
We
should blur out the stem of each of
the flowers, selecting the Turbulence Tool in the Liquefy
window (the blurring can be
done, using a big size brush. After that we
may select a brush of
small size to correct the thickness of the
stems).

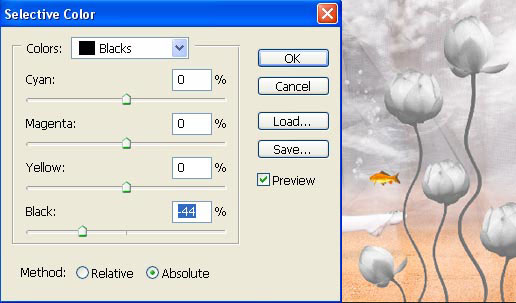
Merge
down the layer containing the flowers, decolorize them
and move off
the black color out of the picture, applying Image
–
Adjustments – Selective Color.
Insert
on a new layer, above all the layers, the texture of the
water.
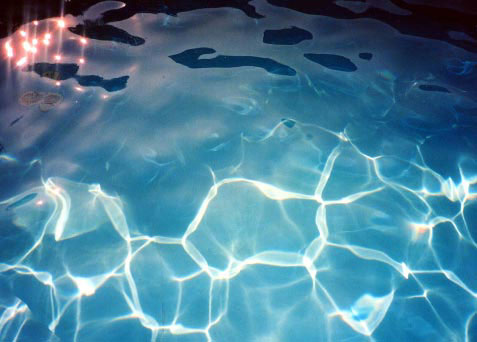
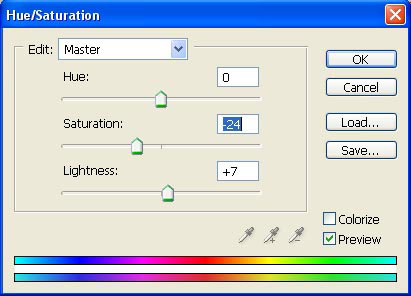
Create
its reflections horizontally and vertically and minimize
the color’s
intensity, applying the next command: Image
–
Adjustments – Hue/Saturation
(ctrl+u).
Change
the layer’s type on Overlay.
We
want the lines and the colors look
smoother (characteristic for an
underwater atmosphere) that is why we
should merge down all the
layers: Layer – Merge Visible
(shift+ctrl+e), copy the new
layer and blur it out a little, selecting
the Gaussian
Blur.
Change
the layer’s type on Darken. The Crop
Tool and Rectangular
Tool may be useful in
representing
the picture’s frame.
The
illustration is finished!
Made
by Sigma
Comments