
Understanding the Project Layout
Understanding the Project Layout
This section provides an overview of the process for using the template and gives you a place to start. If you already feel comfortable with the template layout and general concepts, you may want to jump to the following sections for more details. For anyone new to using Flash templates or unfamiliar with the supplied file structure, this section is for you.
You should be familiar with the following terms used throughout the article:
- FLV: This acronym refers to the Flash video format used by Flash Professional 8 and Flash Media Server.
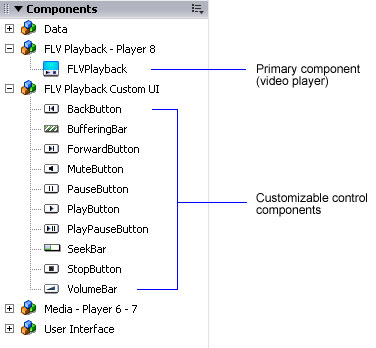
- FLVPlayback component: This is the next-generation FLV playback control available in Flash Professional 8. The FLVPlayback component includes many improvements in workflow, skinning options, and ActionScript API.
- Cue points: You will add cue points at various locations in the video so that you can synchronize content displays with those points or navigate to those points by button click. You can embed cue points in the FLV using the Video Import Wizard or the Flash Video Encoder. You can also create cue points using ActionScript or the FLVPlayback
cuePointsparameter. Embedded cue points are more accurate and can be accessed with more options in the ActionScript API. Either type of cue point will work with this template.
Before You Start
One of the key concepts repeated throughout the template is the concept of sections within the video. The big picture is that you are going to choose cue points within a video and use them for synchronization. The structure of the Flash template mirrors these cue points in the following ways:
- Navigation buttons match the cue points in the video
- Sections of text and animation content match the cue points in the video
- FLVPlayback component settings define the cue points and control the automated navigation through the content
For best results, create a quick outline of the sections you want to show in your movie. The goal during this planning stage is to figure out where to divide your video. What locations will your viewer logically want to jump to? Then figure out what text, image, and animation content you want to show for each section. What content can you use to reinforce the video and provide visual interest?
Understanding the Supplied FLA File
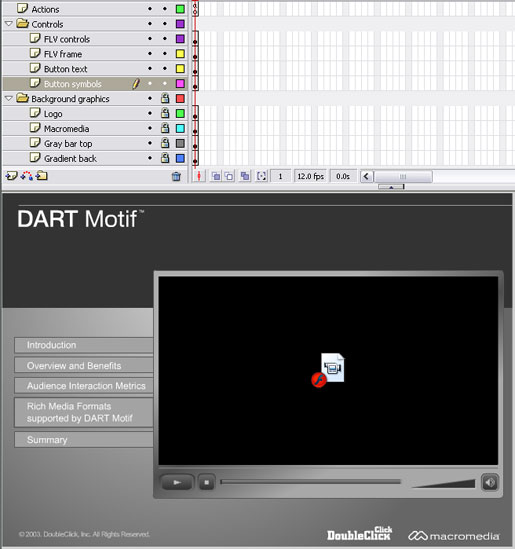
The SynchronizedVideoPres.fla file contains a fully functional example of the working template. The content in the FLA file matches the content seen in the preview on the first page of this article. Take a moment to explore the FLA file.
Download the SynchronizedVideoPres.fla file from the first page if you have not done so already and then open the file in Flash Professional 8.

Notice the Screen Outline pane that appears on the left side of the Stage. Screens provide an easy way to structure hierarchical content. In addition, they work as containers that the FLVPlayback component and FLVPlayback behaviors can act upon to create the synchronization of video and content.
The Synchronized Video Template contains three sections of screens (see Figure 1):
- background: Background screen that contains all the background colors, graphics, and text that you want to display throughout your presentation.
- controls: Screen containing the video and navigation buttons that appear throughout your presentation. The controls screen also contains the code that powers the synchronization in the template. You can find the code on the Actions layer. It consists of four sets of functions that respond to events from the video component and clicks from the navigation buttons.
-
introduction, tellAFriend, trialDownload, and so on: Five screens below the controls screen that contain the text and graphics you might want to display as the video plays.
Figure 1. Screens in the template
The content on the background screen and the controls screen appears continuously while the movie plays. On the background screen, you can customize the user interface graphics. On the controls screen, you can customize the buttons and update the media component parameters. The FLVPlayback component is the mechanism that loads and displays the FLV file. It acts as a center point and controller for the presentation.
The five subscreens below the controls screen are shown one at a time while the video is playing. To add your own collection of subscreens and associate them with cue point sections in the video, enter the screen names into the cue point parameters for the FLVPlayback component on the controls screen.
You can modify the presentation by going to the screen containing the content you want to update and making changes there. It’s a little like modifying the slides in a Microsoft PowerPoint presentation except that you have many more animation capabilities.
Screens Versus Frames
This template is built in a screens document for the ease of use of explaining and developing synchronized sections of content. Screens have built-in paging controls and are very simple to synchronize with video.
You can also use the template code, located on the Actions layer of the content screen, to power a frames-based Flash document. In this case, the template will navigate to frames labeled with the same names as the cue points. If you would like to try this, copy the code from this template into a standard Flash file and switch the value of the uses_screens variable to false. From there you will set up the document much the same way as described here, but in this case you will spread the content out horizontally across a timeline on labeled frames.
First Steps to Using the Template
If you are new to using templates or just want some direction, follow these steps to get started:
- Create a folder on your hard drive to store your copy of the presentation FLA file and your video.
- Duplicate the supplied SynchronizedVideoPres.fla file and rename it. Place the new file in the folder you just created. Note that it’s a good idea not to overwrite the original file so that you can refer back to the working sample as you move forward.
- Create your video, convert it to the FLV format , and place the FLV file in a relative position to the FLA file (usually next to the FLA or in a subfolder that is located in the same folder as the FLA file). Make a note of the filename and path relative to the FLA file. You will enter this information into the FLVPlayback component’s parameters later to load the file.
- Open the FLA file in Flash and start editing. Note that because the supplied file already contains a working sample, you will be adding and removing content as you customize the presentation. Read the following sections for details on how to edit from here.
Comments