
Transitioning from Demo to Simulation Mode
Transitioning from Demo to Simulation Mode
The second part of this tutorial is where you say to the student “OK, now you do it.” The interesting aspect of this switch is that, as a developer, you don’t have to create a separate presentation at all. You can add this functionality directly to the one you are working on.
Before you add the new slides, take a moment to think about what you want to accomplish. In this case, the viewer needs to do the following:
- Select FTP from the Remote Server pop-up menu in the Site Definition Wizard.
- Enter four precise bits of information into the four separate text input boxes.
Therefore, the capture requires only the pop-up menu of the Remote Server choices in the Wizard; the user provides the login information.
When looked at in this manner, the workflow becomes rather uncomplicated:
- Create a capture of the FTP pop-up menu on the Sharing Files screen of the Basic Site Definition Wizard.
- Add four text input boxes for the necessary information.
The student must first select FTP from the list and be told whether he or she made a mistake, in case a wrong choice is made. The same applies to each of the text input boxes. If the text entered is not correct, there must be a gentle notification of this mistake. Finally, rather than jumping from demonstration to simulation, a slide should inform the user that it is their turn to try it.
Building the Transition Slide
To build the transition slide, follow these steps:

- With the presentation open, click the Storyboard tab and select the last slide in the presentation.
- Select Insert > Blank Slide. After the slide has been added to the storyboard, double-click the slide to open it in the Edit view.
- Select Insert >Caption to open the New Caption dialog box.
- Select [transparent] as the Caption Type.
-
Click once in the Text input area and enter the following text:
"Now it is your turn to enter the information.
 You will be using FTP to upload the files to the web server.
 The server's address is: web.studentportfolios.ca
 The folder you will be uploading to is: tomontheweb3.ca
 Your Username is : green3
 Your password is : capTivate12
Click the "Continue" button to go to the exercise. - Select the first line of text and set the font to 16-point Times New Roman Bold.
- Press the Enter key twice to move the remaining text downwards.
- Select the remaining text and set the font to 12-point Arial.
- Select the information that must be entered into the dialog box and change the font color to 128 Red; click the Bold button.
- Click once in front of the “Click the ‘Continue’ button…” line and press the Enter key twice.
- Click once in front of each input line and press the Spacebar a couple of times to move the line to the right.
-
Click OK. Your text should resemble that shown in Figure 16.
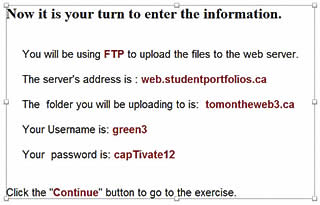
Figure 16. Text formatted and placed on the blank slide
Comments