
Symmetrical Flowers – Part I
Symmetrical Flowers
[Written for Elements 1. Users of version 2, please note that the command to flip a layer is now found at Image > Rotate > Flip Layer Horizontal at the bottom of the Rotate menu. And the Ctrl-J shortcut for duplicating a layer or selection contents to a new layer is disabled in Elements 2. Use Layer > New > Layer via Copy instead.]
In the Free Photos section of this site, there is a group of images called “Photoshop Flowers.” If you haven’t seen them, you might take a look because those images are examples of what this tutorial is going to be about.
Symmetrical flowers are very simple to make. They are also a lot of fun, and a little bit addictive. I made all the images in the Free Photos section in one afternoon when I had nothing else to do.
Though I am using flowers in this lesson, you can use this procedure on any object that is radially symmetrical. You don’t want something that is perfectly symmetrical, though. The deviations from symmetry are what make the process work.
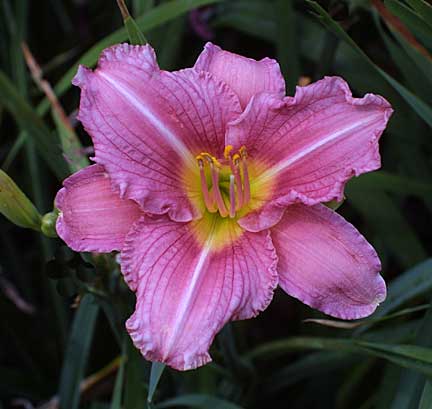
Shown below is the flower that I’ll be using. If you’d like to use this image, download it (right-click on the image and choose Save Picture As. Save to a location that you can remember). Open it in Elements and use Save As to convert it to Photoshop’s .psd format.
 I make it a habit to always duplicate the background layer when editing an image, so that’s my first step, here. Grab the background layer in the Layers palette, and drag it onto the New Layer button, or choose Duplicate Layer from the Layers palette menu. If you use the latter method, simply click OK in the Duplicate Layer dialog box that appears.
Select the new, duplicate layer in the Layers palette and then choose the rectangular marquee tool in the toolbox. In the rectangular marquee tool’s options bar, make sure Feather is set to zero
Drag a selection that crosses either the vertical center or horizontal center of the flower. You want this marquee to cross the center and include all the rest of that side of the image.
Here, I considered using the vertical center.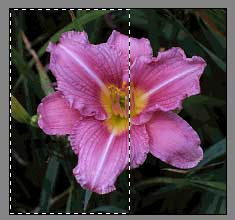
However, I didn’t like the way the selection split the petals both above and below the center. They would not line up well in the next step. So, I deselected (press Ctrl-D) and dragged a horizontal selection instead.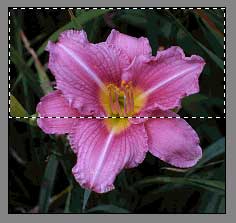
This selection splits the image in a much better spot. You can see that it cuts almost exactly across the petal on the left, and is nicely between the petals on the right. Also, it leaves all of the stamens (hope that’s the right term for the things in the middle of the flower) within the selection which is nice since they’re interesting.
You can reposition your selection while you’re dragging it by pressing the spacebar (with the left mouse button still held down). If you don’t get what you want on the first drag, deselect (press Ctrl-D) and try again.
Once you have the selection right where you want it, press Ctrl-J, or choose Layer > New > Layer via Copy.
Next, with the new, top, copied layer selected (dark blue) in the Layers palette, click on the little arrow in the upper right corner of the Layers palette and choose Duplicate Layer from the menu. Click OK in the dialog box that appears.
Or drag the copied layer you just made onto the New Layer button at the bottom of the Layers palette. This will create a duplicate layer without the dialog box.
This duplicate layer should be at the top of the Layers palette. With that duplicate layer selected, choose Image > Rotate > Flip Vertical. (Photoshop users, choose Edit > Transform > Flip Vertical.)
Note that if you are using your own image, and chose to use a vertical selection in the first step, rather than the horizontal one used here, you should choose Flip Horizontal here.
Turn off visibility for all but the top two (copied) layers in the Layers palette. Do this by clicking on the eyeball icon at the left end of all layers below these two top layers.![]()
With the top layer selected in the Layers palette, choose the move tool in the toolbox. Press the Shift key, and drag straight down on your image to move the flipped layer into alignment with the layer below. Pressing the Shift key constrains your move to specific angles, in this case straight up or down.
Use the zoom tool to magnify your image so you can see the edges clearly. With the move tool selected in the toolbox, you can use the arrow keys on your keyboard to move the layer one pixel at a time.
Be sure and check at 100 % magnification after you’ve positioned the layer. I’ve had cracks appear when I zoomed back out. To return your image to 100 % zoom, double-click on the zoom tool’s icon in the toolbox. Or type 100 in the text box at the left end of the status bar at the bottom of your screen and then press Enter.
Your Layers palette should now look like this. Note that visibility is turned off for all but the top two layers. The cursor is pointing to the visibility icon’s box.
Select the top layer, named Second Copy in my illustration above, and press Ctrl-E, or choose Merge Down from the Layers palette menu.
The first stage is complete. The image now looks as shown below. Not really very nice, so far, is it? The effect really doesn’t kick in until the second flip which I’ll show you in next article.
Comments