
Simulated Alpha Channels – Part IV
Simulated Alpha Channels
Grab the gradient mask layer, and drag it below the original image copy. 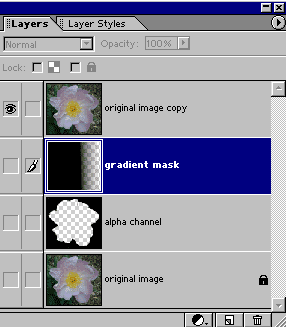
For this effect to show properly, we are going to need another layer. Click the New Layer icon at the bottom of the Layers palette. Name the new layer “white layer”. With the new layer selected, press Ctrl-Backspace to fill it with white (assuming you have the default colors showing in the color box; if not, click the default colors icon in the very bottom left corner of your toolbox to make white your background color).
Drag the white layer to be directly below the original image copy, which will make it the second layer from the top. It will effectively act as a new background.
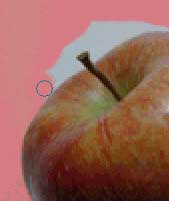
Now load the gradient mask layer as a selection. Do this by pressing Ctrl and clicking on the layer’s name. Next, choose Select > Inverse. Then, with the selection active, select the original image copy layer.
Don’t worry that the selection outline looks wrong; the ‘marching ants’ outline only includes pixels that are more than fifty percent selected. Since the gradient fades to full transparency, its transparent edge will fall below this threshold, but those pixels are selected to the degree that they are opaque. This is what makes masks so useful.
Press the Delete key. Your image should appear as shown below. The white you see is the new white background layer showing through. Pixels have been deleted from the image to the degree that they were selected.
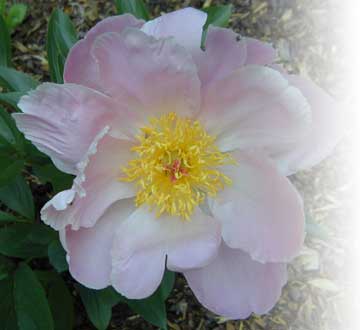
Gradient masks are very useful for blending one image into another, or for any kind of transition. At the bottom of the page you can see where I’ve added some text to the new white area.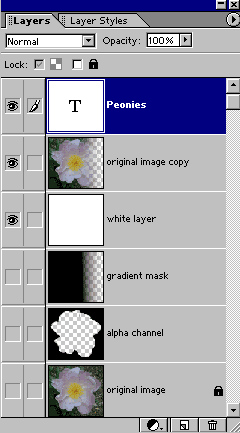
You can create any kind of mask you like using any of the editing tools. Opacity is the only factor that determines the degree of selection that will result from your mask. You can use any color you like, and paint any outline or shape that you like. You might try experimenting with the paintbrush on an empty layer. Try different brushes with an opacity of 30 %.
You do have to be sure and remember the steps necessary to load your selection.
- Select your mask layer. It should be stored below the visible layers at the bottom of the image.
- Press the Ctrl key, and click on the mask layer’s name.
- If necessary, choose Select > Inverse. Remember, the selection is for the areas that are painted black. In the example I used, the flower was not black, so it was necessary to invert the selection in order to select the flower.
- Click on the image’s layer (“original image copy”). This is important! I forgot to do this just about every time I went to use my selection. Make sure you choose your image layer after activating the selection outline from the mask layer.
- And, that’s it. You can apply filters, cut, copy, move, and color selections. You should be able to take advantage of many of the lessons in Photoshop books, as well as online tutorials that require alpha channels or any kind of complicated selections.
- When you are ready to output your image, save a copy with the mask layers, and then delete them from the copy your are outputting.
An alternate, and possibly better method for simulating an alpha channel was suggested by Richard Coencas in the Elements User to User forum at Adobe.com. It goes as follows:
- Select the layer which contains the object you want to select and mask.
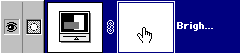
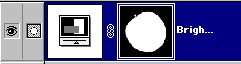
- Click the little black and white circle at the bottom of the Layers palette, and choose Brightness/Contrast, or Levels from the menu (it doesn’t matter which).
- When the adjustment dialog box appears, do not make any changes—simply click OK. This adds an adjustment layer without changing your image in any way.
- Select the adjustment layer you just added, and, while pressing the Shift and Alt keys, click on the white square.
- Choose a hard edged brush, and paint with black on the image, around the outside of the object you want to select. Wherever you paint, you will see a partially transparent red color. This is the rubylith mask. Use black to add to the mask, and switch to white to remove any mistakes.
- When you’re satisfied with your outline, press the Alt and Shift keys and click the mask again, then press Alt alone and click the mask. You will then see the mask, alone (without the underlying image) in black and white. Check to see that you’ve made the black parts of your mask fully opaque.
- To load your adjustment layer mask as a selection, press Ctrl and click on the mask. Then switch to the image layer. Don’t forget to do this! You don’t want to select the adjustment, you want to select the image object.
- The advantage of this method is that you don’t need to drag the layer below the background. This is a layer mask and it only affects the layer it is attached to, which in this case, is an adjustment with zero change. “Real” layer masks, which this is, are not visible in the image. But, no, this layer mask can’t be applied directly to an image layer like you can in Photoshop—you still have to load the selection and then switch to your image layer.
- The disadvantage is that you may or may not like working with the red, rubylith color.
[This is only for Elements 1 users. In Elements 2, you have the ability to save and load alpha channels via Select > Save Selection. However, you can’t see or edit your alphas.]
If you have a document which you know contains an alpha channel, there is a way to make the alpha channel visible, and therefore useable in Elements.
You may have received files created in Photoshop which you contain alpha channels. Also, most 3D programs will allow you to create an alpha channel matte of objects in your scene during an image render.
This technique just occurred to me and I’m posting it in text only, for you to play with. I’m in the middle of another project right now, and don’t have time to add illustrations or perfect the method. (This is not included on the .pdf for this tutorial). Please let me know if you find a way to refine the edges of the revealed alpha. Here is a zipped .psd file (7 KB) which includes an alpha channel. I’ve copied the contents of the alpha to a layer, so you can see if you’re matching the alpha when using this method. Okay, here are the steps:
- With your .psd file open in Elements, create a new layer at the top of the stack and fill it with white.
- Choose Filter > Render > Lighting Effects.
- In the Lighting Effects dialog box, choose Omni from the Light Type menu at the top.
- At the bottom of the dialog box, choose Alpha 1 (or whatever your alpha is called) from the Texture Channel menu. You’ll have to scroll to see it.
- Make sure White is High is checked, and move the Height slider towards Mountainous just enough to make the alpha outline clear in the preview window.
- In the preview window, if necessary, drag and manipulate the Omni thingy to center it over the alpha shape. Then click OK to exit the dialog.
- You should see a black outline of your alpha on your new white layer. With that layer selected in the Layers palette, choose Filter > Other > Maximum. Set Radius to 1 pixel and click OK.
- This is as far as I can take you. You should be within one pixel of recreating the alpha channel. However, that one pixel fringe is a problem. There is probably a way to get rid of it, but I haven’t the time to spend diddling with it. Help!
- You can play with Enhance > Brightness/Contrast > Levels. However, while this sharpens and intensifies the black outline, it shrinks it. You can try using Select > Modify > Contract (or Expand).
- To see how closely you’re matching the reference layer I created for you (by copying the alpha to a layer), create a new layer at the to of the stack. Use the magic wand with Tolerance set to zero, and Contiguous checked to select the white area outside your outline and fill it with black (on the new layer). Change that layer’s blend mode to Difference. Turn off the outline layer’s visibility. If the image is totally black, you have a perfect match. If you see a fringe outline, it’s not.

Comments