
Simulated Alpha Channels – Part I
Simulated Alpha Channels
[Please note: Elements 2 allows the saving of selections as alphas. However, since you can’t see or edit them until they are loaded, and then you will only see the marching ants outline, the techniques described here should still prove useful. Note that any selection can be edited in the same manner as a Photoshop channel by using an adjustment layer mask as a temporary proxy.]
Beginner Elements users, just ignore the title of this tutorial. You’ll learn what an alpha channel is if you read any full version Photoshop books, or tutorials, but there are no alpha channels in Elements.
What this tutorial will teach you, is how to make complicated selections without using any of the selection tools, and then, how to save those selection outlines so you can reuse them at any time. I think you will find that the methods shown here are much better than struggling with the lasso tools, or the magic wand.
If you would like to use my image, shown below, download it to your hard drive, open it in Elements, and save it in psd format. I am going to show you how to select the flower, and then save that selection so you can reuse it at any time.

In the Layers palette, double click on the background (the only) layer. Double click anywhere on the blue part, where the finger icon is shown, below.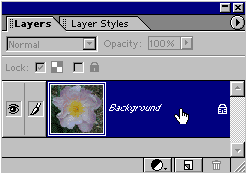
In the dialog box that appears, give the layer a name that will help you remember what it is. Or, if you won’t be using many layers, you can simply accept Adobe’s default name of Layer 0, and click OK. I named mine, “original image,” as shown.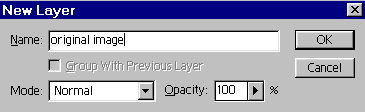
Background layers don’t allow transparency, and you can’t move any other layers below them. The lock icon you see at the right end of the layer is there because the layer is considered partially locked since it doesn’t allow transparency. As soon as you rename the layer, it becomes a “regular” layer and the lock icon disappears.
Next, I want to duplicate this layer. Click on the little arrow in the upper right corner of the layers palette to access the palette menu. Choose Duplicate Layer.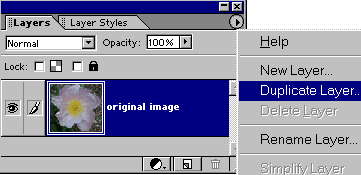
I left the layer with the default name of “original image copy”. We will use this duplicate layer to work on, while keeping the true original out of sight at the bottom of the layers palette. This is a good habit to get into.
To lock the original image, select its layer, and then click the check box next to the lock icon at the top of the layers palette.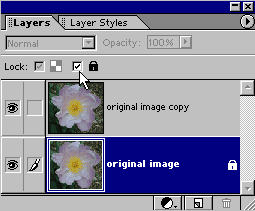
Then turn off the visibility for this layer by clicking the eyeball icon at the far left end of its layer.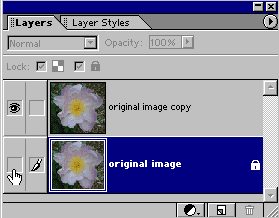
Select the copy layer (the top, unlocked layer), and then click on the New Layer button at the bottom of the layers palette. ![]()
New layers are added above the currently selected layer, and we want this new one on top of the original image copy. Double click on this new layer, and name it “alpha channel.” With the alpha channel layer selected, choose the paintbrush in the toolbox. 
Make sure you have the default colors in your color boxes by clicking the default colors icon at the very bottom left corner of the toolbox.![]()
Be sure the Opacity is set to 100 % in the paintbrush tool’s options bar .
Click on the little arrow next to the brush thumbnail (shown with the pointer, below) to access the brushes pop-up palette. Pick a hard edged brush from the top row.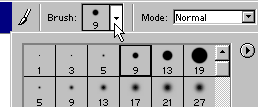
A shortcut to make your brush larger while you are painting is to click the right bracket key on your keyboard. To make your brush smaller, click on the left bracket, [. You’ll need to change brush size often as you paint around the flower’s edge. You’ll want to use a large brush to quickly paint over the areas away from the flower, and little brushes for precise edge details.
Your first stage should appear as shown below. Be sure you are painting on the alpha channel layer.
Comments