
Reflecting Chrome
May 5, 2006 | 0 comments
| 1. Open a new image with a black background and put your white type on it.
|
| 2. Render your type layer and apply Layers- Effects- Bevel and Emboss with the following settings: Leave anything exept- Style:Inner Bevel/ Angle:125/ Depth:around 15-20/ Blur:15 The settings “Depth” and “Blur” depend on your image size so try to achieve something like shown on the right.
|
3. Next we go to Layers- Effects- Create Layers. Now we need to merge the three layers -text, highlights, shadow – Like shown on the right, you need to link all three together and go to Layers- Merge Linked. 
|
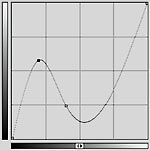
| 4. Looks quite OK but there’s no shiny nothing *g*. Let’s open Image- Adjust- Curves and have a look at it: On the line from down left to up right we need to make 2 points by clicking on it. Select the first point and move it with the mouse like I did, or you can click on it and enter 53 into the “Input” field and 207 into the “Output” field. The second Point lies at 170/39. Now we got an idea of something shiny but:
|
| 5. For a real nice effect I prefer to use a second time Image- Adjust- Curves, this time I can’t tell you any numbers, it depends on your taste; on the right you can see the curve I used- try to find your style to get it really shiny.
|


Comments