
Realistic wood grain texture
Create a new layer in Photoshop and fill it with a light brownish, slightly orange color. Try different colours depending on the type of wood grain you want to create.
Goto Filter->Noise->Add Noise and add some noise with the following settings.


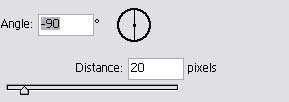
Goto Next goto Filter->Blur->MotionBlur and use these settings

Your image should look something like this. Next take the following steps
- Duplicate the Layer
- Goto Image->Adjustments->Desaturate
- Set the layer’s blending mode to soft light and give it a low opacity

Then select the duplicated layer and goto Filter->Artistic->Poster Edges. Use the default settings.
Now the wood is starting to look somewhat realistic, but its not quite a there yet. The problem is that the photoshoped wood is too perfect (more noticable with a larger sized picture). Real wood has knots, wane and other irregularities in it.

Goto Filter->Liquify
The best way I have found to create the knots with the liquify filter is to take the following steps
- Select the spot to create the knot
- Use the nudger tool to create push out the wood texture on both sides of the spot you selected
- Then use the spiral tool in a slight up down motion to create a realistic knot.
Then you should have your result, a nice realistic wood texture.
Comments