
Position lights and layers
Position lights and layers
From this point, we will be working in several views on our scene to help us position our lights and layers: the main Active Camera view and Top, Front, and Left side views. Right-click/Ctrl+click the Comp 1 window tab and select Apply Workspace and Two Comp Views. This will create two comp windows on your screen.You should leave one of them in the Active Camera view all the time, because you will need to see the effects from all of your movements. At times you will need to adjust the scale of the preview window to be able to see some of the objects that move outside the view window, such as lights, cameras, and layers that fly in and out.
-
Open a side view window, right-click/Ctrl+click the Comp 1 window tab to bring up the context menu, and select Switch 3D View > Left. You can also use the view tab on the bottom right side of the Comp window to change views.
-
Drag the light up to the right of the object layers, and then drag the Point Of Interest handle down to the center of the movie reel. Open the Front view window and drag the X-axis arrow to pull the light slightly off-center and to the right. This will provide a shadow that will be down and to the left of the movie text layer as it rests in front of the film reel (Figure 6). You may wish to zoom out in the Comp window so you can see where you are moving the light beyond the boundaries of the frame.
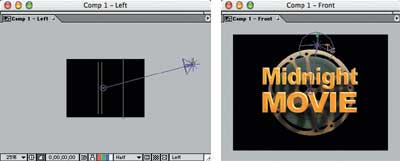
Figure 6: Move the light into position to create a shadow that is cast on the lower-left side of the film reel.
-
Once the light is set into position, hide the layer so the redraw time won’t slow down with each move you make of the Timeline Indicator. Move the Indicator down to the 3-second mark, select the movie text layer in the Timeline, and click the Position Stopwatch. This will set the final position of the movie text fly-in animation (Figure 7).

Figure 7: Set the final rest position of the movie text layer at the 3-second mark.
-
Move the Indicator to the first frame on the Timeline, and set the Z-axis of the movie text layer to –890. This makes the layer disappear from the Active Camera window, but viewing the Left side window, you will see it’s just out of camera range (Figure 8). This gives the appearance that the text will fly in from behind the camera and pull into the spotlight before resting in front of the film reel.
Figure 8: Move the movie text layer along the Z-axis to pull it out of frame so it will appear to fly in from behind the camera.
-
To enhance the realism in this effect, we will add motion blur to the movie text layer as it first enters the frame and pulls into the spotlight. At Frame 1 on the Timeline, apply the Directional Blur filter to the movie text layer, Effect > Blur & Sharpen > Directional Blur. Adjust the Blur Length to 10 pixels and leave the default angle at 0º (Figure 9).
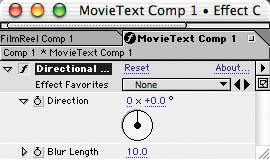
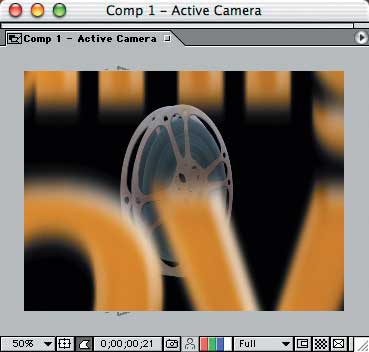
Figure 9: Adding motion blur to the movie text will enhance the fly-in motion.
-
Set the Effects Stopwatch on the Timeline and move the Indicator down to the 3-second mark. Change the Blur Length to 0, because the movie text layer is no longer in motion at this point.
Use a RAM Preview to check that all of the motion is working properly. Though the light and shadows are in the right place at this point, the scene seems a bit muddy—so we’ll add some warm ambient light to brighten up the highlights and shadows. Select Layer > Light and choose an Ambient light, set at 35% Intensity without casting shadows. It will help to adjust the color to a darker orange to be sure the shadows are warmed up a bit as well (Figure 10). Notice the big difference a small amount of ambient light can have on the entire animation!
Figure 10: Adding a little ambient light to the scene brightens up the layers and warms up the shadows.
Comments