Photoshop Elements 2 Type Tool
Photoshop Elements 2 Type Tool |
|
|
|
|
| Used for adding type to images |
|
  |
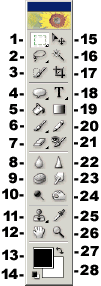
[In Elements 1 the type tool was at position #17 in the toolbox.] When you select the type tool in the toolbox, your cursor will change to an I-beam pointer. A small line across the I beam marks the location of the type’s baseline. For vertical type, it marks the center axis that the type will be created along. The type tool’s options bar will appear as soon as you select the tool. You can set the type’s options before you click in the image to add type. While you are adding or editing type, the options bar will change to be in edit mode. Type may be edited by drag-selecting and applying new options. If you move the cursor a little ways away from the type you’ve added, the pointer becomes the move tool, and type can be repositioned. If you are happy with the type you’ve added or changed, accept it by either clicking the large check mark on the right end of the options bar, by pressing the Enter key on the numeric keypad, or by pressing Ctrl + Enter on the regular keyboard. If you don’t like your changes, and don’t want to accept them, click the big X on the options bar. Each time you use the type tool, a new layer is created with that text on it. Any of the layer styles, or other layer options can be applied to type layers. If you have difficulty positioning point type exactly where you want it, apply it (click the big check box) and then move it with the move tool. To do this, be sure you’ve selected the type layer with the type you want to move, then choose the move tool in the toolbar. Press the arrow keys to move the text layer in one pixel increments. The type selection option creates an outline in the shape of the letters typed. Choose this option by clicking the type selection icon, shown selected, below, at the left end of the type tool’s options bar. Do this before you start entering any type. The option disappears once you click on the image with the type tool. You can do anything with a type selection outline that you can do with any other selection. Unlike the regular type tools, this one does not appear on its own layer. The type is added to the current, active layer. It is preferable to use this tool on an image layer, and not any type layer that you may have added previously. You can do anything with a type layer that you can do with a regular layer such as duplicating it, changing the stacking order, applying layer effects and styles, and changing layer opacity. However, some of the Elements features will not work on a type layer. For example, if you want to apply filters to your type, you will need to first turn the type layer into a regular layer. After you’ve done this, the type becomes part of the image and cannot be edited as type any more. To turn a type layer into a regular layer, select the layer in the Layers palette, and then choose Layer > Simplify Layer. Please note that the type tool doesn’t work very well on 1 bit Bitmap mode, or Index color mode images since they don’t support layers. If you add type in these modes, it will be added directly to the image and cannot be moved, or edited. Special note – a lot of people seem to be having problems with having all their text suddenly be in italics, even though they haven’t selected italic text in the font style drop down menu. If this happens to you, click the Text Options button, and deselect Faux Italic (see below for details). See below for an explanation of a common reason why the warp tool won’t work. Tip: The Photoshop shortcut for baseline shift works in Elements. Use Ctrl-Shift-Alt-Up Arrow to shift the baseline of selected text up ten pixels. Use Ctrl-Shift-Alt-Down Arrow to shift the baseline of selected text down ten pixels To change the attributes of type (such as color or size) on multiple layers all at once, see this tip on the How Do I … page. |
|
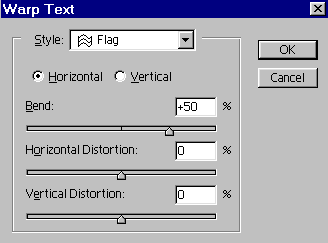
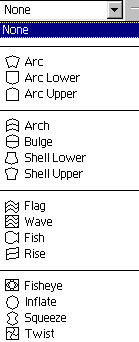
The first two illustrations in the white section below are the type tool’s options bar before the type tool has been clicked in the image. The four little ‘T’ icons to the left of the alignment options don’t become available until you’ve added some type. They are the faux bold, faux italic, underlined and strike through options (shown after type has begun to be added and the option is active in the third illustration). In the illustration shown, the box showing Courier is your font menu, to its left is the style menu for choosing regular, bold, italic, etc. To its right (in the second half of my divided options bar) is the text size box. Click the Anti-aliased button to smooth jaggy edges from the curvy parts of your text. This is best left checked, except for when using very small (less than 12 point) text on the Web. To the right of Anti-aliased option are the alignment buttons, followed by the Orientation button. Click this to change your text from horizontal to vertical or vice versa. Next you see the color box, with the color black selected. To pick another color, click on the color box and the Color Picker will appear. To apply a color to your text, you must choose the color before typing, or select the text before choosing the color. However, once a type layer has been created, you can change the color by simply clicking its layer in the Layers palette, selecting the type tool and clicking the color box on the options bar. You do not have to select the text. The Warp text button is next. You can apply warping to any type layer currently selected in the Layers palette (including type that you are in the process of adding). When you click on the warp tool button, its dialog box, shown below left, will open with all options grayed out. Click on the drop-down menu, shown below right, and choose a style. Then all the options in the dialog box will become available. Use the three sliders to customize your chosen warp style. You can preview all changes in the image as you make them. Type warping affects the entire type layer to which it is applied. It can be edited or removed at any time. Bitmap fonts, and type layers which include Faux Bold formatting can’t be warped. |
|
  |
|
|
If you attempt to warp text to which a faux bold style has been applied, you will get the error message shown below. This was a constant problem for users of Photoshop 6 and Elements 1. In Elements 1, you had to select your text, go to the Text Options box, deselect the Faux Bold style, and then you could warp your text. In Elements 2, you simply click the convenient link included on the error message and all of that is done for you. |
|
|
|
|


Comments