Photoshop Elements 2 Shape Selection
Photoshop Elements 2 Shape Selection |
|
|
|
|
|
Used for selecting shapes created with the shape tool |
|
  |
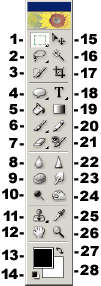
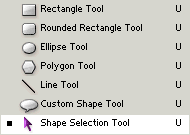
The shape selection tool is grouped with the shapes in the toolbar. To find it, click on the shape icon which is showing and select it from the pop-up list. Or, you can select any of the other shape tools and then choose the shape selection tool from the options bar. Shapes are created by combining a color fill layer with a clipping path that defines the shape outline. Clipping paths are vector outlines, and they must be edited differently than bitmap, or raster image areas (which, with the exception of the type tool, is what the rest of your Elements features use). To select shapes you must use the shape select tool. If you have multiple shapes on the same layer and you want to move only one of the shapes, you also need to use the shape select tool, and not the move tool. You can, however, use the move tool to move the entire layer, and all the shapes (in unison) that are on it. |
|
When you click on a shape (an object) once it will show an iridescent outline (left below). If you click on the same shape again, it will show its edit points (right). If you click on the big check mark at the end of the shape selection tool’s options bar, the shape will be deselected and the outline will be gone. If the Show Bounding Box checkbox is selected, and you click twice on a shape with the black arrow tool, the shape will be surrounded by a box with handles that looks like this (below). Note that this screen shot shows a rounded rectangle on a white background. The white was not part of the shape. From left to right, the items on the transform options bar are the tool icon, the transform origin selection dots, and three text boxes. The first two text boxes are for setting width, and height. Check or uncheck the little chain link between the height and width boxes to constrain proportions or not. The third text box is for entering an angle (for counter clockwise angles use a minus sign) followed by three little faint icons that you’ll probably miss since they’re practically invisible. Click on one of those little icons to limit the transformation to, from left to right, rotation, scale or skew. You can enter values in any of the text boxes to transform by numbers, or simply drag on the handles of the bounding box. Press the Ctrl key as you drag a corner to distort (move only one corner at once). Before and during transformations, your cursor will change to indicate which type of motion will happen depending on which handle you drag. In the black box illustration above, the rotation cursor is shown. If you don’t like your transformation, click the cancel button at the end of the options bar. You will be returned to the move tool position where you started with no transformation applied. If you click twice on a shape with the black arrow tool, you not only can get the bounding box, you can use the little boxy icons to determine how the shape reacts to the rest of the layer or any other objects on that layer. For example, clicking the subtract button when a shape is alone on its own layer will cause its coloring to be applied to all of the area outside of the shape while the shape itself is transparent. If you have two shapes on the same layer, you can use the Combine button to turn them into one shape. The shapes have to be selected (clicked once with the shape selection tool) in order for the Combine button to be available.
|
|
|
|
|
|
If you have doodled with a tool’s options and want to get back to the default settings, click that tool’s icon at the far left end of its options bar. Choose either Reset Tool to reset only the current tool, or Reset All Tools to restore default settings to every tool. Please note that all descriptions, and illustrations featured refer to files which are in Photoshop’s .psd format, and which are in RGB color mode. Other file formats, and color modes may generate different options. Some Photoshop features are not available for images not in .psd format, or RGB color mode. To find what color mode your image is in, choose Image > Mode. |
|


Comments