
Photoshop Elements 2 Selection brush
Photoshop Elements 2 Selection brush |
|
|
|
|
|
Used for making selections |
|
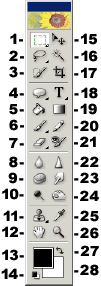 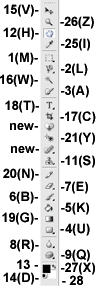 |

Use this tool to ‘paint’ selections. Unlike the other selection tools, you can click and brush repeatedly without using modifier keys or losing your selection. The selection brush has two Modes: Selection and Mask. When in selection mode, what you paint over will be included in the selection. When in Mask mode, you’ll see and paint with a pink rubylith (partially transparent) overlay. All of the pink areas will be outside of or not included in the selection. The selection will consist of all areas that are not pink. Mask mode is the reverse of Selection mode. You can switch modes in the middle of making a selection. Straight lines can be painted by clicking once in the image where the line should begin, and then Shift clicking where you would like the line to end. This behavior is the same as the painting tools, and not the other selection tools where holding down the Shift key allows you to add to an existing selection. However, the ‘remove from selection’ shortcut key which is the Alt key does work the same for this tool as for the other selection tools. Note that when in Mask mode, holding down the Alt key removes the mask, thus in fact adding to the selection. Alt reverses whatever the brush would normally be doing. Please note that if you are accustomed to zooming out by pressing Alt-spacebar, that shortcut combination will not work when you are using the selection brush. Use the zoom tool’s zoom-out option on its options bar, or use Ctrl with the minus key. A shortcut for changing brush sizes while using any of the painting tools is to press the left bracket [ to decrease brush size, and the right bracket ] to move to the next larger brush. To increase or decrease hardness instead of size, add the Shift key to that shortcut. When editing an image with any tool that uses brushes, you can right-click on the image and the brushes pop-up palette will appear right next to your cursor. If you have chosen “brush size” in Display & Cursors preferences, (find at Edit > Preferences > Display & Cursors ), you can toggle to “precise” by pressing Caps Lock. If you have your preference set to “precise”, it will toggle to “brush size”. A preference of “standard” will go to “precise” when Caps Lock is pressed. The keyboard shortcut key for the selection brush is the letter A. See also the Brushes pages.
|
|
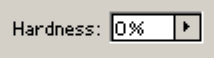
The illustration in the white section below is the selection brush’s options bar. To choose a brush size and type, click on the brush thumbnail. A pop-up palette of available brushes will appear. For more information on brushes, please see the Brushes page. The Size value can be set by typing a number in the text box, or by using a slider. Access this slider by clicking on the arrow to the right of the text box. The box titled Mode, and showing Selection also allows you to choose Mask and paint in pink over everything that you do not want included in the selection. Though you can use any Hardness setting, from 100 % to 0 %, I would recommend that you stick to 100 %. Areas painted with the edge of a soft brush will not be fully selected.
|
|
|
|
|
|
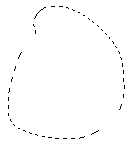
Though you can use any of the brushes in the brushes pop-up palette to make a selection, using soft brushes may result in unexpected results. The selection outline (the ‘marching ants’) indicate everything that is more than 50% selected. However, that includes areas that are, for example 51 % selected. If you have a selection with hardness set to 0 %: |
|


Comments