Photoshop Elements 2 Line Tool
Photoshop Elements 2 Line Tool |
|
|
|
|
|
Used for drawing straight lines and arrows |
|
  |
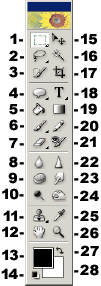
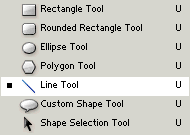
The line tool is grouped with the shape tools in the toolbox. If it is not visible, click on the shape tool icon to find the pop-up menu from which you can select it. Drag in the image to draw (perfectly) straight lines. Note that line width is not chosen by selecting a brush size, but is set according to the Weight value entered in the line tool’s options bar. To limit the a line angle to multiples of 45°, hold down the Shift key while dragging. Unless you alter it on the options bar, the line drawn will be the current foreground color showing in the toolbox. This color is found and set by clicking on the foreground color square in the toolbar. The keyboard shortcut key for the line tool is the letter U. You cycle through all the shape tools by holding down the Shift key while pressing the letter. |
|
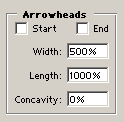
The illustration below shows the line tool’s options bar (split in two because it’s so long). The line tool is chosen from among all the shape icons at the left end of the bar. The Weight text box sets the width of the line. The intersection buttons, in the middle of the options bar determine what happens when you draw a new shape on the same layer as an existing shape. Clicking the thumbnail or the little down arrow next to the Styles thumbnail will get you the current styles palette. To select a different palette, click on the little arrow in the upper right corner of the palette. You also have to use the palette menu to choose No Style; in Elements 2 they have removed that option from the palette and put it in the palette menu. Click on the Color square to access the Color Picker. Clicking the Simplify button will turn your shape layer into a regular layer that can be edited and filtered like any other layer. Shapes are created from a color overlay and a (vector) clipping path, and do not allow such editing. Note that a shape has to be selected in order for the Simplify button to be available. If you click on the little down pointing arrow to the right of the custom shape (and left of the Weight box) you will find the Arrowheads box shown second below. The percentage values are in relation to the line width value that you have entered in the Weight box, above. Concavity refers to how open the V at the back of the arrowhead will be. Values can be from minus 50 % to plus 50 %. The checkboxes titled Start, and End determine whether the arrowhead appears at the starting point or end point of the drawn line.
|
|
 |
|
|
If you have doodled with a tool’s options and want to get back to the default settings, click that tool’s icon at the far left end of its options bar. Choose either Reset Tool to reset only the current tool, or Reset All Tools to restore default settings to every tool. Please note that all descriptions, and illustrations featured refer to files which are in Photoshop’s .psd format, and which are in RGB color mode. Other file formats, and color modes may generate different options. Some Photoshop features are not available for images not in .psd format, or RGB color mode. To find what color mode your image is in, choose Image > Mode.
|
|


Comments