Photoshop Elements 2 Layers Palette
Photoshop Elements 2 Layers Palette |
|
|
|
|
| Used for creating and controlling layers |
|
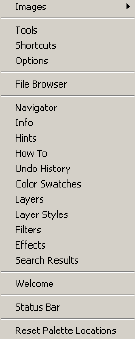 |
You can do almost any kind of painting, and editing on one layer without affecting any of the other layers, and that’s where their power lies. Even effects, and image adjustments can be applied to a copy image on its own layer, and therefore, can also be deleted without disturbing the underlying image if you don’t like the effect. It’s not hard to learn how to use layers, and there are at least as many things that you can do with them as you have time to spend playing with your computer. It is beyond the scope of my one page of instruction to even begin to go into all the layers features and options available. Read your manual, use the online help in Photoshop, and experiment. I have an Elements tutorial on layers, Why Layers? which should help. There is also a layers tutorial in the Photoshop section, Basic Layers, that you might be interested in reading. An excellent way to get a little bit of a feel for what can be done with layers is to look at one of the sample images that is installed with Elements (unless you deselected it in a custom install). Try looking at the Carp.psd , or Working.psd images, found in C:Program FilesAdobePhotoshop ElementsSamples. With the image displayed, click on the eye icon next to various layers to see where they are, and what they’re doing. When you close the image, don’t save any changes (choose No when Photoshop asks if you want to save changes). Please note that layers can only be saved in Photoshop’s .psd format in Elements. If you need to use an image in another format, it is a good idea to save a copy in Photoshop format to retain the layers in case you want to edit it later. The background layer is the only layer that does not allow transparency. You are not required to have a background layer, and can change it into a “regular” layer by double-clicking the word “background” (the layer’s name), in the Layers palette. In the dialog box that appears, give the layer a name, or simply click OK without naming it. Either way, the background will be changed into a fully unlocked layer. Please note that palettes which are in the palette well will not stay open while you edit. To bring a palette out of the well, click on its name tab and drag it out.
|
|
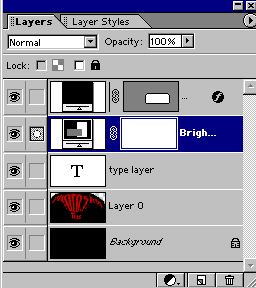
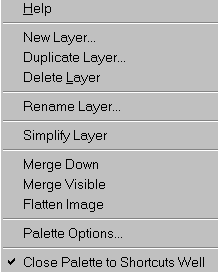
The illustration below left shows the Layers palette containing a variety of different layers types. The top layer is a shape layer which shows the shape color thumbnail on the left with a link icon, center, and the shape’s vector outline (clipping path) thumbnail on the right. Don’t worry if you don’t understand that. Shapes are created by combining a color overlay with a clipping path. The funny little icon that looks like an italic f at the right end of that top layer indicates that a style (from the Layer Styles palette) has been applied to the contents of that layer. The layer shown second from the top is an adjustment layer. The thumbnail on its left indicates that this is a Brightness/Contrast adjustment layer. Next to the thumbnail is the link icon indicating that the effect is linked to, and masked by the layer mask. The layer mask is the white square to the right of the link icon. In this case the mask appears totally white (its not masking anything) but if the effect had been applied to a selection, the mask would be the shape of the selection (black where masked, white where not), thus limiting the effect to that selection. The third layer, with the large black T, is a type layer. All type layers will show this same large T with the text you’ve added shown as the layer name. I didn’t help much by typing the words “type layer” on this one. Anyway, since that’s what I typed, that’s what shows as the layer name. As long as the layer is a type layer, it can be edited as type, but filters will not work on editable type. You need to choose Layer > Simplify Layer to rasterize the layer, first. After it has been simplified, you can apply filters, and edit the layer contents as you would any other image content, but you can no longer edit it as type. This is also true of layers created with the shape tools. Right-clicking on a layer will give you the context menu shown below. The options menu shown to the right is found by clicking little arrow in the top right corner of the Layers palette. |
|
  |
|
|
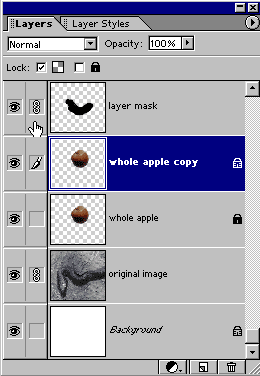
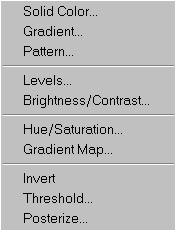
Shown below, are the icons from the bottom of the palette. They are, from left to right, Add Adjustment Layer, New Layer, and Delete. The lock options, shown next are for transparency (the checkerboard), and complete locking (the padlock). Checking the transparency box will prevent any pixels (color, opacity) from being added to transparent areas of the layer. It also, and less intuitively, prevents any areas that currently have pixels from being made transparent. Erasing on a layer with transparency locked will add the background color to erased areas. Layers with transparency locked will show a partial padlock which is not black in its center. Fully locked layers cannot be edited, painted on, or moved. The icons in the two columns at the left side of each layer are shown next. The eyeball, when showing, indicates that the layer is visible. Click it to turn visibility off. The paintbrush indicates that that layer is selected. In the layers illustration above, left, the shape layer (second from top) shows a mask icon in that place. If Elements allowed editing of masks (you can, but it’s tricky), this would indicate that you were editing the mask and not the image. The box showing Normal in the upper left corner of the palette contains the blend modes menu which is shown at center below. Note that there are quite a few new blend modes in Elements 2 (Linear Burn, Linear Dodge, Vivid Light, Linear Light, and Pin Light). To its right, is the Opacity box which can be set by typing in a value, or by clicking on the arrow on the right side of the box to access a pop-up slider which can be dragged to set the value. A high value is more opaque; a low value is more transparent. On the right below is the Adjustments menu found when you click on the little black and white circle icon. [Note that (with the exception of the blend modes) all illustrations shown above and below are from Elements 1. Except for cosmetic differences, they are the same in Elements 2.] |
|
|
|
|



Comments