
Photoshop Elements 2 Eraser
Photoshop Elements 2 Eraser |
|
|
|
|
|
Used for removing portions of an image |
|
  |
Please note that the background eraser, and the magic eraser have their own pages. 
These tools act like paintbrushes in reverse. Instead of laying down color, they pick it up. It’s like watching a movie in reverse. To use the eraser tool, select it in the toolbox, set your options and choose a brush from the pop-up palette in the options bar, and drag in the image to remove pixels wherever you paint. If you are applying the eraser to the background layer, or to any layer with Preserve Transparency selected, the erased area will be filled with the current background color. Otherwise it will erase to transparency with the exception of when you are erasing to a history state. [See below] A shortcut for changing brush sizes while using any of the painting tools is to press the left bracket [ to decrease brush size, and the right bracket ] to move to the next larger brush. When editing an image with any tool that uses brushes, you can right click on the image and the brushes pop-up palette will appear next to your cursor. Press Enter or click your document’s blue title bar to close the pop-up palette after choosing a brush. The keyboard shortcut for the eraser is the letter E. To cycle through all three eraser tools, hold down the Shift key while repeatedly pressing the shortcut key.
|
|
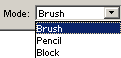
The illustration below, is the eraser tool’s options bar. To choose a brush size, and type, click on the little down arrow to the right of the brush thumbnail. A pop-up palette of available brushes will appear. For more information on brushes, please see the Brushes page. The Opacity setting, which can be set by either typing a value into the text box, or by using a slider, determines how much erasing occurs at each stroke. Access the slider by clicking on the small arrow to the right of its value box. Use the Mode menu to choose which tool the eraser will work like. It will do what that tool does, only in reverse.
|
|
|
|
|
|
If you have doodled with a tool’s options and want to get back to the default settings, click that tool’s icon at the far left end of its options bar. Choose either Reset Tool to reset only the current tool, or Reset All Tools to restore default settings to every tool. Please note that all descriptions, and illustrations featured refer to files which are in Photoshop’s .psd format, and which are in RGB color mode. Other file formats, and color modes may generate different options. Some Photoshop features are not available for images not in .psd format, or RGB color mode. To find what color mode your image is in, choose Image > Mode.
|
|

Comments