
Photoshop Elements 2 Brush
Photoshop Elements 2 Brush |
|
|
|
|
|
Used for painting |
|
 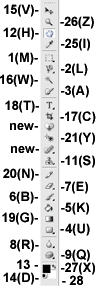 |
[In Elements 1 this tool is called the paintbrush and is found at the #19 position on the toolbar.] 
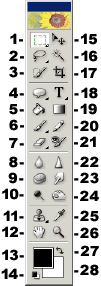
Dragging in the image with this tool creates colored strokes similar to what might be created by a paintbrush. The way the paint is applied varies according the options you have selected. The basic painting procedure is to 1) choose your foreground color by clicking on the foreground square in the toolbox [#13 in the diagram at left] 2) set your options [explained below], 3) select a brush from the pop-up palette in the options bar, and 4) drag in the image to paint. Note that you can limit the area that paint can be applied to by making a selection and then painting inside it. Paint will only appear within the selection outline, even if you drag over areas outside of it. Straight lines can be painted by clicking once in the image where the line should begin, and then Shift clicking where you would like the line to end. A shortcut for changing brush sizes while using any of the painting tools is to press the left bracket [ to decrease brush size, and the right bracket ] to move to the next larger brush. When editing an image with any tool that uses brushes, you can right-click on the image and the brushes pop-up palette will appear right next to your cursor. If you have chosen “brush size” in Display & Cursors preferences, (find at Edit > Preferences > Display & Cursors ), you can toggle to “precise” by pressing Caps Lock. If you have your preference set to “precise,” Caps Lock will toggle to “brush size”. A preference of “standard” will go to “precise” when Caps Lock is pressed. The keyboard shortcut key for the paintbrush is the letter B. See also the Swatches palette, and Brushes pages.
|
|
The illustration below is the paintbrush tool’s options bar (split in two because it’s so long). To choose a brush size, and type, click on the brush thumbnail. A pop-up palette of available brushes will appear. For more information on brushes, please see the Brushes page. The box titled Mode, and showing Normal contains a drop down menu of the blend modes which you can choose from. The Opacity value can be set by typing a number in the text box, or by using a slider. Access this slider by clicking on the arrow to the right of the percentage box. You can make your paint less opaque (more transparent) by moving the slider to a lower percentage Click on the More Options button to find many additional settings (Spacing, Fade, Color Jitter, Hardness, Scatter, Angle) that can be applied to individual brushes. Find details on the Brushes page. In Elements 2, the airbrush tool has been relegated to a button option on this tool’s options bar. Use it to allow color to continue to be applied even when the cursor is not moving.
|
|
|
|
|
|
If you have doodled with a tool’s options and want to get back to the default settings, click that tool’s icon at the far left end of its options bar. Choose either Reset Tool to reset only the current tool, or Reset All Tools to restore default settings to every tool. Please note that all descriptions, and illustrations featured refer to files which are in Photoshop’s .psd format, and which are in RGB color mode. Other file formats, and color modes may generate different options. Some Photoshop features are not available for images not in .psd format, or RGB color mode. To find what color mode your image is in, choose Image > Mode.
|
|

Comments