
Panning and Zooming with After Effects 5.5
| Article Focus: Pan and Zoom. In this tutorial, Matt Dallos will cover the preparation of your images, the basic theory behind making them move, real world examples, and a few ideas about how this effect can be extended to other and more advanced applications. |
| No Movie | Project files (includes footage) | Download Stuffit Expander for Windows |
|
|
—preparation— |
The first step in making your still image move is to get the image into a digital format that can be imported into After Effects. There are various ways to do this. Personally, I have always preferred to have the client give me the actual photograph so that I can scan it myself and have complete control over the size of the imported image. Regardless of the way you get your images onto your computer, there are a few precautions that you must take.

Size:
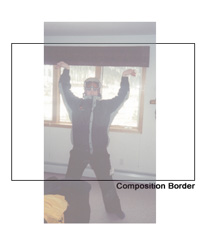
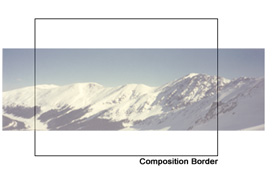
The size of your pictures is directly linked to how much you will be able to scale and pan within them. It is very difficult to say exactly what size to make your images because it varies depending on the image and the movement desired. I always attempt to import my images at as large of a size as I possibly can. I would rather shrink an image that was too big than ask the client to send me the images again because I scanned them at a size that was not large enough. A good way to test if an image is large enough is to open it in Adobe Photoshop and change the select tool option to create a selection that is 720 x 540 (image 1) (or whatever your composition size is) and then move the selection around. Make sure to have the marquee tool (image 2) active while moving around the selection. Also keep in mind that to get movement equal to one screen size your image will need to be twice the size of the screen (image 3)
| image 1: |
|
image 2: |
image 3: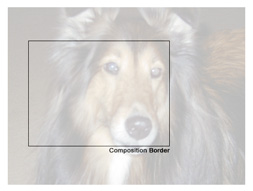 |
Quality:
Another worry is the quality of the image itself. Are there rips? Cracks? Dirt spots? After your image is scanned at a large size, every little blemish will magnified. It is of course possible to repair your image, but if the repair is in an area with a lot of detail it will take lots of time and you will need to make a decision as to if it is worth it or not. I have had good results with quickly repairing images that have large cracks or rips in a generally bland area.
Image Dimensions:
Sometimes certain movements are difficult to do with the photograph provided. For example, if you have a very tall and skinny image, you could do an upward tilt on the image, but zooming out of the image will reveal black bars on the sides of the screen. The same thing applies to very wide images that are not very tall. This may not be a problem depending on what are you looking for, but it is something to look out for. I will discuss this more in the real world examples below:
 |
 |
The actual file format (.psd, .jpg, .bmp) is not important. I have worked with a wide variety of differing formats and have had no problems. Just make sure that you are not working with a file that was heavily compressed for the web or for storage. A few good examples of images not to use are the ones included in the coming up examples. They are extremely “blocky” and would look terrible on a broadcast monitor. They were compressed for faster downloads.
|
—basic theory— |
The basic idea behind panning and zooming still images is to create two different framings of your pictures picture and then allow After Effects to interpret the motion between them. Making still images move is no more difficult than animating a simple box across the screen, because when you break it down, the picture acts exactly the same within the program. Check out the three real world examples below for detailed instructions.
|
—real world examples— |
Panning across an Image:
In this example we will take the given picture and have it pan across the screen.
- Download and open the project file, panStart.aep. (All project files are in one folder. Download them from the green bar above if you haven’t already.)
- Within this project you will find only one composition, Pan, and one image file, mountains.jpg
- Make sure that the Pan comp is active and that the current time is 0:00:00.
- Drag the image of the mountains to the timeline and allow it to snap to its default location at the center of the composition.
- Move the time slider forward to 2 seconds. Leaving space in front of still images is a good practice because editors will often want to cut to the still image before it begins its movement.
- At 2 seconds, press P on your keyboard to reveal on the position property and create a position keyframe for the mountain image.
- Increase the x value of this position keyframe to 1088.
- This should place the left edge of the picture near the left edge of the composition.
- Now move the time slider forward to 6 seconds.
- At this point, create another position keyframe and enter a value of –367 for the X value.
- If you do a RAM preview of your animation at this point, you will see that you have successfully made your image move across the screen. There is another step to take in order to make your animation more fluid.
- Select both of the keyframes that you have created and go to Animation–>Keyframe assistant–>Easy Ease.
- If you preview your animation again, you will have a nice smooth panoramic shot of the Rocky Mountains in Colorado.
Zooming into an Image:
- Open the project file zoomStart.aep.
- Within this project you will find only one composition, Zoom, and one image file, zoom.jpg
- Make sure that the zoom comp is active and that the current time is at 0:00:00.
- Drag the image to the timeline and allow it to snap to its default location at the center of the composition.
- Move the time slider forward to 2 seconds, as we did in the previous example.
- The first thing that you will notice for this image is that the initial framing of the mountains is not very visually pleasing. To fix this we must somehow move the picture.
- Your initial reaction may by to adjust the position value, but that will not work in this situation. Adjusting the position value would move the picture but it will not change the location in space where After Effects calculates the scale of the image. To fix this we must adjust our Anchor point value, which will move the image and the central point of the image.
- Select the image in the composition and press the A key on your keyboard. This will bring up only the anchor point setting. Now adjust the anchor point until you have a nice framing of the mountains just to the left of the wire, with the top of the mountains near the upper third of the frame. I used values of 901 for the X value and 905 for the Y value. Now that we have a proper framing of our image, we can continue.
- At 2 seconds create a scale keyframe and leave it at the default value of 100%
- Drag the time slider to 6 seconds and create another scale keyframe.
- At this keyframe, decrease the scale value as much as you possibly can before the black of the background shows around the edges. I used a value of 36%
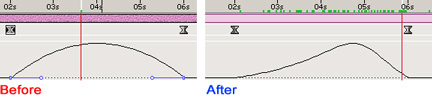
- If you preview the animation at this point you will notice that you have a nice revealing shot of Whistler, B.C., but the zoom seems to speed up as it nears completion. Fortunately there is an easy way to fix this.
- Select both of your scale keyframes and go to Animation–>Keyframe assistant–>Exponential Scale.
- Dozens of scale keyframes are created to properly interpret the scale.
- Preview the animation again and you should see a noticeable difference.
Pan and Zoom:
In this example we will zoom out of an image while we pan across it.
- Open the project file panZoom.aep.
- Within this project you will find only one composition, panZoom, and one image file, panzoom.jpg
- Make sure that the panZoom comp is active and that the current time is at 0:00:00.
- Drag the image of my friends and I to the timeline and allow it to snap to its default location at the center of the composition.
- Move the time slider forward to 2 seconds and create anchor point and scale keyframes. To access only these two properties press A for anchor point and then shift + S for scale.
- Adjust the anchor point value to properly frame my friend and I (the two on the right) and leave the scale value at its default 100%. For the anchor point, I used an X value of 1144.5 and a Y value of 434.
- Drag the time slider to 6 seconds and again create key frames for anchor point and scale.
- Change the scale value to 45%. You will notice how some of the black background now shows through. This is why it is necessary to animate the anchor point value.
- Reframe the image by adjusting the anchor point value of your keyframe at seconds. I used values of 816.5 for X and 558 for Y.
- Select both sets of keyframes and turn them into easy ease keyframes, as was mentioned in example #1.
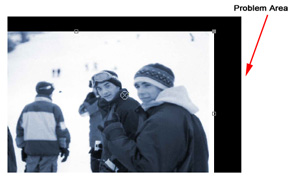
- If you preview the animation at this point, you will see a nice zoom out of the photograph, but if you look closely there is something a little off. The motion that the image takes seems to have a slight arch to it. This example illustrates it fairly well by looking at the distance between the edge of the composition and my friend’s head. The edge of his head goes off the screen and then comes back on.
- Many will not notice this, and if you do not care, feel free to stop here. But if you feel you would like to remove that odd-looking movement, read on.
The odd movement is caused when there is a large difference between the rate of change for the scale property and the rate of change for the anchor point property. The only workaround I have found for this is to adjust the curve for the anchor point value. I know that is sounds scary and really hard, but trust me when I say it really isn’t too bad.
- Press A on your keyboard so that only the anchor point value is showing. Click the arrow that is next to the stopwatch by the anchor point property. This will twirl down the curve menu.

- Select the first of the two anchor point key frames. From the beginning of the curve, a little horizontal line with a circle at the end will appear.
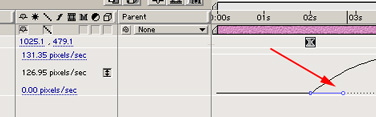
- Click and drag this circle until the bulge of the curve is closer to the second third of space between the two keyframes; this is what mine looks like:
- If you are again preview the animation, you should see a difference. If you still see the odd movement, you should go back and readjust the curve again.
|
—real world issues— |
Very Small Image:
Sometimes a client will want you to have a small image move and it will simply be impossible. There is no way to make images that are smaller than your composition size move at all unless you are willing to sacrifice image quality by scaling the image past 100%. This can be done but you will encounter severe reduction in the quality of your image. If there is no other option than to do this, there are a few ways to try to still use the image.
- Scale your image to the desired size and then perform your wanted motion. Precompose the layer and then apply Chris and Trish Meyer’s “instant sex” recipe that involves:
- Duplicating the composition
- Blurring the top composition
- Changing the transfer mode of the top composition to multiply, screen or overlay. This will cover up some of the artifacts that occurred when you the image was scaled above 100%.
- Try framing the image in a smaller window.
- Apply your motion to your image in a smaller composition such as 500X400 and then place that smaller composition within a larger one. This project file has an example of this (open file frame.aep)
Neither of these will produce perfect or amazing results, but if you are in a pinch, they are better than nothing at all.
Image Dimensions:
If you need to create movement of an image that is very tall and skinny or very wide and not tall, try to soften the edges of the image. This creates a much softer transition from the image to your background. An easy way to do this is to open your image in Photoshop and soften the edges using a matte. Softening the edge provides a more professional look over having your picture just suddenly end.
|
—extending the concept— |
I hope that you have learned something from completing this tutorial. With this same process you can create a large variety of effects. There are endless possibilities. If you have a very large map you can put the map in its own very large composition and then import that composition into a standard sized composition and you would be able to pan over the map. On top of that you could go into the map composition and animate a certain road or path as the map pans across the screen. If there is any interest, I will also write a tutorial on this effect. Other applications may include creating animated flow charts or panning across a large video collage.
Comments