
Optimizing Performance in Photoshop CS2 – part 4
Assigning Scratch Disks
Photoshop uses a temporary file for storing data and performing computations when there is insufficient RAM. It places this temporary file, commonly referred to as a scratch disk, on your hard disk, or it can spread it across several hard disks.When you exit Photoshop, this temporary file is deleted, and a fresh one is created the next time you launch Photoshop.
By default, Photoshop uses your primary, startup hard drive as the scratch disk. This is something to be avoided because it can hinder performance if your OS also uses it to for its virtual memory needs. Because Mac OS uses the primary hard drive to place its paging file, you are almost guaranteed conflict on a Mac.To overcome this potential conflict of interests, you can tell Photoshop which hard disk to place its scratch disk on, provided, of course, that you have more than one hard disk installed in your computer. If you have just the one disk but it’s partitioned, selecting a different partition to the one containing the OS virtual memory files won’t speed up performance. In fact, performing some operations may even take longer because the read/write heads will have to travel farther.
Although Windows users have a choice of easily assigning different hard disks for the paging file, thus avoiding conflict between the Photoshop scratch disk and the system’s paging file, Mac OS users will find it a lot harder to assign a different hard drive for its virtual memory (in fact, you have to be an advanced user of Terminal to do it!) and may find it easier to assign a different hard drive for Photoshop to use as a scratch disk. You can assign scratch disk(s) from the Preferences>Plug-Ins & Scratch Disks screen (Figure1-10). It’s possible to assign up to four hard disks, or partitions, and Photoshop will see them as one large storage space for the temporary file. Photoshop supports up to 64EBs (an exabyte is equal to 1 billion gigabytes) of scratch disk space—more than sufficient for most needs! Regardless of the number of hard disks you assign, make sure the minimum size is three to five times the RAM allocated to Photoshop. Furthermore, it should be a fast hard drive and, if that hard disk is partitioned, the first partition should be assigned. Do not assign removable media, such as a Zip drive, or a network drive as a scratch disk. If you assign dedicated partitions that do not store any other files, defragging should not be required. Needless to say, the more space you can spare, the lower the likelihood that you will encounter the dreaded “Scratch disk is full” error at the crucial moment.
Single Scratch Disks vs. RAID
If you work on large files and have maxed out on the amount of RAM you can allocate to Photoshop, you can increase Photoshop performance by investing in a RAID 0 array (Redundant Array of Individual Disks) and assigning it as a scratch disk. Because all the disks in an array can read and write simultaneously, the striped data can be accessed much more quickly than it would be from a single large disk.
There are several types of RAID arrays on the market. The configuration in a RAID 0 level array, sometimes called a striped array, allows two or more disks to be combined into one larger volume and the activity shared over all the disks for improved performance. However, it’s not a true RAID, because it does not offer redundancy; in other words, the failure of just one drive in the array will result in all data’s being lost. Although such a shortcoming may defeat the whole purpose for creating a true RAID array, the raw speed gained by sacrificing fault tolerance to backup data makes it ideally suited for storing temporary, swap files.
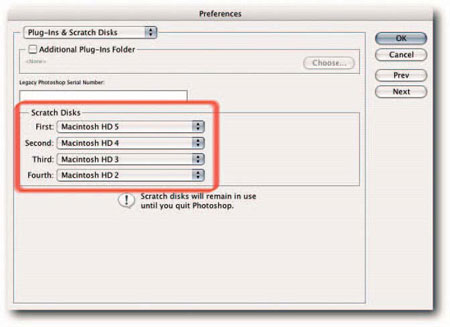
FIGURE 1-10: Photoshop stores its temporary file on a scratch disk. You can specify in the Plug-Ins & Scratch Disks section of the Preferences dialog box which hard drive, and how many, to use as a scratch disk or disks.

A RAID array can be composed of two or more Serial ATA drives, SCSI drives, or FireWire 800 drives. Although a software RAID array made of two serial, fast ATA drives will be much faster than a single drive, for speed, a fast SCSI disk array will be hard to beat; however, it will also cost much more. The third possibility, a multichannel FireWire 800 array, devised by adding extra controllers, can even exceed a SCSI disk array for speed and is now a viable alternative.
16-Bits/Channel vs. 8-Bits/Channel
A debate is raging on the benefits of using 16-Bits/Channel files, also known as high-bit, as opposed to the more traditional 8-Bits/Channel files. Basically, and speaking in nutshells, a 16- BPC image can contain 65,536 levels, whereas an 8-BPC image can contain only 256 levels. (In fact, Photoshop shows only 32,768 levels for images in 16-BPC, which is closer to 15-BPC; it also sees any file above 8-BPC as 16-BPC.) Therefore, it seems natural to assume that because 16-BPC images contain more bits, they must contain more information and be superior in every way to images in 8-BPC mode. Based on the “more bits = more information” theory, the advocates of 16-BPC maintain that you can achieve superior results if you work in high-bit mode. However, the advocates of a 8-BPC workflow maintain that although for a very limited number of images that may be true, for the majority of the images the extra overheads in file size, RAM, larger and faster scratch disks, slower workflow, and so forth do not justify the end results, which are very hard to discern when images are output to print.
Both camps agree that there is more flexibility during image editing in 16-BPC because of fewer quantization errors and, therefore, less banding and overall image degradation, though some of this banding may not actually translate to print.Quantization errors are attributed to the rounding off of numbers when fractions are recalculated to the nearest binary number; only binary numbers, not fractions, can represent digital values. But to benefit from editing in 16-BPC, you must start with a file in 16-BPC mode.
You may have noticed that Photoshop gives you the option of changing from 8-BPC mode to 16-BPC mode. If you fall for this option, don’t be fooled into thinking you will somehow increase the detail. Changing modes upward can be likened to changing a file in a small color space to a larger color space, or a family of four moving from a small apartment to a large mansion. Though they may find that they have more space to move around, they ostensibly remain the same width and height and have maintained the same number of members. In other words, you will have more space between the colors but not necessarily more colors (more space between the family members but no additional offspring). If anything, you will increase the chance of degradation by having to make larger adjustment moves and introducing quantization errors.
There is a middle way being adapted by digital photographers who work in Raw mode:
1. Process the raw file in Camera Raw and then open it in Photoshop in 16-BPC mode.
2. Do any major tonal and color corrections.
3. Save the file as a master file.
4. Duplicate the document.
5. Convert it down to 8-BPC.
6. Do any major edits that require hefty resources, such as multiple adjustment layers,
duplicate blending layers, layer styles, multiple type layers, and so on.
7. Optimize the 8-BPC version for output.
While this debate is raging, you may wish to do your own tests, which are easy to perform:
1. Duplicate a 16-BPC file.
2. Convert the copy to 8-BPC (Image>Mode>8-Bits/Channel).
3. Perform the same edits on the original and the copy (use adjustment layers and drag
them into the other file).
4. Send the files to your desktop printer, or convert the 16-BPC to 8-BPC and then
send both to a four-color offset printer and a photographic printer for good measure,
such as a Fuji Frontier or a LightJet.
If you find no discernible difference between the prints, or the difference is insignificant, you will be in the best position to decide whether to work in 16-BPC or only in 8-BPC mode from the get-go and enjoy cruising through your workload.
Saving Files
When you save your files, you have another prime opportunity to save time and optimize Photoshop performance. The following sections discuss how, where, and when you can save time and space as you save your files.
Saving Files in 16-Bits/Channel Mode
Not only can working on files in 16-Bits/Channel mode slow down many of the processes, such as applying filters, using the Extract command, rotating content, and so forth (as was discussed previously in the chapter) but also saving files can take considerably longer. If you have finished correcting the image and optimizing it for output, there’s no benefit in keeping it in 16-Bits/ Channel mode, other than keeping the option open for editing it again at some future date. Convert it to 8-Bits/Channel mode before saving it or sending it to your printer if speed and space are a higher priority for you.
Saving Files in CMYK Mode
After you have optimized and purposed a CMYK document, you can remove the embedded profile, which can reduce file size and help speed the saving process. This can amount to a considerable saving of disk space and time if you are purposing hundreds of files.To remove a profile, choose Image>Mode>Assign Profile. In the Assign Profile dialog box (Figure 1-11), select Don’t Color Manage This Document.
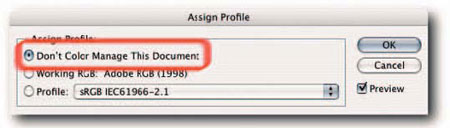
FIGURE 1-11: You can remove a profile from a document by choosing Image>Mode>Assign Profile and then “Don’t Color Manage This Document.”
Reducing Layers and Channels
The number of layers and alpha channels in your file can also impact on the size of the file and consequently the time it takes to save it. You can minimize the file size and the time it takes to save the file by deleting any empty layers, merging others that do not benefit from being standalone layers, and deleting alpha channels that you no longer require.
Maximizing File Compatibility
When you save a file in the native Photoshop file format (PSD), you can include a flattened, composite version, as well as all the layers, layer sets, adjustment layers, blend modes, and styles that go to make up your file. The flattened version can then be used by older versions of Photoshop and applications that do not support all the Photoshop features used to create the file. However, the downside is that it can take considerably longer to save the file and can
increase the file size unacceptably, especially if you are working on very large files. If you feel your workflow is unlikely to benefit from a file that also includes a flattened version, you can elect never to include a flattened version, or to do so always, or sometimes (Figure 1-12). To tell Photoshop how you would like to save PSD files, open the Preferences dialog, choose File Handling from the pop-up menu at the top of the dialog box, and then select an option for Maximize PSD File Compatibility.

FIGURE 1-12: You can save time and disk space by electing not to save a flattened version
with your PSD file automatically or to do it on a case-by-case basis.
Comments