
Optimizing Performance in Photoshop CS2 – part 3
Reducing Palette Thumbnail Size
Leaving the Preferences dialog for the time being, the palettes also have options that can affect performance. For example, the Layers, Channels, and Paths palettes all store thumbnails by default, and these thumbnails are continually updated as you work on the image. However, to draw and update the thumbnails, Photoshop uses resources that may be gainfully employed elsewhere. If your resources are painfully low, you may like to select None or the smallest thumbnail size.To customize the palette previews, select Palette Options from the palette’s menu and then choose an option that suits your needs (Figure 1-7).
Do You Really Need That Snapshot?
Apart from the maximum number of saved histories, which you can specify in the Preferences dialog, you can set other history options that affect performance by selecting History Options from the History palette menu (Figure 1-8). The first two options in the History Options dialog box, “Automatically Create First Snapshot” and “Automatically Create New Snapshot When Saving,” are the ones that consume extra resources.
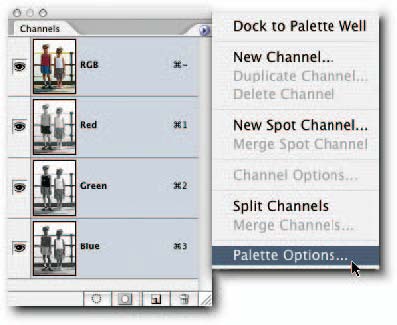
FIGURE 1-7: Palette previews can consume resources. Select “None” or the smallest thumbnail size to conserve resources.

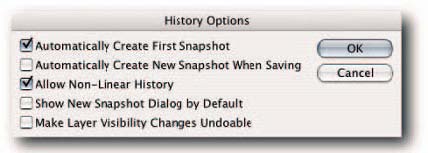
FIGURE 1-8: Histories, though indispensable, can consume resources. You can set the number of saved histories in Preferences and set snapshot preferences in History Options.
Of the two, the first option is actually quite handy, even if it does consume extra resources. It can get you out of a tight spot if you accidentally flattened a multilayered file or pressed Ctrl+S (Windows),Ф+S (Mac OS)—easily done—when you meant to press another keyboard shortcut and don’t discover your mistake until well into the editing session, by which time the earlier history states have been overwritten, including the open, first state.When you click the snapshot, the document will revert back to the state it was in when it was first viewed in Photoshop, which may not be the same as the version on disk if you changed its color profile in any way when the document was opened. The second option (Automatically Create New Snapshot When Saving) is one that you can probably live without, but again, you’ll just have to decide whether to take advantage of it. Just remember that it will consume extra resources if enabled.
The RAM Connection
A Photoshop legend goes, “If you need to test your RAM, use Photoshop.” It will root out any inherent problems, as a good farmer roots out weeds. Photoshop will put your RAM under stress, thus revealing any flaws, as few applications will do—or so the legend goes. The legend has spread because it’s probably rooted in equal amounts of truth and folklore. You may ask, where’s the connection between this legend and Photoshop performance? Well, if any of your RAM chips have gone south, as it were, Photoshop performance will degrade, and corrupted data may follow in its wake. Photoshop relies very heavily on two things for good performance: masses of RAM and a fast scratch disk (which basically is hard disk space used to temporarily page data out of RAM). A dual processor can make a difference, but not all processes in Photoshop can take advantage of dual processors. Therefore, you come back to RAM, and the more RAM you can allocate to Photoshop, the more it will use in order to process your images faster, relying less on the scratch disk, which can slow it down (as is discussed later in this chapter). However, Photoshop currently can make use of only 4GB of RAM. Because of the limitation, the less you can waste in allocating to functions that you may not use, the more will be available for tools and commands before Photoshop starts to page data to the scratch disk. There is good reason for Photoshop’s being probably one of the most RAM-hungry programs. Continuous tone images are made of pixels (picture elements). An average image can contain millions of pixels.When you open a file or manipulate it in any way, Photoshop has to keep track of and update the information required to describe each pixel’s color, luminosity, and location, among other things. What’s more, because of the method used for storing information about each pixel, as soon as you duplicate the pixels in order to work on an image, the resources required to keep track of the extra data have to be similarly multiplied. Furthermore, now that Photoshop supports most operations on 16-Bits/Channel files, the resources needed to simply open a file in 16-bit mode need to be doubled. Then there are the files in Large Document Format (PSB), 32-bit files in High Dynamic Range (HDR) files, and on and on. So, anything you can do to speed the workflow will help you accomplish your tasks in Photoshop that much quicker.
Assigning RAM for Optimal Performance
If the processor in your computer is the brain, the RAM can be likened to its heart. All the software on your computer, from the operating system to applications to widgets, relies heavily on it for their speed and efficiency. As mentioned previously, Photoshop can guzzle RAM as a Mercedes G500 5L guzzles gasoline. So, you need to give it as much RAM as you can possibly afford. The key word here is afford because the operating system also needs a plentiful supply of RAM; therefore, it’s a bad idea to starve it while indulging Photoshop.
Photoshop gets its share of RAM from the figure allocated to it in Preferences. When it has used up that allocation, it pages out the data to the hard disk (allocated to it as the scratch disk in Preferences), and the end result is it runs more slowly. Knowing that, you may be tempted to max out the RAM allocation to 100% in order to make it run faster. Not a good idea! If anything, allocating too much memory to Photoshop may slow down the performance by forcing the operating system and Photoshop to swap pages in and out of memory. So, what amount of available RAM should you allocate? Well, as with all things in nature, that depends. Photoshop can use a maximum of only 4GB of RAM. This limitation is imposed by hardware and the operating systems, among other things that only geeks and engineers with degrees in astrophysics understand fully. Suffice it to say, if you have 4GB of RAM installed, or more, you can safely increase the RAM allocation to 70%. Doing so will ensure that Photoshop uses as much RAM as it possibly can, up to the 3.7GB limit (or thereabouts, because the OS will reserve some of the 4GB for itself ). If you do not have more than 4GB of RAM installed, you should reduce the allocation to something like 50–60%, especially if you are experiencing slow performance in Photoshop, which includes Camera Raw.To allocate RAM, go to Preferences>Memory & Image Cache and specify a percentage in the Memory Usage section of the dialog box (Figure 1-9).
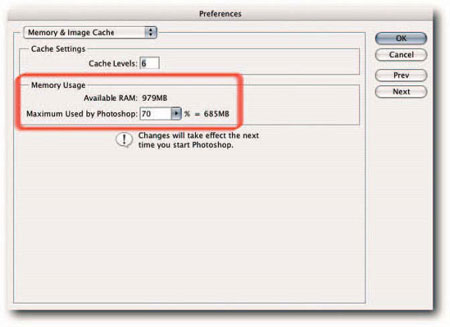
FIGURE 1-9: If you experience slow performance, try reducing the RAM allocation to 50–60% in the Memory Usage section of the Memory & Image Cache section of the Preferences dialog box.
Saving Files in CMYK Mode After you have optimized and purposed a CMYK document, you can remove the embedded profile, which can reduce file size and help speed the saving process. This can amount to a considerable saving of disk space and time if you are purposing hundreds of files.To remove a profile, choose Image>Mode>Assign Profile. In the Assign Profile dialog box (Figure 1-11), select Don’t Color Manage This Document. FIGURE 1-11: You can remove a profile from a document by choosing Image>Mode>Assign Profile and then “Don’t Color Manage This Document.” Reducing Layers and Channels The number of layers and alpha channels in your file can also impact on the size of the file and consequently the time it takes to save it. You can minimize the file size and the time it takes to save the file by deleting any empty layers, merging others that do not benefit from being standalone layers, and deleting alpha channels that you no longer require. Maximizing File Compatibility When you save a file in the native Photoshop file format (PSD), you can include a flattened, composite version, as well as all the layers, layer sets, adjustment layers, blend modes, and styles that go to make up your file. The flattened version can then be used by older versions of Photoshop and applications that do not support all the Photoshop features used to create the file. However, the downside is that it can take considerably longer to save the file and can increase the file size unacceptably, especially if you are working on very large files. If you feel your workflow is unlikely to benefit from a file that also includes a flattened version, you can elect never to include a flattened version, or to do so always, or sometimes (Figure 1-12). To tell Photoshop how you would like to save PSD files, open the Preferences dialog, choose File Handling from the pop-up menu at the top of the dialog box, and then select an option for Maximize PSD File Compatibility. FIGURE 1-12: You can save time and disk space by electing not to save a flattened version with your PSD file automatically or to do it on a case-by-case basis.
Comments