
Making Changes to the Navigation Buttons
Making Changes to the Navigation Buttons
You can customize the buttons along the bottom any way you want (see Figure 5). You can add graphics, text, and even animations to the buttons.
![]()
Figure 5. Navigation buttons in the template
The buttons and associated graphics are located along the bottom of the screen on the Navigation bar layer in the controls screen.
There are several things you can do to update the navigation bar:
- Change the buttons’ positions and graphic content
- Change the section highlight color
- Remove navigation buttons
- Add navigation buttons
Updating the Supplied Button Graphics
To move the collection of navigation buttons to another location on the screen:

- Click the controls screen.
- Lock the FLVPlayback layer and move the buttons and button graphics to the desired location.
To update the graphic or replace the graphic with text:
- Click the controls screen.
- Notice that the buttons on the Navigation Bar layer appear as a series of rectangular buttons with text overlaying them. The buttons are all instances of the same symbol in the Library.
- Change the button graphic by double-clicking an instance of it to enter its timeline. Edit the Up, Over, and Down frames as desired. Import new graphics by selecting File > Import > Import to Stage and choosing the graphic file you want to use. Return to the controls screen when you’re finished.
- Change or remove the text by double-clicking the text to edit it. Change the text attributes by changing the values in the Property inspector at the bottom of the work area.
To resize graphics you have imported, right-click (Control-click on the Mac) and select Free Transform from the pop-up menu. Use the handles to resize the image. Note that it is most efficient to import images at the size you intend to use them in the movie.
Changing the Section Highlight Color
If you really want to do so, you can change the highlight that appears on the navigation buttons (see Figure 6). You need to do this only if you want to change the color, add text, or even make the highlight a graphic, such as a fancy frame. Most people will probably leave the highlight as is.
![]()
Figure 6. Green highlight box around the navigation graphics
The same green highlight box is used for all graphics, so you need to change the green box only in one place. Notice that the size of the highlight is the same as the size of the button. The code on the controls screen timeline dynamically aligns the highlight to the top left edge of the buttons during the course of the movie. Keep this in mind if you create custom highlight graphics so you can achieve proper alignment.
Because all graphics used in the project are stored in a library, you can open this graphic directly from the library and change it once:
- Open the Library panel by pressing F11 or selecting Windows > Library.
-
Open the Navigation Buttons folder (see Figure 7).
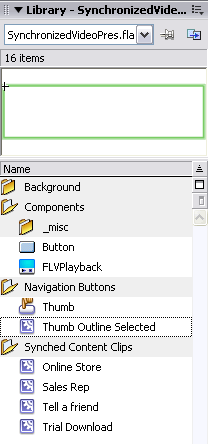
Figure 7. Library panel with the highlight box selected
-
Double-click the small graphic next to the Thumb Outline Selected item.
In the center, you will see the green highlight box; you can edit the graphic there.
-
To change the green highlight box, double-click the green highlight. To change the line color, select a new color in the Tools palette:

You can add anything you want in this area, including graphics or text. Anything you add will appear when the video plays to this point. Notice that the green highlight is actually made up of two slightly different colors of green to create a glowing effect. You can change one or both of those box colors.
- To accept your changes, click the controls screen again.
Removing Navigation Buttons
To remove the entire navigation button bar, select the controls screen, click the Navigation bar layer to select everything on it, and press the Delete key.
Removing just one button is different. After you click the controls screen, highlight the button you want to delete and press Delete. Make sure you delete the button instance and the text field. To make sure you delete all the items, drag the mouse across that area of the screen to draw a box around anything on the Stage. If you see any blue highlight boxes, delete them.
Adding Navigation Buttons
To add a button to the navigation bar, you can either make the other buttons smaller to make room for the new one or place the button somewhere else on the screen. Buttons do not need to be in a single row. Follow these steps:
- Click the controls screen and lock all the layers except for the navigation bar layer.
- It’s easiest to copy a button and then modify the copy. Highlight a button you want to copy on the buttons layer by clicking it with the mouse, and then copy and paste it (it will appear in the middle of the screen).
- Position the button where you want it.
- Select File > Import to Stage to add a graphic. Replace the old graphics with your newly imported graphics.
-
Click the button you just added. Be sure to click the button, not just the graphic. When you click the button, a blue highlight box appears around the button (see Figure 8).
In the Property inspector, name the button instance. This triggers the button highlight when the cue point changes. The controller code expects the name to be in the format of cue point name plus the characters _btn. For example, if the cue point is named introduction, then the matching button’s instance name should be introduction_btn (see Figure 8). As you’ll recall, cue point names are defined in the FLVPlayback component parameters and match the corresponding screen names as well.

Figure 8. Properly selected button with the instance name applied to associate it with the introduction cue point
-
With the button still selected, open the Actions panel (select Window > Development Panels > Actions) and find the line of code that reads as follows:
seekToCuePoint( "introduction" );
- Change the text within the quotes to the cue point name to which you want to launch the video. In the example above, when the user clicks this button, the video moves to the introduction cue point and starts playing from there.
Comments