
Macromedia Flash Animation – Linear Gradient Blur Method
Linear Gradient Blur Method
You probably see it all the time, yet you don’t really “see” it. I’m talking about the blur effect used on some websites where objects literally animate into view so quickly that they are merely a blur to the naked eye.
In most cases, you don’t think you saw the effect because you think what you just saw truly was a blur. The term blur refers to the smearing of color, an indistinct object to give the illusion of speed. This technique can be a great transitional effect for your website or an additional weapon in your character-animation arsenal. What makes this effect so cool is that it does not require a very high frame rate to achieve.
Figure 2. Blur effect in action
I’m going to show you two techniques to achieve the blur effect. You do the first method entirely within Flash, which produces a smaller file size. You are going to create a blur effect with a simple shape and a linear gradient.
- Open the blurEffect_gradient.fla file (located in the sample files you downloaded) and save it with a new name. You can play the movie to see the already completed effect. Now I’m going to show you how easy it is to make this type of animation.
-
Create a new layer and make sure the playhead is on Frame 1 of the Timeline. Select any of the drawing tools and make a shape. It doesn’t really matter what color or style of shape you create; just keep it simple for now. Make sure you turn off the stroke color; you want a simple shape with no stroke. Select this shape with the selection tool (V) and convert it to a symbol (F8). Position this shape to the left side of the Stage.

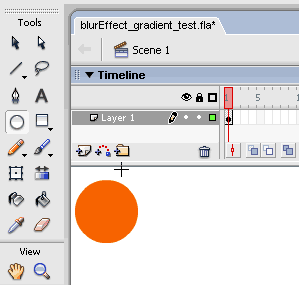
Figure 3. Shape positioned on the Stage with the playhead on Frame 1
-
Select Frame 10 and convert it to a keyframe (F6). You now have two keyframes (Frames 1 and 10) containing your new symbol in exactly the same position on the Stage. With the playhead still on Frame 10, select the instance of your shape on the Stage and use the arrow keys to move it to the opposite side of the Stage.
Tip: Hold down the Shift key while pressing the arrow keys to move your instance in 10-pixel increments.
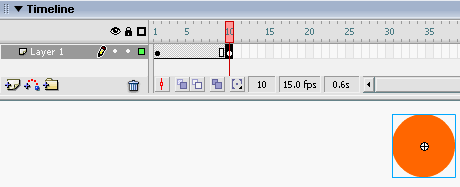
Figure 4. The shape positioned to the right of the Stage on Frame 10
-
Open your Color Mixer panel and select Linear from the pop-up menu. Now you need to add a third marker to the gradient. Simply click in the area below the gradient ramp and a new marker will appear.
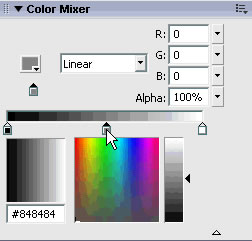
Figure 5. New marker in the middle of the gradient
To change the color of a marker, select it and pick a new color. Notice that the selected marker updates with the new color you just selected.
To create the blur effect, make sure the middle marker is the same color you gave your shape. The left and right markers need to be the same color as your background. If you have a solid color background, then choose the same color.
In some cases you may have a background image that is more complex. If this is the case, adjust the alpha slider to 0% for the left and right markers. In this example, the background is white and the shape is orange. Therefore my three-color linear gradient looks like Figure 6:

Figure 6. Three-color linear gradient you will use for the blur effect on an orange object
-
From the Color Mixer panel menu at upper right corner of the panel, select Add Swatch to add your new gradient to your palette. Next, select the rectangle tool (R) and choose your new gradient as your fill color. Make sure you turn off the stroke color. Create a blank keyframe on Frame 8 and move the playhead to this frame. Now simply draw your rectangle with your gradient fill. Try to make the rectangle the same height as your original shape and at least three times as wide. Select it and convert it to a symbol.
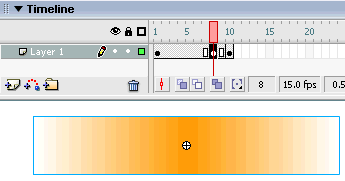
Figure 7. Rectangle, filled with three-color linear gradient
-
Position this gradient symbol to the right of your shape in Frame 1.
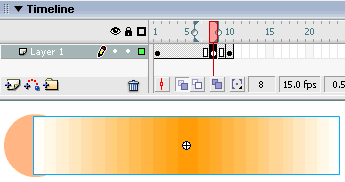
Figure 8. Rectangle gradient, positioned next to the graphic
Next, create a keyframe in Frame 9 and use the Right Arrow key to shift the gradient symbol over to the right side of the Stage.
Tip: You can use the onion skin tool to see your previous and future frames as reference when trying to position your gradient.
- Play back your movie (Test Movie, Control+Enter) to see your shape appear to travel at a very high frame rate from the left side of the Stage to the right. The frame rate for this file is only 15 frames per second (fps). You can experiment with higher and lower frame rates and also increase and decrease the number of keyframes for your gradient symbol. Just remember to use as few keyframes as possible. This effect should be a blur to the viewer’s eye. If the user can see the blur long enough to understand how the effect was made, then it’s probably too slow.
Comments