
Load and Display Multiple Videos
Load and Display Multiple Videos
One of the cool new features of the FLVPlayback component is its ability to load multiple Flash Video (FLV) files into a single component instance. The FLVPlayback can store a list of videos and set the active index to display the videos in any order.
I discuss these behaviors in this section:
- Set Videos
- Set Video Index
The FLVPlayback behaviors offer two behaviors to load and control the display of multiple videos: the Set Videos behavior and the Set Video Index behavior. The Set Videos behavior allows you to load up to seven FLV files into a single FLVPlayback instance. The videos play sequentially from one to the next and an option for looping is included for continuous play. You can use the Set Video Index behavior to jump to any video in the list from a button click, among other options.
Set Videos
To use the Set Videos behavior, follow these steps:
- Add an FLVPlayback component to the Stage and give it an instance name in the Property inspector.
- You can attach this behavior to a frame, button, or other object. Let’s say you want the video to load immediately without having to click a button. In this case, add a layer named actions to the Timeline and select the keyframe on Frame 1.
-
Open the Behaviors panel and click the plus (+) icon to access the list of behavior categories. Select the FLVPlayback Controls category and choose Set Videos from the list. The behavior’s dialog box opens (see Figure 2).
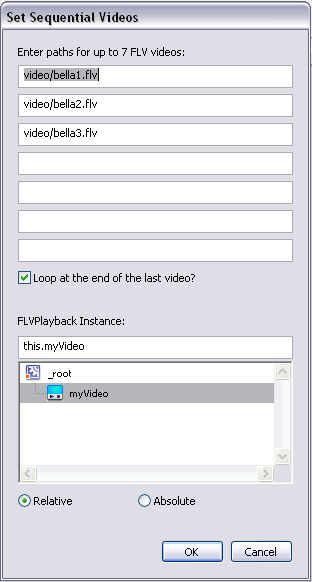

Figure 2. Set Video dialog box showing three videos assigned to the myVideo component instance
- Enter paths for up to seven FLV files in the text boxes provided. If you have three videos to display, simply leave the four following text boxes blank to omit them.
- The videos play sequentially from one to the next. Select the Loop at the End of the Last Video check box if you want the last video in the list to loop back to the first (for continuous play).
- Browse for the FLVPlayback instance in the target list in the bottom portion of the dialog box. This targets the instance name of the component displaying the video. A best practice is to use the Relative option for the path, as shown in Figure 2. If you have problems adding paths to component buttons, try using the Absolute option instead.
- Click OK.
Here’s the code that is added to Frame 1:
// Set Videos Behavior
  // Create a videos object to hold a video
 // playlist and event handler functions...
 var videos:Object = new Object();

  // Set up to 7 video feeds in a single component
 videos.list = new Array();
 videos.list[0] = "video/bella1.flv";
 videos.list[1] = "video/bella2.flv";
 videos.list[2] = "video/bella3.flv";
 videos.list[3] = "";
 videos.list[4] = "";
 videos.list[5] = "";
 videos.list[6] = "";
 videos.loop = true;
 videos.length = 1;
 videos.loaded = false;

  // Path to FLVPlayback components
var m = this.myVideo;

  // Set the path of the first video feed
 m.contentPath = videos.list[0];

  // Set a 'ready' event handler to load the videos
videos.ready = function( evt:Object ):Void
{
if(!this.loaded){
         this.loaded = true;
         for( var n=1; n<this.list.length; n++ ){
             if( videos.list[n].indexOf(".flv") != -1 ){
                m.activeVideoPlayerIndex = n;
                 m.contentPath = videos.list[n];
                 this.length++;
             }
         }
         m.activeVideoPlayerIndex = 0;
     }
 }
 m.addEventListener("ready",videos);

  // Set a 'complete' event handler to load the next video
 videos.complete = function( evt:Object ):Void
 {
     var nextIndex = Number(evt.vp)+1;
         if( nextIndex == this.length){
             if( this.loop ){
                 nextIndex = 0;
            }else{
                 return;
            }
         }
         m.activeVideoPlayerIndex = nextIndex;
         m.visibleVideoPlayerIndex = nextIndex;
         m.play();
 }
 m.addEventListener("complete",videos);

 // End Set Videos Behavior
Set Video Index
To use the Set Video Index behavior, follow these steps:
- Assuming that you’re continuing from the previous sample, you already have an FLVPlayback component on the Stage with several videos assigned to it through ActionScript. This behavior enables you to jump to the display of a specific video.
- Add a button to the Stage and select it.
-
Open the Behaviors panel and click the plus (+) icon to access the list of behavior categories. Select the FLVPlayback Controls category and choose Set Video Index from the list. The behavior’s dialog box opens (see Figure 3).
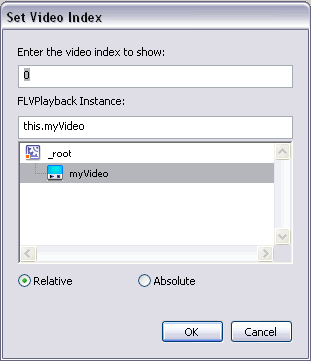
Figure 3. Set Video Index dialog box showing that the command will jump back to display the first video at index 0
- Enter the index of the video to jump to. Index numbers start at 0 and go in the order as entered in the Set Videos path text boxes.
- Browse for the FLVPlayback instance in the target list in the bottom portion of the dialog box. This targets the instance name of the component displaying the video. A best practice is to use the Relative option for the path, as shown in Figure 3. If you have problems adding paths to component buttons, try using the Absolute option instead.
- Click OK.
Here’s the code that is added to the button:
// Set Video Index Behavior

  this.myVideo.stop();
 this.myVideo.activeVideoPlayerIndex = 0;
 this.myVideo.visibleVideoPlayerIndex = 0;
this.myVideo.play();

  // End Set Video Index Behavior
Comments