Learning Effects – Part 2
Learning Effects
Before you start, look at your History palette, and make a mental note of what the last state showing is named. We will be coming back to it.
Choose the Asphalt effect in the Effects Browser, and click on the Apply button in the palette’s upper right corner.
When Elements is finished applying the effect, you will be asked, in an alert box, “Do you wish to keep this effect?”.
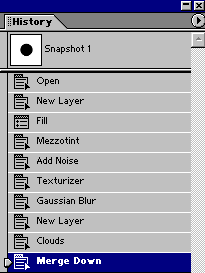
Before clicking “Yes”, I want you to look at your History palette. Notice that, at the very top of the palette, there is a Snapshot. 
This is a Photoshop feature that is not accessible in Elements. It allows you to “save” a particular history state for as long as your document is open.
Normally, when you exceed the number of history states that you have specified in preferences, the oldest states are discarded. By creating a snapshot, Elements is making sure that it can return you to where you started from if you decide not to keep the effect.
Go ahead and click “Yes” to accept the effect. Now, go to your History palette, scroll up the list of states to the top, and click on the first step before the start of the Asphalt effect. In this case, that would be the state right before New Layer.
In all cases, when we are walking through these effects I want you to watch 1) the Layers palette, and don’t forget to check for Blend Mode and Opacity changes, and 2) your image.
Click on the first state of the effect, which is the New Layer state. Notice the new layer which appears in your Layers palette. Click on the next state, named Fill. Notice that the new layer is now filled with black.
The next four states, Mezzotint, Add Noise, Texturizer, and Gaussian Blur are all filters. Watch your image as you click on each successive state to see what the filter is doing to the image.
Just in case you’re looking at your totally blotted out image, and wondering what the heck this is for, the Asphalt effect is from the Textures group, and is intended for filling suitable objects with a particular texture.
When stepping through these history states, unless you are a veteran Photoshop user, you are not going to recognize many of the names. I have made an Appendix with an alphabetized list of all the state names found in Effects, accompanied by the path to where you can find the commands in Elements. See the Appendix page, whenever you need help.
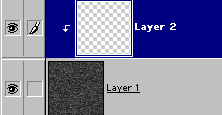
When you click on the New Layer state that follows the four filter states, I want you to look closely at your Layers palette. Notice the little crooked arrow that appears on the left side of the new layer? This means that this layer is grouped with the layer below it. I’ll show you what grouping does when we look at the next effect, but for now, just notice that it’s there.
Also, please notice the Blend Mode, and the Opacity settings for this new layer.
Go ahead and have a look at the last two states. Clouds is a filter. Watch the image to see its effect. Then watch the Merge Down command combine the Clouds layer with Layer 1 which is where the asphalt texture was created.
You can walk backward, and forward through your History palette as many times as you like, or need, in order to understand what was going on. You can also turn off the visibility of layers in the Layers palette by clicking on the eyeball icon at the left side of a layer, in order to try and see what’s on another layer.
However, and please remember this, the minute you use any tools, or commands, or change the Blend Mode, or layer Opacity, this constitutes a new history state, and all subsequent states will be deleted.
Off course, you can simply go back to the beginning, and run the effect again, but do be aware that you can’t add new edits to the image and still be able to see edits in a different direction.
Now that you’ve walked all the way through the Asphalt effect, I want to have you look a little closer at one of the states that may have puzzled you. When it added that Cloud filter to the new layer, you could barely see any change. And, you can’t look at the layer alone because it’s grouped. If you turn off visibility for the Layer 1 layer with all the black texture, the grouped Cloud layer is automatically turned off, too.
We need to have a closer look. With the Cloud state selected in the History palette, select the Cloud layer (Layer 2) in the Layers palette, and then choose Layer > Ungroup.
Notice that you have now lost the last history state of the effect, Merge Down. This is what I just warned you about. Performing an edit deletes all history states which follow the one you add edits to.
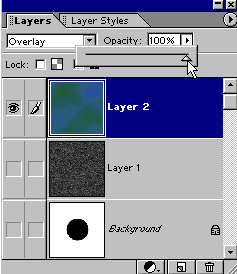
In the Layers palette, turn off visibility for all layers except Layer 2 which is the top layer. Next, with Layer 2 selected, enter 100 in the Opacity text box, or use the slider as shown below. In your image, you can see what the Cloud filter layer looks like.
Now, I want to jump down the list of effects, and do the Brushed Metal effect. It combines several features that I want to talk about, so we’ll do it next.


Comments