Learning Effects – Part 1
Learning Effects
[Please note: you can not use this tutorial for Elements 2. History states for all effects are concealed.]
Before I get started, I’d like to point out to any users of Photoshop 5.0 or later that Effects in Photoshop Elements are not layer effects. They are prepackaged actions that come with the program (Elements does not have an Actions palette).
By watching how effects/actions do what they do, you can learn a great deal about how to use Elements creatively on your own.
In this tutorial, I’m going to make you work a little bit. To see the results, you’ll have to apply the effects. I’m not going to show them to you. I will translate for you, and tell you exactly what to do, but you’ll want to be looking at your Elements window as you read along.
Okay. Let’s get started. Create a new, white document, about four inches square, resolution – 72 dpi.
Click the color square in the toolbar, and pick a light color other than white. Click OK to exit the Color Picker, and the press Alt-Backspace to fill your document with the new color.
Choose the elliptical marquee tool in the toolbar, and drag to create a small circle, about two inches in diameter near the center of your image. Pressing the Shift key as you drag will cause your shape to be a perfect circle.
Click the color box again to go to the Color Picker again and this time pick a medium to dark color that will contrast with your first, light color. Click OK to exit the Color Picker, and then press Alt-Backspace to fill your elliptical selection with the new, darker color. Press Ctrl-D, or choose Select > Deselect to deselect your shape.
All we’re doing is creating a test document that is small enough to run the many steps in each effect easily, and rapidly. There’s no need for any fancy image to see what we are going to be looking at.
Next, choose Edit > Preferences, and in General preferences, at the top, right side of the box, reset your History States number to 40. You’ll need to remember to reset this back to 20, or whatever you normally have it set for, when you’re finished. I’ll remind you at the end. Adding History states is very memory intensive, so you don’t want to keep that set to more than you need.
If theLayers palette is in the palette well, grab it by its title tab and drag it out. Drag on its bottom border to extend the number of layers that will be visible at one time. Make it about twice as tall as it is wide.
Do the same with the History palette. Drag it out of the palette well, and extend its length. This time, I want you to make the palette as tall as your window will permit. I put the top of the palette all the way up on my Elements title bar, and dragged the bottom of the palette to be at the bottom of the window, on the status bar.
Place both these palettes on the right side of your screen. Put the Layers palette on the outside, and the History palette on the inside. Your open document should be in the center of the screen.
Last, grab the Effects Browser and drag it out of the palette well. Place it on the left side of the window
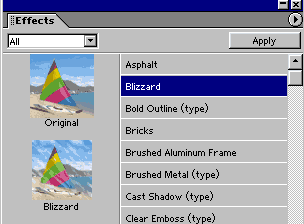
There are two little icons at the bottom of the Effects Browser palette. Click on the one on the left to change your view from Thumbs, to List View.
In the palette menu, choose All to include all of the effects in your list.
If you will look at the illustration above, you’ll notice that some of the effects have the word (type) next to them. These effects require that you have a type layer selected in the Layers palette before you can apply the effect.
When you go to try those effects, select the type tool in the toolbar, pick Verdana as your font (or Helvetica if you prefer), Bold, type 50 in the size box, and pick black for your color. Actually, type anything you like. Just be sure and make it big. Effects won’t show up well on small type.
I didn’t save my type layer since it got in the way when looking at the results of effects that didn’t require type. It’s very simple to add the type layer again each time you need it.
The last step needed before we get started is to wipe your History palette clean. Click on the very first step you can see at the top of the History palette. Then click on the little arrow in the upper right corner of the palette, and choose Clear History from the menu.
You don’t want to use this command, normally. If you’re running low on memory, it is a way to free some up in an emergency, but otherwise, I can’t imagine you’d want to give up your Undo capability.
However, for the purposes of this tutorial, it’s much easier to keep the History palette clean. I used this step repeatedly as I was testing out the effects. I’d recommend that you do so, too. After you’ve had a look at an effect, click on the first effect at the top of the palette, and clear you states, again.
You should be ready to get started. I’m going to show you the Asphalt effect first, and then jump to the Brushed Metal effect, because it happens to include several steps that require a fair amount of explanation.


Comments