
Layer Masks – Part II
Layer Masks
Here we are, then. All set with our mask on the layer where we need it. A lot of trouble, but you’ll see, when you work with the mask, that it’s worth it.
Click on the mask thumbnail (the white square on the masked layer). Any edits made now will be to the mask, and not the image. Confirm that you are in mask edit mode by checking the icon next to the eyeball.![]()
Use the zoom tool to zoom way, way in, and then paint with the paintbrush with a hard edged brush (from the first row in the brushes pop-up palette). Make sure the paintbrush tool’s opacity is set to 100 %.
Wherever you paint with black, you will see the apple disappear. However, if you paint with white, the apple will reappear. The image, below, shows the round brush cursor stroking the red apple away from where it covers the snake. The apple is not gone; it’s just hidden.
This is the magic of layer masks. Press the X key on your keyboard to switch back and forth between black and white. (Press D if black and white aren’t the colors showing in your toolbar’s color boxes.)
Painting a mask with shades of gray will mask the image in proportion to that shade. Painting with the paintbrush tool’s opacity set to 50 % will cause the mask to allow 50 % visibility of the layer’s contents wherever you apply your strokes.
After adding the mask to the apple, the Layers palette looks like this.
And, the masked part of the image looks like this (the burn tool was used to add shading where the two objects join).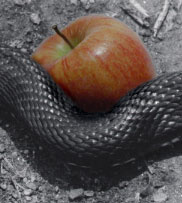
This tutorial is narrowly focused on how to create a layer mask. If you’d like to learn more about the details of combining images, I recommend that you try the two Combining Images tutorials in the Photoshop section.

An Elements user, sent me an excellent technique for simulating layer masks. It works exactly the same as a real layer mask.
It’s faster than making a real layer mask. It looks a little bit confusing in the Layers palette, so you’ll need to make sure and name your layers to remind yourself of what the various layers are doing. Here’s how it goes:
- In the document to which you want to add a layer mask, add a new adjustment layer (Layer > New Adjustment Layer). Use Brightness/Contrast or Levels. In the dialog box that appears, make no changes—just click OK to add the layer with no alteration. [Do not use one of the Fill layers for this technique. You may think that you can use a fill layer’s mask to avoid the problem described in the Update note below. If you use a Solid Fill layer and have any transparency in the grouped layer above, the fill color will show through. This is not what you want.]
- Drag the new adjustment layer to be directly under the layer you want to mask. In the case used here, that would be directly below the apple’s layer.
- Click on the layer that you want to mask (the apple’s layer) and choose Layer > Group with Previous. Or use the shortcut of Alt-clicking on the line between the two layers.
- Click on the adjustment layer’s mask icon to put the mask into edit mode. Paint on the mask as described in this tutorial. Alt-click on the mask to see it alone, without the image. Alt-Shift click on the mask icon to see the mask as a red rubylith overlay on the image when editing it.
Here is what your Layers palette should look like.
This is a beautiful, simple method for getting all the benefits of a true layer mask.
Well, it was too good to be true. There is one flaw with this technique. An Elements user, Don Fukushima, discovered this problem and was kind enough send me an email to let me know about it. If your image has areas that are completely transparent in the (combined) layers below the adjustment layer, you won’t be able to mask the areas on your layer that overlap those transparent areas. If you have a proper background layer (which does not allow transparency) this won’t happen. Real layer masks do not have this problem.]
I hope you are clever enough to notice that adjustment layers and fill layers always have their own layer mask, already in place when you add the layer. All mask editing techniques work on those masks in the same way that they work on a “regular” layer mask. Note that it is usually better to use soft, low opacity brushes to hand-edit adjustment layer masks (and the gradient tool).

Think about that. You therefore have complete control over how much and where that adjustment or fill color is applied. By editing the mask, you can add or remove the adjustment or fill at will. And all without touching the original image below. This is true non-destructive editing.
If you want to make use of all of the power that is in Elements, you have to master masks.
Comments