Keying 101
Keying 101
This section looks at one of the simplest ways to key video for use with Flash 8. The sample files that accompany this article include a video file (Sample.mov), located in the assets directory, with which you can play. Note that the process of keying a video varies from video to video and application to application. The basic process follows these steps:
- Create a new project in After Effects (File > New Project).
- Create a composition (Composition > New Composition). In the Composition dialog box, select your video options and set the size, length, and other settings that may apply to your project. In the case of this sample, use a size of 640 x 480 with a duration of 4:24 (the size and length of the Sample.mov file).
- Import your source video file (File > Import > File). Find the Sample.mov file, click Open, and drag it to your work area.
-
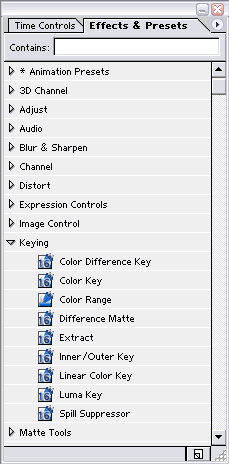
Open the After Effects Filters panel (Windows > Effects & Presets). You will see a category called Keying (see Figure 1).

Figure 1. Effects & Presets panel showing the open Keying section
The Keying category shows the default keying effects you can use with After Effects.
You can also use plug-ins to expedite this process. If you plan to create a lot of alpha videos, or your project has the budget to cover the cost, you might want to look into using them.
- In this case, use the Color Key effect, which simply extracts the color that closely matches the source color you choose. Drag this effect from the Effects Panel onto your video. Don’t worry about ruining your source file; After Effects uses layers to control effects.
- Select the eyedropper to the left of Key Color and select the background color of your video.
- The first option below Key Color is Color Tolerance. This slider tells After Effects how much color in the range of the selected background color to remove. For this example, choose a setting of about 54, which removes an adequate amount of color.
- The second option, Edge Thin, “pulls” in the color bounds around your subject, removing color that the Tolerance setting couldn’t remove. You don’t need to adjust this setting for the First Color Key effect.
-
The third setting, Edge Feather, softens the edges from where the color was removed. Setting this to 1.1 gives your video a softened, more final look.
Note: Keep in mind when creating your own alpha video that keying is not the only option available to you. You can also set custom masks, manually erase the background (good for cleaning up open areas that keying cannot remove), or find a plug-in that does a lot of the keying for you. Macromedia video pros recommend dvMatte Pro AE when working with plug-ins for Adobe After Effects. Try different techniques to see what works for you.
-
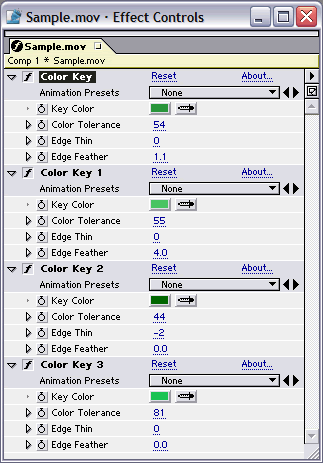
When working with the Sample.mov file, I found it necessary to layer four color keys onto the video. What this does is remove the different ranges of green from the background. Figure 2 shows the settings I used. Doing this removes a majority of the background color. You could also use the Eraser tool to remove other color remnants to finalize the video.

Figure 2. After Effects Color Keying controls, showing the settings for the demo
-
Export this video as an FLV file. If you installed Flash 8, you’ll see an Export to FLV option in After Effects. Select File > Export > Macromedia Flash Video (FLV), name the file Sample.flv, and click Save. This opens the Flash Video Encoder settings dialog box, in which you can change your FLV settings.
If you don’t have After Effects, or you have another video editing application that doesn’t support the FLV format, then export to another video format that supports alpha channels and use the Flash 8 Video Encoder to convert your file to the FLV format. Keep in mind that using the actual Flash Video Encoder has a few benefits over the After Effects FLV Encoder option. For example, you can add cue points to your video before encoding. Using this feature can save you lots of time and effort later on. Flash 8 Video Encoder also supports the crop and trim options.
-
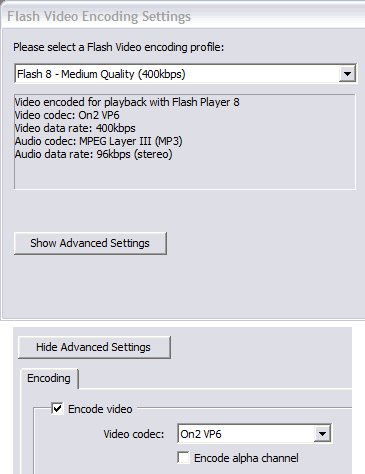
To encode the alpha channel, click the Show Advanced Settings button and click the Encode Alpha Channel option (see Figure 3). You can change the other settings as required. However, other than the Encode Alpha Channel feature, the default settings are fine for this example. After you select your settings, click OK. The FLV file will be saved to the location you chose earlier.

Figure 3. FLV Export panel (top) showing the Encode Alpha Channel option (bottom)


Comments