
Introducing "2.5D"
Introducing “2.5D”
Just because tweening in Flash is easy does not mean you can always rely on it for creating convincing animations. Don’t get me wrong: Tweening can be a great timesaver and can get the job done, as long as the job doesn’t require anything more than simple objects moving around the Stage.
But what if you could push the tweening method to give more realism to your character? What if you could harness its simplicity and make it work in ways not too many other Flash users have thought of? What if you have learned everything there is to know about tweening, go back to the first 10% of that knowledge, and take a left turn? Where would that take you?
In this lesson, I’m going to reveal a truly killer Flash animation technique that will actually create what some consider a convincing 3D effect. The cool thing is you never leave the Flash environment; you remain in the 2D realm. You are now in a dimensional limbo. If it’s still 2D but looks like 3D, then what exactly is it?
Welcome to the world of 2.5D animation.
Yup, 2.5D animation. I made that name up. I don’t claim to have invented this technique but so far the name, two-and-a-half D, may be mine.
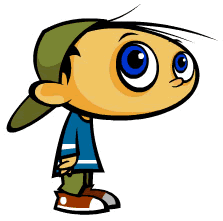

Figure 28. Isn’t he oh-so-cute?
Figure 29 demonstrates that I placed each symbol on its own layer. I have turned on the outlines feature so you can see how each part of the character’s body has been separated. This is very important because motion tweens require only one symbol per layer during the tween. If you try to have two different symbols on the same layer within the same motion tween, the tween will break.

Figure 29. Each symbol has its own layer
I have even taken the time to name each layer. Although this is not necessary, it does help to have layer names because, as your Timeline grows, you eventually start to scroll the Timeline more and more. It is also important when working in team environments where file sharing is common. You can never be too organized.
After your Timeline is set up, you can begin to apply motion tweens to your character. For this example, I animated only the symbols that make up the character’s head, so I made sure all other layers were locked to avoid making changes to the wrong layer or layers.
Turning Heads—Part 1
First I created my keyframes where I wanted the head to start and stop turning. Click and drag vertically from the top to the bottom layer and convert to keyframes (F6). Do this twice, keeping about 15 to 20 frames in between keyframes. In my example, I made keyframes on frames 15 and 30 (see Figure 30).
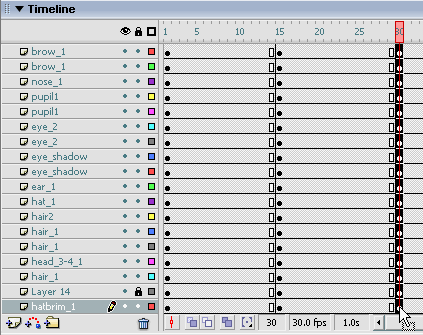
Figure 30. Getting ready to apply motion tweens
Keeping the playhead on the frame at which I wanted the character’s head turn to stop, I edited each of the symbols on the Stage using the Free Transform tool.
Follow my lead. I started with one of the eyes. You need to imagine the eyes wrapping around a sphere (the head). If this were truly a 3D object, one eye would get bigger as it comes closer towards you. It also wouldn’t be as egg-shaped, so making it wider is also a good idea. Because my character’s eye consists of three different symbols, I scaled them all at once by holding down the Shift key and selecting all three symbols (see Figure 31). Then I used the Free Transform tool to scale them at the same time. Don’t worry about being perfect at this point. You can always fine-tune your animation later. This is almost blind work, as you won’t know exactly how it will look until you apply the motion tweens.
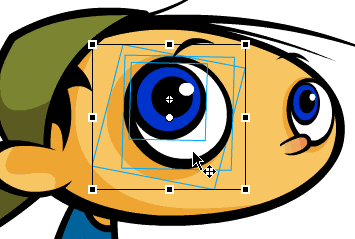
Figure 31. Selecting the eye symbols
Let’s move on to the nose. Because the character is turning towards us, everything closest to us should move from right to left. If it were truly a 3D object, the nose would be sticking straight out from the head. To make this a little more convincing, I turned it slightly downwards as I moved the nose from right to left (see Figure 32). Don’t forget to scale it up a bit as it is also coming closer towards the viewer.
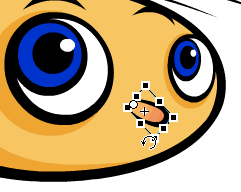
Figure 32. Modifying the nose
Next I moved the other eye over while scaling it larger and making it less of an oval shape and more circular. I also moved over both eyebrows and rotated them slightly while scaling them up (see Figure 33).
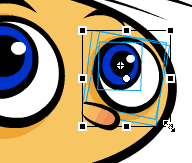
Figure 33. Modifying the other eye
At this point I applied motion tweens to each of the layers where I made these edits. It’s time to reveal what I have actually done and determine whether it needs further adjustments.
Don’t worry, there’s almost always a lot of tweaking to get this effect just right. Figure 34 illustrates the character’s head turn at this stage.
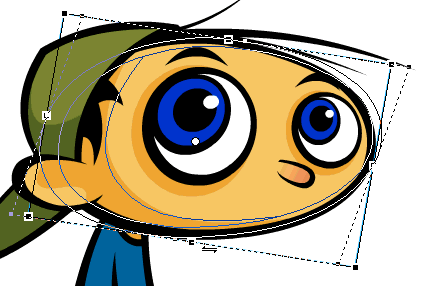
Figure 34. Turning the character’s head
View the file mudbubble_boy.swf to see the final animated effect (see Figure 35).
Figure 35. Final animated effect of the head turning
Not a bad start, is it? With a few simple edits with the Free Transform tool, you can start to see the effect come to life. It’s not perfect but at this point it doesn’t have to be. You can continue to tweak the amount of scaling, positioning, and skewing of your elements until you achieve the desired effect.
Turning Heads—Part 2
Next I address the remaining assets of the character’s head to further emphasize his head turning.
The most important part of this illusion is convincing the viewer that this flat, 2D object has volume and mass. You also need to trick the user’s eye into perceiving depth in the animation. You need to imagine this character as being built from a variety of 3D objects in space. If the character were truly turning his head in a 3D space, what is in the foreground would travel in the opposite direction from what is in the background. To help you imagine this, picture the earth spinning on its axis in space. The earth essentially spins counter-clockwise. This means the surface closest to us travels from right to left. The surface farthest from us travels from left to right. Let me apply this to my character’s head.
Because the head symbol itself is simply a flat oval shape, all I really needed to do is skew it a little bit. I also chose to nudge it a little to the right. I did this because when someone turns to face you, you see more flesh to the right of the left eye. Also, because this head shape is farther back from the facial features, it should move slightly to the right a few pixels. Don’t over-exaggerate some of these movements. This is an effect best executed with many subtle movements rather than a few major changes. It’s the sum of its parts that make up the whole because several subtle animations complete the overall dramatic effect.
Next I rotated the brim towards the right side of the character’s head (see Figure 36). Remember, objects farther back move in the opposite direction to objects in the foreground.

Figure 36. Rotating the brim of the hat
I also used the arrow keys to nudge the brim over to the right so it appears to be behind the character’s neck even more.
The same principle applies to his hat. I skewed the hat to make it thinner while moving it over to the right a few pixels (see Figure 37).
Figure 37. Adjusting the hat
The ear got skewed a bit as well as it moved upward and to the left (see Figure 38).
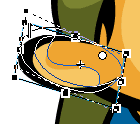
Figure 38. Skewing the ear
Don’t forget the hair. I designed the hair as three individual symbols so they could be edited independently. As the head turns towards the viewer, I skewed them down towards the character’s eyes and made them shorter as if they were pointing towards the viewer a little more (see Figure 39). This is cheating the perspective a bit and can be difficult to achieve. There is a limit to how far you can skew and scale a symbol. Remember, this effect is better when used sparingly and in a subtle way. You can only push the envelope so far. Less is more.
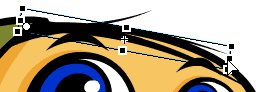
Figure 39. Skewing the hair
Next I added some motion tweens to the rest of the layers to which I made edits. If you followed my lead so far, play back the results.
Not too shabby, is it? You clearly can see his head turn as if it were a 3D object. Remember that most characters, if human, have two ears. To have the character’s second ear coming around the right side of his head, create a new layer below all other layers. Copy the existing ear and paste it to this new layer in a blank keyframe midway between the motion tweens (around Frame 22). Then select Modify > Transform > Flip Horizontal to flip it.
Position the ear on the right side behind the head so it’s sticking out about half way. This is about as much of the ear you need to see (see Figure 40).
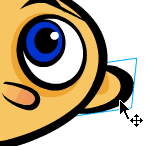
Figure 40. Positioning the second ear
Add a second keyframe on Frame 30 (where all the other keyframes reside) as shown in Figure 41.
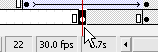
Figure 41. Adding a second keyframe
Go back to the ear’s first keyframe and reposition the ear almost completely behind the head. I have converted some of the other layers to outlines so you can see the ear’s new position (see Figure 42).
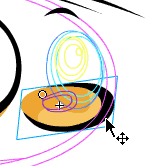
Figure 42. Repositioning the second ear
Now just apply a motion tween. Play back your animation to see the ear reveal itself as the head “turns” towards you (see Figure 43). This small detail adds an enormous amount of realism to the head turn as it helps create the illusion of the head being a rounded sphere (this requires Flash Player 8).
Figure 43. Final animated effect of the ear revealing itself during the head-turn
Feel free to scrub the Timeline and make adjustments to your symbols if something doesn’t feel quite right. This depends on how much of a perfectionist you are as well as on the complexity of your character. The boy character in this example is fairly complex, given the amount of objects I used in his design.
Custom Ease In/Ease Out Panel (Flash Professional 8 Only)
I’d like to add one more finishing touch to the head turn. As you know, motion tweens can look pretty static due to their constant rate of speed. They can look pretty jerky in their initial state. Thanks to a new feature in Flash Professional 8, however, you can add some “easing in and easing out” to make the transition softer. The trick is how to ease in and out inside of a single tween.
The first step is to apply the motion tween. You can do this in one of two ways:
- Right-click the frames in between the two keyframes. From the pop-up menu, select Create Motion Tween.
- Select all layers with the selection tool by clicking and dragging, highlighting them all in black. From the Tween drop-down menu in the Property inspector, select Motion.
Notice the Edit button in the Property inspector (see Figure 44).
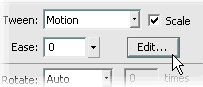
Figure 44. Click the Edit button to open the Custom Ease In/Ease Out panel.
Clicking this button opens the new Custom Ease In/Ease Out panel (see Figure 45).

Figure 45. New Custom Ease In/Ease Out panel
With the new Custom Ease In/Ease Out panel you have a lot more control over easing than you did with previous versions. The Custom Ease In/Ease Out panel displays a graph that represents the degree of motion over time. The horizontal axis represents the frames, while the vertical axis represents the percentage of change to the object.
The graph’s curve dictates the rate of change of the object. When the curve is horizontal (no slope), the velocity is zero; when the curve is vertical, you don’t have any easing or delay to the objects’ movement.
If you select the Use One Setting for All Properties check box, the current curve is applied to all properties (Position, Rotation, Scale, Color, Filters). If you deselect this check box, you can apply a separate curve to each of the properties, as follows:
- Position: Specifies custom ease settings for the position of an animated object on the Stage.
- Rotation: Specifies custom ease settings for the rotation of an animated object. For example, you can fine-tune how quickly or slowly an animated character turns around to face the user on the Stage.
- Scale: Specifies custom ease settings for the scale of an animated object. For example, you can customize the scale of an object more easily so it appears to be moving away from the viewer, then coming closer, and then moving away again.
- Color: Specifies custom ease settings for color transitions applied to an animated object.
- Filters: Specifies custom ease settings for filters applied to an animated object. For example, you can control the ease setting of a drop shadow that simulates a change in the direction of a light source.
- Play and Stop buttons: Lets you preview an animation on the Stage using all the current velocity curves defined in the Custom Ease In/Ease Out dialog box.
- Reset button: Lets you reset the velocity curve to the default, linear state.
Click the diagonal line once to add a new control point. You can precisely control the motion of an object by dragging the positions of the control points.
Using frame indicators (represented by square handles), you click where you want an object to ease in or ease out (accelerate or decelerate). Clicking the handle of a control point (the square handles) selects that control point, and displays the tangent points (hollow circles) on either side of it. You can use the mouse or the keyboard’s keys to drag the control or tangent points to new positions.
Tip: By default, the control points snap to a grid. You can temporarily turn this off by holding down the X key while dragging the control point.
Clicking on the curve away from any control points creates a new control point to the curve. Clicking anywhere away from the curve and control points deselects the control point that is currently selected.
To make an animation start gradually and end gradually, adjust the curve so it’s similar to Figure 46. I highly recommend experimenting by creating and editing control points and tangents and playing back your animation using the Stop and Play buttons in the lower left corner of the panel. It won’t be long before you have a good feel for the relationship between the curve and its effect on the animation.
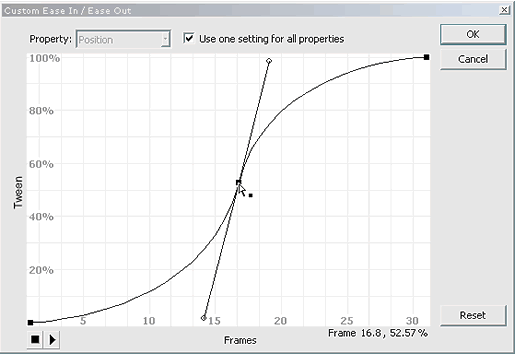
Figure 46. Using this ease in/ease out path
Now play back your animation. Notice how the head-turn eases in and then out as it approaches its end. To animate the head turning back again to its original position, you only need to copy frames from Frame 1 and paste them after the tween you just created. Repeat the same procedure by adding a motion tween, and for easing in and out and you have a character that can turn its head back and forth in a cool way.
Applying Filters
Yes, the impossible is now possible in Flash. Flash 8 introduces graphic filters and blend modes, which the Flash community has accepted with open arms. You can now apply effects such as Drop Shadow, Blur, Glow, Bevel, Gradient Glow, Gradient Bevel, and Adjust Color to any movie clip instance. So have fun with your character by applying a drop shadow.
The first thing to do is place your character in a movie clip symbol. In the Timeline, click and drag to select all frames across all layers. (Hint: start on Frame 1 in the upper left corner and drag diagonally to the last frame on the bottom layer.) This highlights your frames and layers in black. Select Edit > Timeline > Copy Frames (or press Ctrl+At+C) to copy the entire Timeline to the Clipboard. (You could also right-click anywhere on your highlighted frames and select Copy Frames from the context menu.) Now hold that thought until the next step.
Open your Library (Ctrl+L) and from the upper right drop-down menu, select New Symbol > and then select Movie Clip behavior and click OK. You are now in Edit mode for this new symbol. Select the first frame of the Timeline and select to Edit > Timeline > Paste Frames (or press Ctrl+Alt+V) to paste your selection, as shown in Figure 47. (You could also right-click over Frame 1 and select Paste Frames from the context menu.)
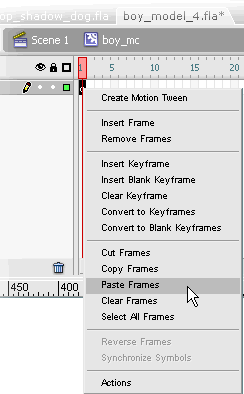
Figure 47. Right-clicking Frame 1 and selecting Paste Frames
Return to the main Stage and create a new layer. Locate the movie clip symbol you just created in the Library and drag it to the Stage on this new layer (see Figure 48).
Figure 48. Dragging the movie clip to the Stage
Delete all other layers that contain your original character. At this point your Timeline should have one layer and one movie clip symbol containing your character animation.
There are two kinds of shadows you can create. A standard drop shadow creates a shadow below the instance that is slightly offset from the original. This type of effect is often very flat and similar to a shadow cast against a wall or any other flat surface. It is not very convincing if you are trying to achieve a shadow cast on the ground. For a more realistic shadow effect, you need to add a few simple steps.
Duplicate the movie clip instance and place it behind the original instance. (You can keep the duplicate on the same layer and arrange it behind the original instance, or paste it to a new layer below the original.)
Select the duplicate instance and, in the Filters tab of the Property inspector, select Drop Shadow from the Plus (+) menu (see Figure 49). Next, adjust the strength level to around 45% and select Hide Object. This hides the movie clip object but reveals the Drop Shadow Filter properties. You can make further adjustments by setting Quality to Low, Medium, or High, or modifying the amount of blur, color, angle, or distance of the blur effect from the original graphic.
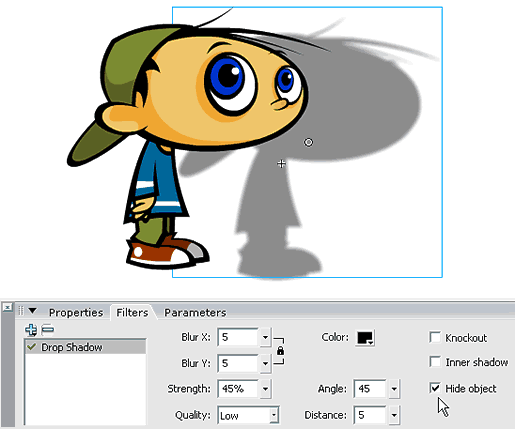
Figure 49. Drop Shadow filter applied to the duplicated movie clip instance
To prevent this effect from looking too much like a drop shadow against a flat wall behind the original object, use the Free Transform tool to skew the filtered movie clip instance. This technique requires some trial and error before you can apply it successfully. Squash and skew the instance until it looks as if the shadow is cast on a floor (see Figure 50). You may need to reposition the instance to make this look right.
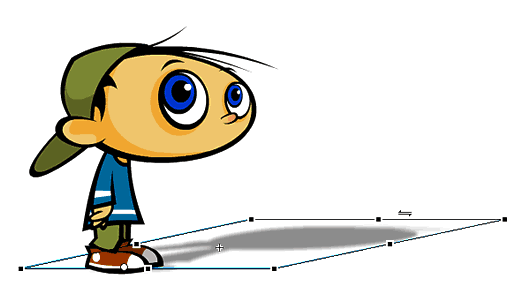
Figure 50. Duplicated movie clip skewed with the Free Transform tool
Test the movie and see the effect come to life.
When combining looping animations with several other looping animations, you can achieve some sophisticated visual results, as shown in Figure 51 (this requires Flash Player 8).
Figure 51. Examples of the 2.5D effect using the Drop Shadow filter
In this sample you can see how the drop shadow effect adds an exciting dimension to the animation. This animation is a series of movie clips containing looping animations of the boy and dog characters. In a future article I will explain how small animated loops can yield a lot of mileage to your movies.
I hope this article has helped you sharpen your Flash design and animation skills. There are several more animation techniques that you can achieve with Flash, such as full animation (often referred to as frame-by-frame), shape tweens, and image sequences from video or 3D animation programs. There are also a number of cool plug-ins available from other designers and animators that can help speed up your Flash workflow. Look for future articles that explore these techniques and tools.
Comments