
How Keying Works
How Keying Works
If you watch any television news, you’ve seen the keying technique in action. Weather forecasters use it all the time. The meteorologist stands in front of a radar image and points out important weather patterns in the background. If you observe the studio during the broadcast, the scene looks rather odd. The weather person stands in front of a green or blue wall and points to it while delivering the news, simultaneously looking at a monitor which shows them standing in front of the appropriate radar image. The green or blue color in the background is keyed out of the video signal and replaced with the radar image.
In many respects, you are already familiar with keying video if you know how to create masks in Adobe Photoshop or Macromedia Fireworks. As with masking, you target a color to be removed and then manipulate the edges and add a bit of feathering to smooth out the transition between the subject and the background. Both Premiere and Adobe After Effects use plug-ins for this task.
In Figure 3, you can see the mask that is applied to the video in Premiere. Anything within the black area will be masked. This type of mask differs from one in a graphics application, however, because it moves. For example, if I were to lean to the right, the white area would adjust itself to accommodate my movement. This is an important concept to grasp, especially in Flash Professional 8. If I place the video in a movie clip and attach a Drop Shadow filter to the mask, the shadow moves and changes shape in conjunction with the changing shape of the video mask.
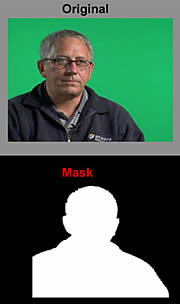
Figure 3. Mask used to remove the green background
The first thing you need to do is find out what you are working with. It is important when creating video that the project settings match those in the source file or you will be setting yourself up for problems at a later date.

Open the CMXGS.mov file (see the sample code download) in QuickTime and select Window > Show Movie Info (or press Control+I). The Movie Info dialog box provides you with the information you will need to create the project file in Premiere (see Figure 4). This tells you that the movie will have to be 320 x 240 pixels (a standard size for web video) and that the frame rate is to be 25 frames per second. The audio in this project is mono and 44.1 kHz.
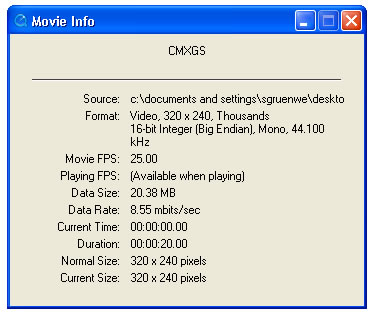
Figure 4. Information needed to create a project in Adobe Premiere
Comments