
Holes
I get email all the time asking how to make one photo show through a hole or shape in another image. You should be able to figure this out on your own if you’ve been through many of the other tutorials, but I can see that it is not an something that is easy for a beginner to understand. So, here you go. Short and sweet.


Open the picture that you want to be your surrounding or background image. Or simply create a new document with a solid background of the color you want behind or under your hole. In my examples, shown above, I simply used the default white document background.
Make a new, empty layer by clicking the New Layer button in the Layers palette, or by choosing Layer > New > Layer.
Go to File > Open and open the image that you want to have (part of) show through a hole in the picture that is already open.
In the toolbox, choose the move tool and click on the image. Drag it onto your first picture. Press the Shift key before you release it. The Shift key will cause it to “land” centered on the target document.
You should now have three layers in the Layers palette; your background picture at the bottom, an empty layer in the middle and the picture that you just dragged onto the original image will be the topmost layer. The top image is probably obscuring most or all of the lower layers. That’s okay.
Click on the top layer if it’s not still selected. Then choose Layer > Group With Previous. Once you do that, the top layer will totally disappear from sight.
Click on the middle, empty layer. Choose a selection tool such as the elliptical or rectangular marquee tool in the toolbox. Drag a selection that is approximately the shape and size that you want for the hole through which the top layer will show.
With that selection active, press Alt-Backspace (that’s the shortcut to fill with the current foreground color) or use Edit > Fill. It doesn’t matter what color you use. The Group With command allows the layer above to be visible only where there is content in the layer below. The layer below is, itself, invisible other than its limiting influence on the visibility of the layer above.
You can now use the move tool to move the hole around. Just be sure the middle layer (the one with the hole shape on it) is selected in the Layers palette before dragging with the move tool.
Or, you can drag the image above around within the hole by clicking on its layer and then using the move tool.
If your top layer is the wrong size or if you would like to rotate it, click on its layer and then use the Image > Resize > Scale (not the Resize > Image command; that resizes your entire document), or Image > Transform commands. Be sure and press the Shift key as you drag on a corner handle of the bounding box. Pressing the Shift key will constrain proportions and prevent you from distorting your picture.
If your top picture is too small, I would strongly recommend that you not enlarge it with the transform or scale commands. Enlarging will make your picture look lousy. If it’s a scanned picture, go back and rescan at a larger size. If it’s a digital picture, try starting with a smaller background image document size, scaling that picture (your bottom, background layer) down if necessary. See my page on Resolution for the reasons why upsampling is a bad idea.
If you would like a soft, blurry edge on your hole, select the middle layer and then choose Filter > Blur > Gaussian Blur. Move the slider in the Gaussian Blur dialog while watching your image to get as much softening as you wish.
You can make any shape, using any of the paint tools on the middle layer to alter your hole. For fun, and so you can truly understand how Group With works, I hope you’ll use the paintbrush to paint some strokes or shapes on the middle layer just for fun. The third example, above, shows a single stroke applied to the middle layer with a big soft brush.You can use the History palette, or undo, or just delete the layer and add a new one in order to get back to where you started.
If you like, you can use the shape tool or type tool to make your hole. If you do that, you won’t need to add an empty layer; the shape and type tools creates their own layer when you apply them. If you find that the edges of the shapes are to hard, you can simplify the shape or type layer (click the simplify button on the shape tool’s options bar, or use Layer > Simplify Layer), then apply a blur to the layer as already described (you can’t apply filters to shapes or type without first simplifying them).
If you want to apply a shadow or bevel to your hole, apply a shadow or bevel layer style from the Layer Styles palette to the middle layer (the bottom layer in your grouped pair). In the examples shown above, the hearts have a bevel style applied, and the type has a drop shadow style.
The Layers palette for the hearts image looks like this: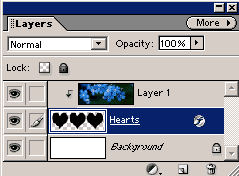
And, the Layers palette for the stroke example (third and last, above) looks like this: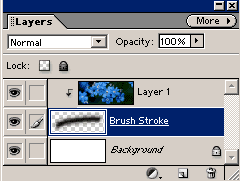
Notice the underlined layer name for the base layer in the group, and the partially indented thumbnail with downward pointing arrow for the layer above that is grouped with it.
For a follow-up tutorial showing you how to blend one image into another, see the Fade In lesson.
Comments