
Hacking Preferences and Documents part 4
Saving Files
You would think that saving files would be dead easy: Select Save and click OK. If only it were that simple. There are a few gotchas that can, well, get you. The following hacks show you how to avoid some of them, as well as how to include, exclude, and, should you need to, prevent unauthorized access to your files.
Failsafe Way of Including a Background Layer
Background layers are essential in some workflows because not all applications can read a Photoshop layered file. However, they will read a PSD file provided that it has the image on the Background layer or that Maximize PSD File Compatibility is turned on in Preferences (it will increase the file size and take longer to save, and that can be a big minus). Programs that cannot read features, such as adjustment layers, effects, and so forth, will ignore them and use only the composite version. If you are flattening files, it’s a good idea to fall into a workflow that minimizes the chances of your making mistakes. For example, you can create an action that duplicates documents and then flattens the duplicate for output, thus ensuring that the master layered files are kept out of harm’s way.
You can also make any layer into a Background layer from the Layer>New submenu. If your data is spread over lots of layers, stamp them all into a new layer and then convert that layer into a Background layer. To stamp all visible layers into one layer, Ctrl+Alt+Shift+E (Windows), Ф+Opt+Shift+E (Mac OS).
Saving in Large Document Format

If the file you are working on grows beyond 4GB (the maximum file size supported by the TIFF and PSD formats) and you want to save all the Photoshop features, such as adjustment layers, vector data, and so forth, you can save your document in the large document PSB file format. PSB supports documents up to 300,000 pixels in both directions. The one downside of saving in this format is that you can open it only in Photoshop CS or Photoshop CS2.To save in PSB format, select the Enable Large Document Format (.psb) option in the File Handling screen in Preferences.
Password Protecting Files
Do you need to send a file to a client but don’t want the client to make changes to it or print it? Save the file as a PDF and then, in the Save Adobe PDF dialog box, limit the permissions. To do so, choose File>Save As and then from the Save Type As (Windows), Format (Mac OS) dialog box, choose Photoshop PDF. In the Save Adobe PDF dialog box, select Security from the options and then select the options for Security and Permissions. You can require the recipient to use a password to open the document, print it, make changes to it, copy it, or extract data from it.
Appending File Extensions Automatically
Are you a Windows user? Do you constantly receive Macintosh-originated files that have either an incorrect file extension or no extension appended to the filename? Have a word with the senders and point out to them the options for automatically appending extensions. They can be found in Preferences>File Handling. The three available options are Never, Always, and Ask When Saving. Chances are they have the Never option selected because extensions are not needed by the Mac OS in the same way as they are by Windows.
Saving Previews
The default settings for image previews in the File Handling screen of Preferences always create an icon and a thumbnail and then embed them in your file (Figure 5-7). This is so that utilities such as Explorer (Windows) and Finder (Mac OS) can show an icon-sized preview and a thumbnail-size preview to help you locate the right files on your hard drive.
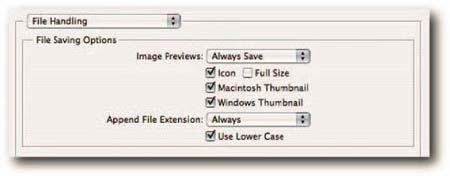
FIGURE 5-7: In the File Handling section of Preferences, you can choose how you want to save previews with your file.
You can change the Preferences to include a full-sized preview along with the icon and the thumbnail. This option adds a compressed JPEG that can be used by third-party image browsers, such as ACDSee, IrfanView (Windows), iView MediaPro (Mac OS), and so forth. Because it has the same dimensions as the image, it can add considerably to the file size, and you may wish to leave this option off unless you see the benefits in your third-party application. You can also choose not to include an icon or a thumbnail if you so wish by setting the Image Previews option to Never Save, or Ask When Saving.When you choose the latter option, you are given the choice in Windows to embed a thumbnail and on Mac OS an icon and or a thumbnail.
Reverting an Accidentally Saved Document
If you have accidentally pressed Ctrl+S (Windows), Ф+S (Mac OS) when you meant to do a Select All, or meant to press another key combo, don’t despair or throw your keyboard across the room. All is not lost.To undo any consequential damage:
– Select a previous history state in the history palette, do a save, and then select the last history state to get back to where you were before the accidental save—this is one good reason for selecting Allow Non-Linear History in the History palette options.
– Select the first snapshot to revert to the open document state, do a save, and then select the last history state. This recourse is available only if you have selected Automatically Create First Snapshot from the History palette options (see later in this section).
Unfortunately, if you applied any color management settings when you opened the file and then saved it, there is no way of reverting to the state it was in before you opened it. For instance, if you assigned a profile or converted it to your working color space, selecting a history state or snapshot won’t revert the file back to the original state. After you have saved, accidentally or in order to revert to the original, the file on disk will be overwritten and include the changes made to the color in the Missing Profile or Embedded Profile Mismatch dialog box. This is because Photoshop bases the first snapshot on the opened document state and not the state of the file on disk. Although the Automatically Create First Snapshot option eats into your Photoshop RAM allocation, especially if the document happens to be a large document, in 16-Bits/Channel mode, or both, it’s a good tradeoff if you can spare the RAM or put up with Photoshop writing to scratch disk earlier than it would otherwise. As pointed out previously, a first snapshot can pull you out of the mire when you have to revert to the opening state at any time during an editing session, or when you have to revert elements to the opening state by using the History Brush tool (you can do the latter as long as you haven’t rotated or resized the document since it was opened).
To turn the Automatically Create First Snapshot option on/off, select History Options from the History palette menu and then choose Automatically Create First Snapshot from the pop-up dialog box. Click OK.
Comments