
Hacking Preferences and Documents part 3
Comparing Documents for Differences
Sometimes you need to compare two files that might look identical when opened but that you suspect differ in some minor detail. You can do this in Photoshop without having to rely on visual feedback.To do so, take the following steps:
1. Open the two files that you want to compare.
2. Select the Move tool.
FIGURE 5-4: Duplicating a document in ImageReady by dragging a tab.
3. Working in the document windows, drag the contents of one file into the other by pressing Shift (holding down the Shift key will ensure that the content of the two files “pin registers”). For best results, the two documents need to have the same pixel dimensions.
4. Change the blend mode of the top layer (the one you just dragged) to Difference.
5. Merge the two layers either by using the shortcut keys of Ctrl+E (Windows),Ф+E (Mac OS) or choosing Merge Visible or Flatten from the Layers palette menu.
6. Close the original.
At this stage, you can simply hover the mouse cursor over the image and see whether the color readings change in the Info palette. However, to be absolutely sure, you can let Photoshop do the work by choosing Image>Adjustments>Equalize. If the two images are exactly the same, Photoshop will warn that it cannot equalize because the image contains only one brightness value. If there is a difference, it will be accentuated and you should be able to see it (Figure 5-5).


FIGURE 5-5: Comparing two documents for dissimilarity by using the Difference layer mode followed by the Equalize command.
Opening a Composite Version of a Layered Document
Sometimes it can be useful to open a composite version of a layered document—especially if it contains hundreds of layers and may take eons to open and you need only to do some quick retouching or editing that doesn’t require layers. To do so, hold down Alt+Shift (Windows), Opt+Shift (Mac OS) while clicking the Open button in the Open dialog box (the button and dialog box might be named differently depending on your platform).You can also hold down the same modifier keys and double-click a thumbnail in Bridge or select File>Open. One small caveat: The file must have been saved with a composite layer or Photoshop can show you only the following warning in four different languages: “This layered Photoshop file was not saved with a composite image.” If you change your mind and decide to open the layered file, just click the Cancel button.
Adding Canvas Size
The Canvas Size command, located in the Image menu, enables you to increase or decrease the document dimensions in any one of eight configurations, as well as equally on all four sides. To increase size, enter new units in the Width and Height text fields. To decrease size, add the minus sign before the figure.
If your current canvas size is an odd size, for example, 12496 Ч 1689 pixels, and you want to increase/decrease the size by a known number of pixels, select the Relative checkbox and then add the figure in the text appropriate field. Sometimes this action can be faster than searching for a calculator or trying to do the math in your head.
Adding Text and Audio Annotations
When you work in a collaborative environment and need to hand off complex files, you can protect your back by adding text notes or audio annotations (Figure 5-6). In the same vein, you can include information to remind yourself while working on a document that may take days or even weeks to edit.
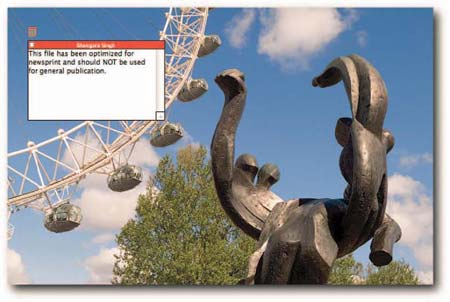
FIGURE 5-6: A nonprintable note added as a reminder that the file has been targeted for newsprint.
The notes are nonprintable and can be placed anywhere on the canvas or the document window: right in the middle to make people take note (pun intended) or in one corner of the canvas so that it’s unobtrusive. You can collapse the note window by clicking the Close button on the grab bar and expand it again by double-clicking on the note icon. The notes can be read and annotations heard in Photoshop and Acrobat.
To add an annotation, select the Notes tool from the Toolbox, click in the document window, and then select options as required:
1. Enter an author name or other text. The text will appear in the title bar of the notes window.
2. Choose a font size from the pop-up menu.
3. Select a color for the title bar; this will also be used for the note and audio annotation icon.
4. Click in the note window and type your message; you can compose your message in a text editor if it’s long, perform a spell check, and then paste it.
To add an audio annotation:
1. Make sure that a suitable microphone is plugged into the audio-in port of your computer and that it’s working.
2. Select the Audio Annotation tool, click in the document window, and then select options as required (see preceding list).
3. Click in the document window and then select Start in the Audio Annotations dialog box.When you have finished, click the Stop button.
Notes and Audio Annotations may also be imported from a PDF or FDF (Form Data Format) file.To load, choose File>Import>Annotations and then click the Load button.
Comments