
Getting Started
Getting Started
In this article, you will build a website for a fictional travel agency that books vacations in the Caribbean. You will use Dreamweaver and KTML to:
- Create the basic page design using Starter Pages.
- Connect to the database server and display the latest travel destination.
- Create a page that allows your users to edit the travel destination’s description.
- Manage the site content using a visual HTML editor directly in the browser window.
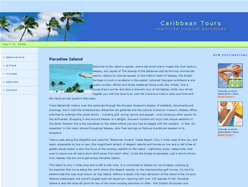
Figure 1. Preview of the completed application
Before you start building the application, make sure that:
- You have a running database and application server.
- You have installed the required software: Dreamweaver and KTML Lite.
- You have correctly defined a Dreamweaver site with a PHP_MySQL testing server.
The next two sections briefly present how to accomplish these steps.
Setting Up the Development Framework
First you have to set up your application server environment and install Dreamweaver 8 and KTML Lite.

This article assumes that you have already installed and configured a web server with PHP and MySQL support. If this is not the case, take a look at the following articles from the Developer Center:
- Setting Up Your PHP Server Environment Using Linux, Apache, MySQL and PHP (by David Sklar) if you use the LAMP platform.
- Setting Up the PHP, MySQL, and Apache Server Platform on Macintosh OS X for Dreamweaver MX (by Minh Huynh) if you use Mac OS.
- Setting up PHP for Microsoft IIS (by Andrew Stopford) if you’re a fan of IIS.
If you’re using Windows, also take a look at WAMP Server, a free tool that automatically installs Apache, PHP 5, MySQL server, phpMyAdmin, and SQLiteManager. For detailed instructions on installing WAMP Server.
Defining Your Site
Before you build the application, set up your site in Dreamweaver. For a quick site setup, take a look at the TechNote: How to Define a Site in Dreamweaver.
The site will only contain two files and the images that are associated with them, as you can see in figure 2:
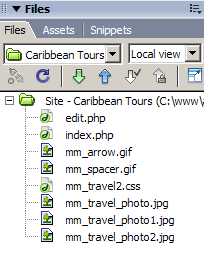
Figure 2. File structure for the travel agency site
You will create these files in the sections that follow, using Dreamweaver’s Starter Pages. If you want to skip these steps, unzip the sample file archive into the site root.
In the next section, you will set up and connect to your database.
Setting Up Your Database
The application is entirely dynamic. It stores travel destinations and their descriptions into a database table. As you will only implement displaying and editing travel destinations, the database will only need one table: destination_dst.
Table 1 lists the structure of the travel destinations table.
| Travel destinations | Destination_dst |
|---|---|
| id_dst | Primary key: unique identifier for each destination. |
| name_dst | The travel destination name. |
| date_dst | The date when the destination has been added. |
| description_dst | Description of the destination. Contains HTML code and is displayed in the browser. |
The SQL code for creating this table is pretty straightforward. Notice that the ID is set to automatically increment, so the latest entry will have the highest ID and there are no repeating ID’s.
CREATE TABLE 'destination_dst' (
  'id_dst' int(11) NOT NULL auto_increment,   'name_dst' varchar(255) NOT NULL,
  'description_dst' text NOT NULL,
  'date_dst' date NOT NULL,   PRIMARY KEY  ('id_dst') )
To add user authentication to the application, you will need to add another database to store user information, at the very basic, the name, e-mail address, and password.
Now that you have an idea of how your database will look, fire up the sample SQL script in your MySQL console or in your favorite database management software (such as phpMyAdmin) and create the database. Include the following line at the beginning if you want to create a separate database:
create database travel_agency;
When creating the database, consider using a naming convention to ease further development. Read more about guidelines on database naming conventions can be found the article, Naming Conventions in Application Development.
Before you can connect to the database, you have to create the site files.
Comments