FreeHand MX Extrude Tool 101
FreeHand MX Extrude Tool 101
Prerequisites:
Before reading about this TechNote you should have studied and performed the steps in “Lesson 3: Using the Extrude Tool” in the FreeHand MX lessons. Choose Help > Learning FreeHand MX to access this and other lessons.
Background Information
The Extrude tool was originally developed as a feature to be used with text. As development progressed, it became evident that a broader range of objects could be manipulated with this tool. As a result, the User Interface (UI) was expanded to accommodate new extrude features. The Object panel contains the various items that control the look of the extruded object including free rotation of the object, lighting and profiles. This TechNote will cover some of the less obvious UI features of the Extrude tool. In addition we will point out a few limitations of the Extrude tool.
Working with text
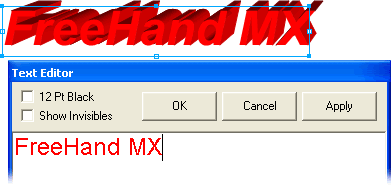
As mentioned above, the Extrude tool was originally designed for working with text objects. When you extrude text in FreeHand MX, it remains fully editable. In fact unless the extruded text has been transformed you can change the spelling, font, kerning or any other property of a text object that has been extruded. You can even run the spell checker feature on the extruded text.
To edit text do the following:
| 1 | Using the text tool, click the extruded text. This will open the Text Editor |
 |
|
| 2 | Select the text you wish to change, or select any point on the line of text. Enter new text, or change properties in the Object panel. After selecting OK the text object on the page will be updated and the extrude will adjust to the new outlines. |
Changing the color of an extrude
Extruded objects are fully editable for color and shape.
To edit the color of an extrude:
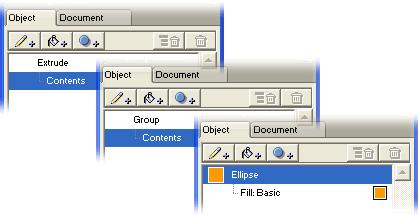
| 1 | Using the Pointer tool, select the extruded object |
| 2 |
Double-click the Contents property in the Object panel . The top property changes to “Group”. You are now inside the contents of the extrude, and need to drill down another level. |
| 3 | Double-click the Contents property under the Group property. |
| 4 | The object level properties are now revealed. Select the property you wish to change and change the settings in the Object panel. |
 |
|
| Note: Once you are at this level, the object’s shape can also be modified using any of the modifier tools, such as the Subselect, Freeform and Bend tools. |
Working with profiles
Drawing a path to use as a profile and applying it to an extrude has a specific series of steps to achieve success when working with the Extrude tool.
|
|
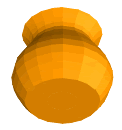 |
| Before applying a profile to an extrude |
After applying a profile to an extrude |
To successfully create a profile to apply to an extrudee object:
| 1 | Draw the path in the direction and orientation shown, left to right, with the centerline of the contour at the bottom as shown in the following example (notice that the bottom of the page was used as a guide.) |
|
|
|
| Note: Drawing a profile in a different orientation, like the top or a side of the page, will produce strange results. Experiment with various paths to learn how to use profiles. | |
| 2 | Cut or copy the path to the clipboard. |
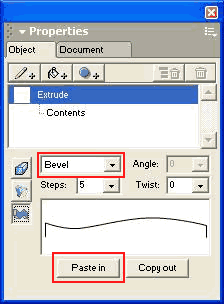
| 3 | Select the extruded object and choose the Profile button in the Object panel. |
| 4 | Select the Bevel option from the extrude type pop-up. Select the Paste in button at the bottom of the panel to use the copied path as the extrusion profile shape. |
 |
|
| Note: The Steps setting can be an aid in speeding redraw or improving the quality of the rendered object. To improve redraw speed, reduce the value in the Steps field. To get a smoother extrusion, increase the value in the Steps field. Generally it’s a good idea to use a smaller value while working with your file and then increase the Steps before exporting or printing. |
Resetting an extrude
An extruded object which has been rotated or transformed cannot be edited for text or attributes. If you try you will see the following alert:
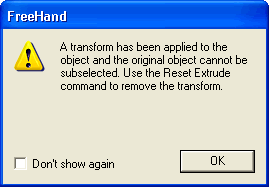
If you get the above error message select Modify > Extrude > Reset Extrude to reset the Extrude.
Note: One way to transform or rotate an extrude is to select the Extrude tool and double click the object that has the Extrude applied to it. This will allow you to access the rotation mode of the extrude tool:
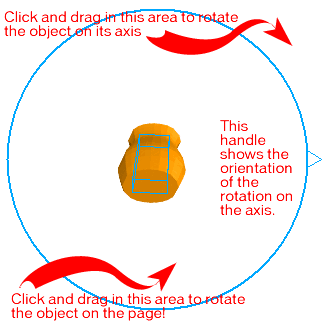
Limitations of the Extrude tool
Although the Extrude tool is very powerful there are a few things which cannot be done:
| Mapping (skin or texture) cannot be applied to the surface of an extrude. | |
|
Multiple extrudes cannot be linked together to make a hinged joint |
|
|
Profiles cannot be applied to text that has been extruded. Note: The calculations that are used to extrude objects can be very complex. Using several extruded objects in a FreeHand MX document can have negative effects on performance. |
|
| Profiles cannot be applied to an object that is extruded from a composite path, such as a donut shape. |


Comments