
FrameMaker 7.0 Tutorial: Tables
About Tables
Tables make information easy to find and understand and are often used for illustrating comparisons among similar data. A table usually consists of a heading row and one or more body rows and may also contain a title.
The following sections show you how to create this table.
Inserting a Table
You can insert a table anywhere in a FrameMaker document. To insert a table:
- Open FrameMaker.
- Select File > New > Document.
- Type This is an example of a table:.
- Select Table > Insert Table.
The Insert Table dialog box appears.
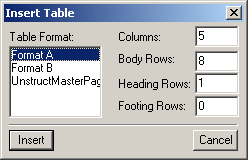
- From the Table Format list, select Format A.
Note: The table formats that are available in the Table Format list are stored in a catalog, just like character or paragraph formats. Every blank document includes two default formats, Format A and Format B. - In the Columns box, type 3.
- In the Body Rows box, type 5.
- Click Insert.
The table is added to the document. (An anchor symbol
 appears at the table’s insertion point. If you don’t see an anchor symbol, your text symbols may be hidden. Select View > Text Symbols to display the symbols.)
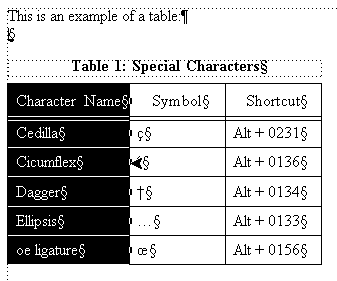
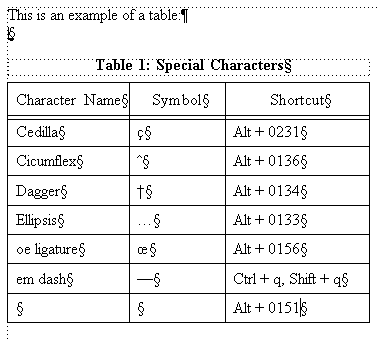
Your table should look similar to the following.
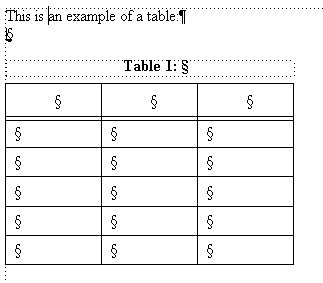
Note: The table format used in the example above, Format A, includes a table title that is formatted using the TableTitle paragraph tag. This paragraph tag includes an autonumber, so that subsequent tables within the document will be incremented in the order that they appear.
Adding Content to a Table
You can now add information to your table.
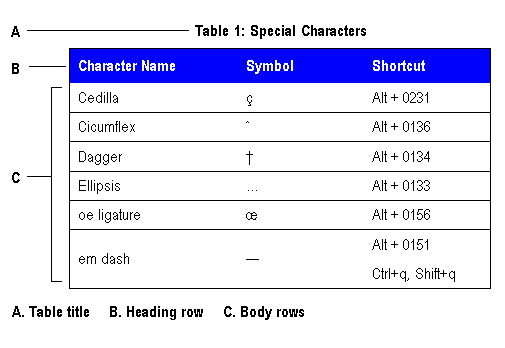
- Place your cursor within the TableTitle paragraph, and type Special Characters.
- Place your cursor in the first heading cell, and type Character name.
- Press Tab to move to the next heading cell, and type Symbol.
- Press Tab to move to the last heading cell, and type Shortcut.
- Press Tab to move to the first cell in the first body row, and type Dagger.
- Press Tab again to move to the second cell in the first body row.
- Type a dagger symbol by pressing (and holding) the Alt key and typing 0134 (then release the Alt key).
A dagger symbol should appear at the insertion point.
Note: If the dagger symbol does not appear, try again. Be sure to press and hold the Alt key while you type 0134. - Repeat the steps above to add content to the remaining cells. Use the shortcuts described in the table to add the symbols.
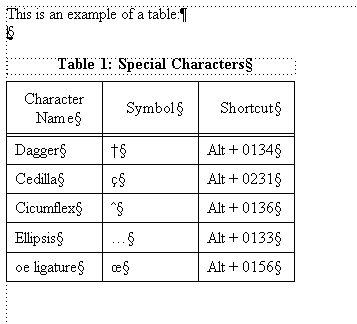
Your table should look similar to the following.
Rearranging Rows and Columns
Once you have entered the content, you can rearrange rows and columns, and sort the columns in ascending or descending alphabetical order.
To move a row:
- Place your cursor in the cell that contains the word Dagger.
- Click and drag to the right until the entire row is selected.
Tip: You can also press Esc+t+h+r to select the row. (Press Esc, and then press t h r.) - Press Ctrl + X to cut the selected cells from the table.
The Cut Table Cells dialog box appears.
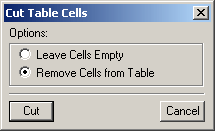
- Select the Remove Cells from Table option, and click Cut.
- Place your cursor in the cell that contains the word Circumflex, and press Ctrl + V.
The Paste Rows dialog box appears.
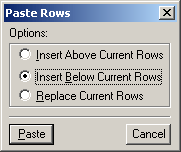
- In the Paste Rows dialog box, select Insert Below Current Rows, and click Paste.
Your entries should appear in alphabetical order.
Resizing Cells
Notice the heading row text wraps around to the second line. You can resize the cells of your table so that the text does not wrap. To resize table cells:
- Place your cursor in the cell that contains the words Character name.
- Select Table > Resize Columns.
The Resize Selected Columns dialog box appears.
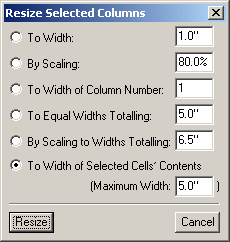
- Select the To Width of Selected Cells’ Contents option.
- Click Resize.
Resizing Columns by Dragging
Another way to resize columns is to select the column and drag it to the new width. To resize columns by dragging:
- Place your cursor in the cell that contains the words Character name.
- Click and drag downward until the entire column is selected.
- Move the cursor over one of the sizing handles until the cursor turns into an arrow, as shown in the figure below.
- Click the sizing handle, and drag it to the right.
The column is still too wide.
- Press Ctrl + Z to undo.
Instead, you should make the entire table wider.
- Place your cursor in the cell that contains the words Character name.
- Click and drag down and to the right until the entire table is selected.
Tip: To select the table, you can also press Esc, and then press t h t. - Click one of the sizing handles on the right side, and drag it about an inch to the right to resize the entire table proportionally.
Adding Rows or Columns to a Table
If you need to add information to your table, you can add rows or columns. To add rows or columns:
- Place your cursor in the cell that contains the word oe ligature.
- Select Table > Add Rows or Columns.
- In the Add Rows or Columns dialog box, select Add 1 Row, and select Below Selection from the pull-down menu.
- Click Add.
A new row is added to the end of the table.
Straddling Cells
At times, you may need to join or merge two cells into one; this is known as straddling.
To straddle table cells:
- In the first column of the new row, type the words em dash.
- Press Tab to move to the next cell.
- Type an em dash by pressing Ctrl + q and then Shift + q.
An em dash appears at the insertion point. - Press Tab to move to the next cell.
- Type again Ctrl + q and then Shift + q.
- Place your cursor in the last row, and press Ctrl + Enter to add a new row to the table.
- Press Tab twice, and type Alt + 0151 in the Shortcut column.
Your table should look similar to the following.
Because there are two shortcuts for creating an em dash, you need to straddle two cells.
- Select the cell that contains the words em dash, as well as the empty cell below it.
- Select Table > Straddle.
- Follow Steps 6 and 7 to straddle the two cells in the Symbol column the same way.
Your table should look similar to the following.
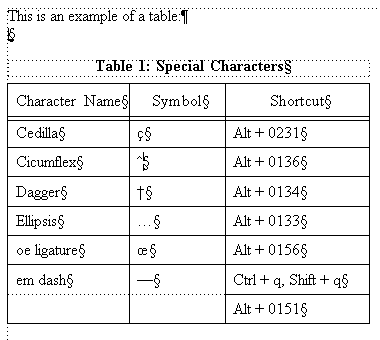
Note: You can straddle cells horizontally as well. To straddle cells horizontally, select the cells that you wish to straddle, and follow the steps above.
Aligning Text within a Cell
To align text within a cell:
- Place your cursor in the cell that contains the words em dash and open the Paragraph Designer (Ctrl + M).
- Select the Table Cell tab.
- From the Cell Vertical Alignment pull-down menu, select Middle.
- Click Apply.
Note: Do not click Update All. If you select Update All, all paragraph tags named CellBody will be altered to match the current tag. - Follow the steps above to align the em dash symbol.
- Close the Paragraph Designer.
Take a look at your table. You can hide the borders and text symbols by choosing View > Borders and View > Text Symbols to get a better view.
Applying Custom Ruling
To customize the ruling in your table:
- Place your cursor in the heading row, and press Esc, and then press t h r to select the entire row.
- Select Table > Custom Ruling & Shading.
- From the Custom Ruling & Shading dialog box, select Thick from the Apply Ruling Style column.
- In the To Selection area, select Bottom located in the Outside Edge group.
- Deselect the Top, Left, and Right check boxes.
- Deselect the Row and Column check boxes located in the Inside Borders group.
Your settings should look similar to the following.
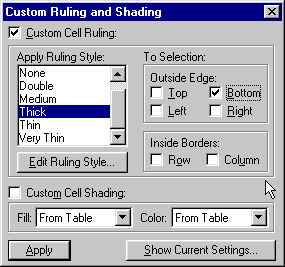
- Click Apply.
The table now has a thick line instead of a double line to separate the heading
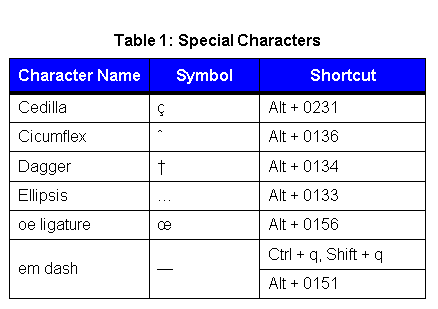
Applying Custom Shading
You can also customize shading within the table. To apply custom shading:
- Place your cursor in the heading row, and press Esc, and then press t h r to select the entire row.
- Select Table > Custom Ruling & Shading to open the Custom Ruling and Shading dialog box.
- Select Custom Cell Shading.
- From the Fill pull-down menu, select 100%.
- From the Color pull-down menu, select Blue.
- Click Apply.
The heading row now includes custom shading.
Formatting Table Contents
To format the contents of your table:
- Place your cursor in one of the heading cells.
- Press Ctrl+M to open the Paragraph Designer.
- Select the Default Font tab.
- From the Family pull-down menu, select Arial.
- From the Weightpull-down menu, select Bold.
- From the Color pull-down menu, select White.
- Click Update All.
- Place your cursor in one of the body cells.
- From the Family pull-down menu, select Arial.
- Click Update All. (If you get a message about overrides, click Retain Overrides.)
- Place your cursor in the TableTitle paragraph.
- Within the Paragraph Designer, select Arial from the Family pull-down menu.
- Click Update All.
- Close the Paragraph Designer.
Your table should look similar to the following.
Creating a New Table Format
The custom ruling and shading that you added in the previous sections affect this table only. To create tables with a consistent look throughout a document, you can use the Table Designer to create a new table format.
To create a new table format:
- Click View > Symbols to turn on text symbols.
- Double-click the anchor symbol to select the entire table.
- Press Ctrl + T to open the Table Designer.
- In the Table Tag box, type My Format.
- Click Apply.
- In the New Format dialog box, click Create. (Make sure the Store in Catalog and Apply to Selection check boxes are selected.)
Your new table format is available from the Insert Table dialog box.
Controlling Tables that Break Across Pages
A table that wraps to the next page or column requires extra formatting. When a table breaks across a page, it is good practice to repeat the headings and add text to indicate that the table is continued from the previous page. FrameMaker automatically repeats the table title and heading, but does not include continued text. FrameMaker also provides the ability to add page breaks within a table. In this section, you add the Table Continuation variable to your table title and insert a page break within your table.
Adding the Table Continuation Variable
To add a continuation variable:
- Place your cursor at the end of your table title.
- Select Special > Variable.
- From the Variables list, select Table Continuation.
- Click Insert.
A non-breaking space is added to the end of your table title. When the table wraps to the next page, the following text will appear after the title: (continued)
Inserting a Page Break
To insert a page break:
- Right-click the row where you would like to insert a break.
- Select Table > Row Format.
- From the Row Format dialog box, do one of the following:
- From the Start Row: pull-down menu, select Top of Page.
- From the Keep With: section, select Next Row.
- Click Set.
You can also set the minimum number of rows that appear on the next page by doing the following:
- Place your cursor within the table, and open the Table Designer.
- Select the Basic tab.
- In the Orphan Rows box, type the number of rows to include on the next page.
Tip: You can prevent a table from breaking across pages by specifying a large number, such as 99. - Click Apply to Selection.
Helpful Hints
Helpful tips for working with tables:
- To open the table designer, press Ctrl + T on your keyboard. To select the entire table, double-click the anchor symbol.
- To delete a table, press delete when the table is selected.
- To remove the title of a table, open the Table Designer, and select the Basic tab. From the Title Position pull-down menu, select No Title.
Comments