
FrameMaker 7.0 Tutorial: Cross-References
Opening and Renaming the Sample File
For this tutorial, you use one of FrameMaker’s sample documents. To open and rename the sample file:
- Open FrameMaker, and select File > New > Document.
- In the New dialog box, click Explore Standard Templates.
- Click Down to view the rest of the list.
- Under the Book heading, click Chapter, and then click Show Sample. (If you receive an error stating that the document uses unavailable fonts, click OK.)
- Select File > Save As.
- In the File name box, type Chap1.fm, and click Save.
Note: If you are working in the TCM computer lab, save the file to your lab account. If you do not have a lab account, please contact your instructor.
Inserting a Cross-Reference
This secition describes how to insert the following cross-reference:
For more information, see Table 1 on page 3.
To insert the cross-reference:
- Place your cursor at the end of the first paragraph, and type For more information, see.
- Press the space bar once to add a space to the end of the line.
- Select Special > Cross-Reference.
The Cross-Reference dialog box appears.

- From the Source Type pull-down menu, select Paragraphs.
- From the Paragraph Tags scroll list, select TableTitle.
- From the Paragraphs list, select TABLE 1: Ridebis et licet rideas.
- From the Format pull-down menu, select Table Number & Page.
- Click Insert.
- Type a period to complete the sentence.
FrameMaker inserts a cross-reference to the table on page 3 using a predefined cross-reference format.

Understanding Cross-Reference Formats
Cross-reference formats are a combination of text and “Building Blocks.” Building Blocks are code that tells FrameMaker exactly what to insert for the cross-reference. For example, the format Table <$paranumonly> on page <$pagenum> tells FrameMaker to insert the word Table, the table number, the words on page, and then the page number. You can explore other Building Blocks by selecting Edit Format from the Cross-Reference dialog box.
Customizing a Cross-Reference Format
You can customize cross-reference formats by adding or removing text and building blocks.
To customize a cross-reference format:
- Double-click the cross-reference that you just created.
- Within the Cross-Reference dialog box, click Edit Format.
- In the Definition text box, delete everything except page <$pagenum>.
- In the Name box, type Page Number.
Your settings should look similar to the following.
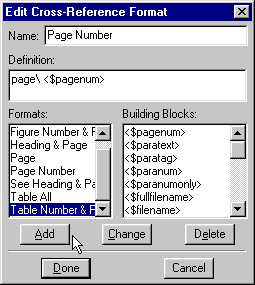
- Click Add.
- Click Done, and then click Replace.
Your custom cross-reference should appear within your document.
Creating a Cross-Reference Format
You can also create your own cross-referenct formats using the building blocks that Framemaker provides.
To create your own cross-reference format:
- Select Special > Cross-Reference, and then click Edit Format.
The Edit Cross-Reference Format dialog box appears.
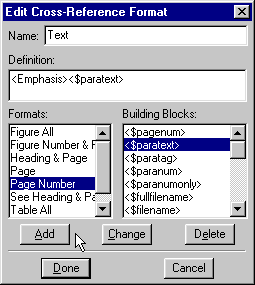
- Delete everything in the Definition box.
- From the Building Blocks list, select <Emphasis>, and then select <$paratext>.
- In the Name box, type Text.
- Click Add.
Your new cross-reference format should appear in the Formats list.
Inserting a Cross-Reference to Another File
To insert a cross-reference to another file:
- Select File > New > Document, and click Explore Standard Templates.
- From the Standard Templates, open the Front Matter sample file.
- Save the file with the name Preface.fm.
- Select Window > Chap1.fm to return to Chap1.fm.
- On the first page, place your cursor after the second paragraph, and press Enter.
- Type This book, and press the space bar once to add a space to the end of the line.
- Select Special > Cross-Reference.
- From the Document pull-down list, select Preface.fm.
- From the Paragraph Tags scroll list, select TitleBook.
- Select Great Events of the Twentieth Century from the Paragraphs list.
- From the Format pull-down list, select Text, and click Insert.
The cross-reference appears as text, “Great Events of the Twentieth Century,” and provides a cross-reference to the Preface.fm file.
Updating Cross-References
Cross-references in Framemaker are automatically updated when you open a file. You can manually update cross-references using the procedure described in this section.
To update cross-references:
- Within the Preface.fm file, change the title of the document to “Great Events of the 1980s.”
- Select Window > Chap1.fm to return to Chap1.fm.
- Select Edit > Update References.
- From the Update References dialog box, select All Cross-References, and then click Update.
The cross-reference in Chap1.fm changes to reflect the new title.
In this tutorial, you learned how to insert a cross-reference, customize an existing cross-reference format, create a custom cross-reference format, and update cross-reference formats. Experiment with other cross-reference formats and create a few of your own.
Comments