
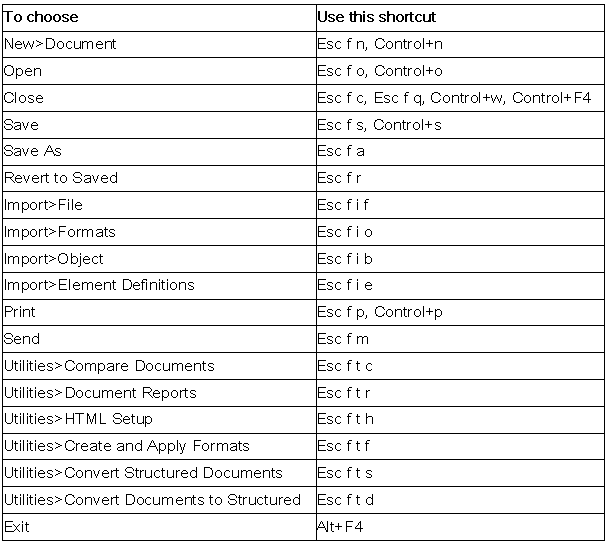
FrameMaker 7.0 Tutorial: Conversion Techniques
About Document Conversion
FrameMaker provides several method for importing and exporting information. You can import information by copying and pasting into a FrameMaker document, or you can use the Import command. You can use the Save As feature to save your document to other formats.
Getting Started
Before you begin, you must download and save the source files.
To download and save the source files:
- Right-click one the following link, and click Save Target As.
- Save the file to a location on your computer.
Note: If you are working in the TCM computer lab, save the file to your lab account. If you do not have a lab account, please contact your instructor. - Repeat the previous steps for each file.
Using Copy and Paste
FrameMaker allows you to copy and paste text and graphics into a document. When you use the copy and paste method, all formatting is lost unless you are copying from one FrameMaker document to another. If you paste a format other than plain text, FrameMaker places the object in an anchored frame. Depending on the format of the file, FrameMaker may paste the object as a graphic.
When you paste text from a tab-deliminated file, FrameMaker allows you to convert that text into a table. The conversions.txt source file is a tab-deliminated text file that was exported from Excel. In this exercise, you use the source file to copy and paste text into a FrameMaker document, and then convert that text into a table.

To use copy and paste:
- Locate the directory in which you saved the source files, and open conversions.txt.
- Select the text (Ctrl+A), and then copy the text to the clipboard. (Ctrl+C)
- Within FrameMaker, open a new document.
- Paste the text from the clipboard into your document. (Ctrl+V)
- Select the text within your document.
- Select Table > Convert to Table.
The Convert to Table dialog box appears.
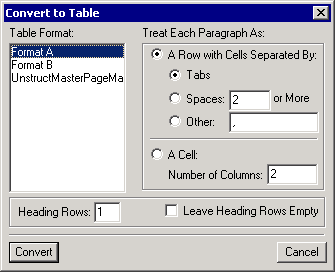
- From the Table Format list, select a table format.
- From the Treat Each Paragraph As area, select A Row with Cells Separated By and Tabs.
- Click Convert.
- Resize the table cells to view the text.
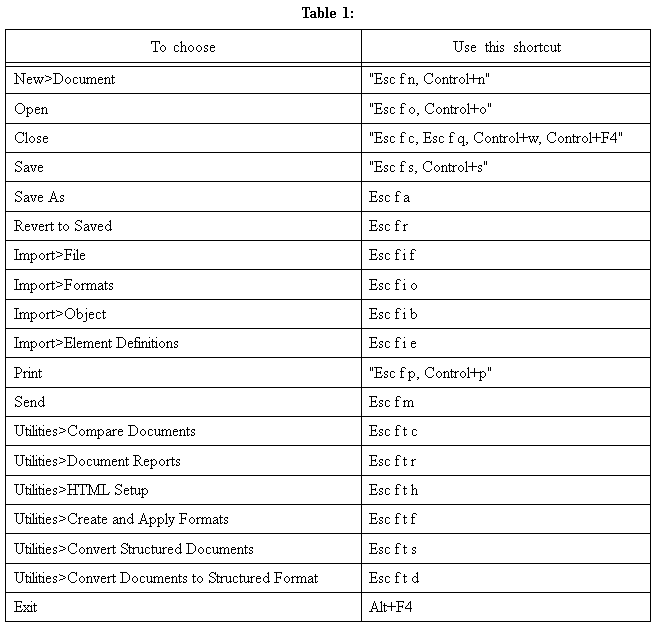
Your table should look similar to the following.
- Close your document. (If desired, save your document before closing.)
Before you continue, experiment with other file formats. Copy and paste information from the conversions.xls and the conversions.doc source files into your document.
Using the Import Command
FrameMaker includes an Import command that provides greater control over importing a file. When you import a file using the Import command, you can import by copying or import by reference.
The Import By Copying Into Document option copies the file directly into the FrameMaker document. This method results in a larger file size.
The Import By Reference option references files in other locations. This method results in a smaller file size, but if you move the FrameMaker file, you must move the imported files with the document.
In this exercise, you import by reference an Excel file:
- Open a new FrameMaker document.
- Select File > Import > File.
- Locate the directory in which you saved the source files, and open conversions.xls.
- Click Import.
The Unknown File Type dialog box appears.
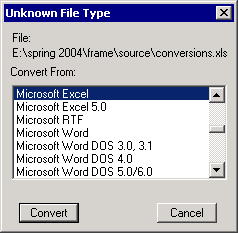
- Select Microsoft Excel, and click Convert.
The Import Text Flow by Reference dialog box appears.
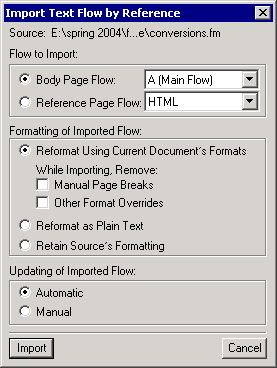
- From the Flow to Import area, select the Body Page Flow option, and select A (Main Flow) from the pull-down menu.
- From the Formatting of Imported Flow area, select Reformat Using Current Document’s Formats.
- From the Updating of Imported Flow area, select Automatic.
- Click Import.
Your document should look similar to the following.
|
Tip: You can also import entire documents by converting them as they are opened. When you open a document of another file type, the Unknown File Type dialog box appears. Select the appropriate document format, and click Import. |
Changing and Updating Imported Files
If you make changes to a document that has been imported by reference, you must update it within your FrameMaker document. In this exercise, you change the source file, and then update it within your document.
To change and update imported files:
- Open Microsoft Excel, change to the directory in which you saved the source files, and open conversions.xls.
- Change any text within the file, and save the file.
- Using the document you created in the previous exercise, double-click the imported text.
The Text Inset Properties dialog box appears.
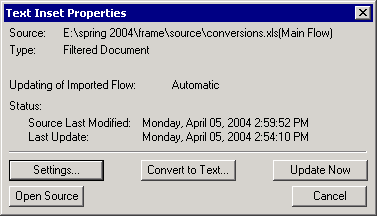
- Click Update Now.
The imported file is updated.
- Close your document. (If you want to save your changes, save the document before closing.)
|
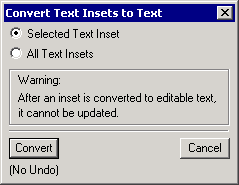
Tip: You can also make changes directly in your FrameMaker document, but you must first convert the imported file to text. Converting a file to text that has been imported by reference provides the same results as when you import by copying. To convert the file to text:
|
Converting Documents to Other Formats
To convert documents to other formats, FrameMaker provides the Save As command. With the Save As command, you can save FrameMaker documents as word processing formats, such as Microsoft Word or WordPerfect, or Web-based formats, such as HTML, Acrobat PDF, or XML. Because they are so widely used, this tutorial provides instruction for saving documents as HTML and Acrobat PDF.
Saving Documents as HTML
To save a document as HTML:
- Locate the directory in which you saved the source files, open conversions.fm.
- Select File > Save As.
- In the Save Document dialog box, type conversions.htm in the File Name box.
- From the Save as type pull-down menu, select HTML (*.htm).
- Click Save.
The file is saved as an HTML file.
To view your HTML file, locate the directory in which you saved the file, and then double-click the file. You can change the HTML formatting by modifying the HTML mapping table.
Saving Documents as Acrobat PDF
To save a document as PDF:
- If it is not already open, open conversion.fm.
- Select File > Save As.
- In the Save Document dialog box, type conversion.pdf in the File Name box.
- From the Save as type pull-down menu, select PDF… (*.pdf).
- Click Save.
- In the PDF Setup dialog box, click Set.
The file is saved as a PDF file.
|
Tip: You can also convert your document to PDF using the Print command. Select File > Print, and then select Acrobat Distiller as your printer. |
To view your PDF file, locate the directory in which you saved the file and double-click the file. You can change the way your PDF file is generated using the PDF Setup dialog box. For more information about PDF settings, refer to the Adobe Acrobat product documentation.
Helpful Hints
When you save your document as HTML or PDF, the cross-reference links within your document become active hyperlinks. You can create additional hyperlinks in FrameMaker by applying a special hypertext link:
- Select the text that you would like to make active.
- Select Special > Hypertext.
- Select the appropriate option from the Command pull-down menu.
For example, select Go to URL. - In the Syntax box, enter the appropriate syntax.
For example, type http://www.austincc.edu/. - Click New Hypertext Marker.
When you save your document as HTML or PDF, the hypertext will appear as an active link. To make the text visible, apply text formatting as desired.
Comments