
FrameMaker 7.0 Tutorial: Books Building
About Books
A book is a FrameMaker file that joins several files together to form one document. The book file includes the filenames of the individual documents, as well as any generated files.
The files in a book can be numbered continuously throughout the book, or they can contain their own number settings and pagination. When you update a book, the generated files, as well as cross-references and variables, are updated across all documents.
Getting Started
Before you begin, you must download and save the source documents.
To download the source documents:
- Select one of the following links:
- Select the directory in which to save the file, and click Save.
Note: If you are working in the TCM computer lab, save the file to your lab account. If you do not have a lab account, please contact your instructor. - Repeat the steps above to download the remaining files.
| Note: Earlier versions of Netscape may attempt to display this file directly. To force Netscape to download this file, right-click the link above, and select Save Link Target As. |

To save the source documents:
- Open FrameMaker, and select File > Open.
- Change to the directory in which you saved the source documents.
- Select one of the files, and click Open. (If messages appear, click OK to continue.)
- Select File > Save As.
- Select the directory in which to save the file.
- In the File name box, change .mif to .fm.
- Click Save.
- Repeat the steps above to save the remaining files.
Building Book Files
In this exercise, you build a book by adding source files to the book file.
To build a book file:
- Select Window > headings.fm to view the headings.fm file.
- Select File > New > Book.
The following message appears.
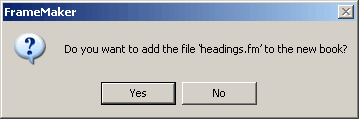
- Click Yes to continue.
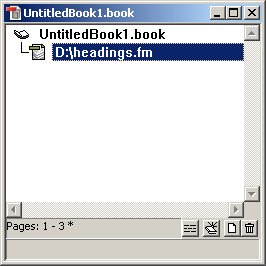
Your new book contains one document file.
- Select File > Save Book.
- In the File Name box, type myBook.book, and click Save.
Note: Notice that the file menu choices are different depending on the file that is currently active.
This image represents the file menu with a document active.

This image represents the file menu with a book active.

- With the book file active, select Add > Files (or click
 in the book window).
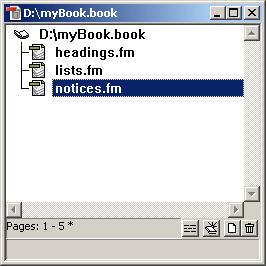
- Select lists.fm, and click Add.
The file is added to the book immediately following headings.fm.
- Repeat the previous steps to add notices.fm to your book.
Your book should look similar to the following.
|
Tip: You can rearrange files within the book window by selecting the file and dragging it to a new location. To delete a file from the book, select the file and click |
Setting up Page Numbering and Pagination
After you the add documents to your book file, you can set up page numbers and pagination to be consistent across all documents in the book.
To set up page numbering:
- In the book window, select headings.fm, and then select Format > Document > Numbering.
The Numbering dialog box appears.
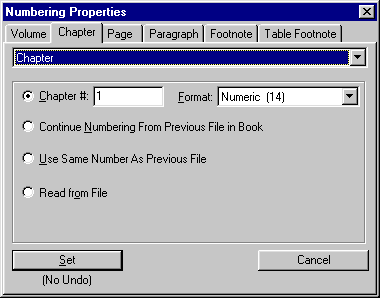
- From the Chapter tab, select the Chapter # option, and type 1 in the text box.
- From the Format: pull-down menu, select Numeric [14].
- From the Page tab, select the First Page # option, and type 1 in the text box.
- From the Format pull-down menu, select Numeric [14].
- Click Set.
- In the book window, select lists.fm, and then select Format > Document > Numbering.
- From the Chapter tab, select Continue Numbering From Previous File in Book.
- From the Page tab, select Continue Numbering From Previous Page in Book, and click Set.
- Repeat the previous steps to set the page numbering for notices.fm.
To set up pagination, do the following to each of the three files:
- Select Format > Page Layout > Pagination.
- From the Pagination dialog box, select Double Sided.
- From the 1st Page Side pull-down menu, select Right, and click Set.
Creating Autonumbers
FrameMaker allows you to automate all numbering streams within a document, including multi-file documents such as books. Numbering streams are used with page numbers, chapter and section numbers, figure and table numbers, and numbered lists. You apply numbering streams using autonumber formats.
In this exercise, you create autonumbers for sections, subheadings, figures, tables, and chapters.
Creating Autonumbers for Sections
To add autonumbers for sections:
- Open a new document, and select File > Save.
- In the File Name: box, type autonumber, and click Save.
- In the document window, type Installing the SuperWidget, and apply the Heading1 paragraph format.
- With your cursor within the Heading1 paragraph, open the Paragraph Designer (Ctrl + M).
- In the Paragraph Tag: box, type SectionHeading1, and press Enter.
- In the New Format dialog box, click Create. (Make sure the Store in Catalog and Apply to Selection options are selected.)
- In the Paragraph Designer, select the Numbering tab.
- In the Autonumber Format: box, type Section <n+>.<n=0>< > . (Include a space at the end of the text.)

Note: Autonumber formats are created using building blocks. The building block,
n+, is an autonumber counter. This counter adds 1 to the value of n. In this case, because it is the beginning of the file, n is zero. To begin the autonumber stream from a number other than 1, you can set n equal to that number; for example,<n=5>. You can view other building blocks within the Numbering tab of the Paragraph Designer. - Click Update All.
Your text should look similar to the following.

- Place your cursor at the end of this paragraph, and press Enter.
- Type Configuring the SuperWidget, and apply the SectionHeading1 paragraph tag.
Creating Autonumbers for Subheadings
To create autonumbers for subheadings:
- Create a new body paragraph beneath the Installing the SuperWidget heading, and type Set Up and Installation.
- Press Enter, and type Troubleshooting.
- Place your cursor in the first subheading, and apply the Heading2 paragraph format.
- With you cursor in the Heading2 paragraph, open the Paragraph Designer, and create a new paragraph tag named SectionHeading2 using the procedure you learned in the previous section.
- In the Paragraph Designer, select the Numbering tab.
- In the Autonumbering Format: box, type <n>.<n+>< > . (Include a space at the end of the text.)
- Click Update All.
- Apply the SectionHeading2 paragraph format to the Troubleshooting subheading.
- Beneath the Configuring the SuperWidget heading, type the following text:
Windows 2000 Configuration
Windows 95/98 Configuration
- Apply the SectionHeading2 paragraph format.
Your text should look similar to the following.
Creating Autonumbers for Figures
To create autonumbers for figures:
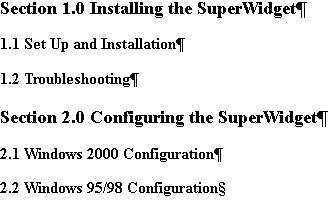
- Below subsection 1.1, create a new body paragraph, and type Layout of a Basic SuperWidget.
- In the Paragraph Designer, create a new paragraph tag named FigureHeading, and then select the Numbering tab.
- In the Autonumbering Format: box, type Figure <n>< >.<n+> . (Include a space at the end of the text.)
- Click Update All.
- Type at least two paragraphs under each subsections, and apply the FigureHeading paragraph tag to each line.
Your text should look similar to the following.

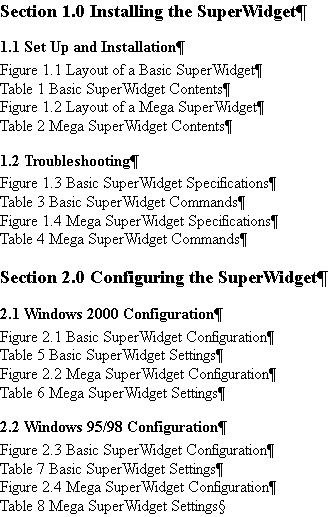
Notice that the figure headings correctly increment the section number, but the figure numbers continue sequentially from the figure numbers in Section 1. To fix this problem, you must restart the numbering for the figure number. Open the Paragraph Designer, and within the Numbering tab, change the autonumbering value for SectionHeading1 to Section <n+>.<n=0>< =0> , and click Update All. The tag < =0> tells FrameMaker to make the figure number value zero, but do not display it.
Creating Autonumbers for Tables
To create autonumbers for tables:
- Create a new body paragraph within Section 1.
- In the Paragraph Designer, create a new paragraph tag named TableHeading, and select the Numbering tab.
- In the Autonumbering Format: box, type T:Table <n+> . (Include a space at the end of the text.)
- Click Update All.
- Within sections 1 and 2, create several paragraphs, and apply the TableHeading paragraph format to each paragraph.
Your text should look similar to the following.
Notice that the TableHeading format uses a numbering system that is different from the section and subsection numbers. This alternate numbering system is created using a series label; in this exercise, the series label is T:. For more information about series labels, refer to Framemaker Online Help.
Creating Autonumbers for Chapter
To create autonumbers for chapters:
- Open a new document, and select File > Save.
- In the File Name: box, type chapter, and click Save.
- In the document window, type SuperWidget Installation Procedures, and apply the Title paragraph format.
- In the Paragraph Designer dialog box, create a new paragraph tag named Chapter, and select the Numbering tab.
- In the Autonumber Format: box, type Chapter <$chapnum>: . (Include a space at the end of the text).
Notice that <$chapnum> is used instead of a series label. The <$chapnum> building block keeps your chapter numbers accurate and up-to-date. You can reorder, add, and delete documents without having to manually update the chapter numbers.
- Click Update All.
Your text should look similar to the following.

| Note: If you add this document to a book that includes other chapters. The chapter number increments according to the numbering properties for that file. |
The following table provides autonumber formats for chapter-based numbering.
| Example | Tag | Autonumber Format |
| Chapter 3: | Chapter | Chapter <$chapnum>: |
| Section 3.1 | Head1 | M:Section <$chapnum>.<n+>< =0> |
| Section 3.1.1 | Head2 | M:Section <$chapnum>.<n>.<n+> |
| Figure 3-1 | Figure | F:Figure <$chapnum>-<n+> |
| Table 3-1 | Table | T:Table <$chapnum>-<n+> |
Experiment with the autonumbering formats in the previous table, and create your own formats using the building blocks in the Paragraph Designer.
Updating a Book File
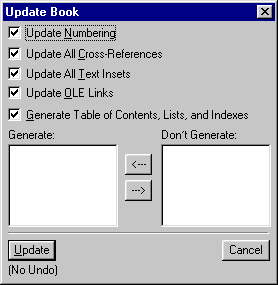
You can update a book file to update numbering, cross-references, and generated files.
To update a book file:
- Select Edit > Update Book (or click
 in the book window).
- In the Update Book dialog box, select the options for the items that you want to update.
 .
.
- Click Update.
- Select File > Save Book to save your book.
In this tutorial, you learned to create and update books. To complete your book, you can add a table of contents and an index
Comments