
Flash 8 Workspace and Workflow
Flash 8 Workspace and Workflow
The workspace in Flash 8 has not changed significantly from the previous version, so you’ll still be able to find your way around the tool and create new applications without any difficulties finding the tools you are accustomed to. However, there are notable improvements to the interface that will improve, and enhance, your everyday workflow.
Changes to Panels and Tabs in Flash 8
Flash 8 provides improved panel management that enables you to customize the workspace to better suit the way that you work. You can now group panels together in tabbed-panel sets, such as the panel set shown in Figure 1. This enables you to create custom panel sets with your most commonly used panels, while also helping you keep your workspace neat. You can even select Rename panel group from the Options menu to assign custom names to each panel group.
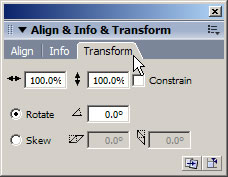
Figure 1. Group panels together to reduce your clutter. If you like clutter, you can ungroup panels, too!
In Flash MX 2004, you had to open separate libraries for each document that you were working with. If you needed to move assets between FLA files, for example, you could end up with a huge number of library panels cluttering the workspace. Now you can use a single Library panel to view the library items of multiple Flash files simultaneously (see Figure 2).
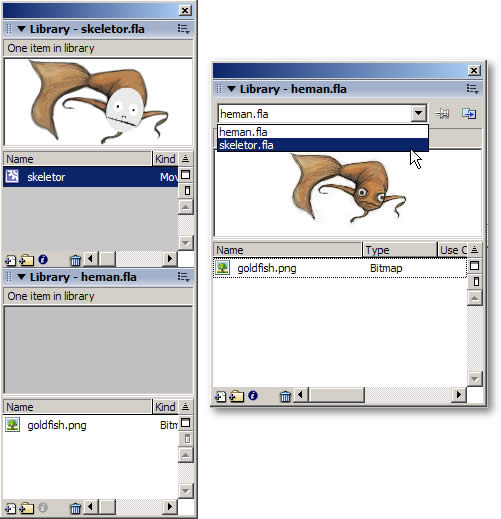

Figure 2. The library is easier, and not quite as messy or awkward, to use in Flash 8.
A pop-up menu appears at the top of the Library panel where you can select which document you need to work with from that panel. For example, if you want to use an asset from one.fla in two.fla, you can select the library for one.fla in the library’s pop-up menu. Then you can either drag that asset onto the Stage of two.fla (which is currently open) or you can follow these simple steps (assuming the scenario above):
- In two.fla’s Library panel, select one.fla from the pop-up menu.
- Select the asset you want to copy to two.fla.
- Select Edit > Copy.
- Open the library for the current document (two.fla) from the pop-up menu.
- Select Edit > Paste.
Another improvement in Flash 8 is drag-and-drop support between the Components and Library panels—you can now drag components from the Components panel to the Library panel. In earlier versions of Flash, you had to place components on the Stage and then delete them—even components that had no visual elements and were only accessed using ActionScript. You can now place such components directly into the library without having to place them on the Stage and later delete them.
Finally, Macintosh users can now enjoy document tabs in the Flash 8 workspace. You can now open multiple FLA files in the same window and select among them using document tabs near the top of the workspace.
Changes to Dialog Boxes and Windows in Flash 8
There are a number of changes to dialog boxes and windows in Flash 8. However, these are not radical changes that would force you to refamiliarize yourself with them. The most notable changes center around the user interface elements discussed in this section.
The Preferences dialog box has been streamlined and reorganized for improved clarity and ease of use. In Flash MX 2004, the Preferences dialog box had tabs that each contained a lot of information. In Flash 8, the information in the Preferences dialog box has been separated into intuitive sections, which are listed on the left of the dialog box (see Figure 3).
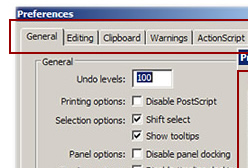
Figure 3. The Preferences dialog box has seen an improvement in Flash.
You can now assign a linkage identifier to bitmaps and sounds (select Linkage from the Options menu). This helps you add additional functionality to your applications (such as shared libraries) and SWF files by using the BitmapData class. You can use the BitmapData class with images in your library to which you assign linkage identifiers.
The importer for Fireworks PNG files now supports a greater number of the graphic properties that you apply to your art in Fireworks. When you import Fireworks PNG files into Flash, the graphics properties that you use remain intact and editable in Flash. For example, you can now import Fireworks filters and blend modes (called effects in Fireworks) into a FLA file.
New Functionality in the Flash 8 Workspace
There are a bunch of new features added to the Flash 8 workspace. This section provides an overview of new panels or interface elements in the program.
New easing controls, contained in a new dialog box that you launch from the Property inspector, enable you to choose precisely how tweens (that you apply in the Timeline) appear when you animate an instance on the Stage.
Note: A tween is the application of a change to an object over a period of time. When you ease a tween, you control when and how the tweening motion to the object is applied.
Custom easing enables you to control these elements through an intuitive graph that provides independent control over the position, rotation, scale, color, and filters used in a motion tween.
When you create a motion tween, and then select it in the Timeline, you can click a button labeled Edit to customize the motion tween (see Figure 4). The Custom Ease In/Ease Out dialog box displays a graph representing the degree of motion over time. Frames are represented by the horizontal axis, and the tween’s percentage of change is represented by the vertical axis. The first keyframe in the animation is at 0% and the last keyframe is at 100%. The rate of change of the tweened instance is shown by the slope of the graph’s curve. If you create a horizontal line (no slope) on the graph, the velocity is zero; if you create a vertical line on the graph, there is an instantaneous rate of change.
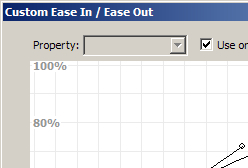
Figure 4. Edit a motion tween to add customized easing to the tween.
The following SWF file shows regular easing (the top bee) and customized easing (the bottom bee). The vertical line has no easing applied.
You can use the area around the Stage (the pasteboard or work area) to store graphics and other objects without having them appear on the Stage when you play the SWF file. Macromedia expanded this area in Flash 8 to enable you to store more items around the Stage. Flash developers often use the pasteboard to store assets they plan to use on the Stage later, or to store assets that do not have a graphical representation during playback, such as data components.
You can now export Flash keyboard shortcuts as an HTML file that you can view and print using a standard web browser. To export the keyboard shortcuts, follow these steps:
- Select Edit > Keyboard Shortcuts (Windows) or Flash > Keyboard Shortcuts (Mac OS X).
- Click the Export Set as HTML button.
- Select a location on your hard drive to save the HTML file.
- Click Save.
You can add metadata information to your FLA files in the Document Properties dialog box. You can add a name and description to your FLA file using this dialog box to help increase visibility in search engines.
Flash 8 also supports improved Flash Player detection. In Flash MX 2004, adding Flash Player detection meant that three separate HTML pages were generated with your SWF file. The Flash Player detection feature has been improved so that it publishes one HTML page, which simplifies the publishing process.
Old Friends Revisited: Object-level Undo and Script Assist
There are two changes to the workflow in Flash 8 that are features found in earlier editions of Flash, and will be welcome additions for those who missed them in Flash MX 2004. Flash MX 2004 changed the way the undo feature worked and also removed a feature called normal mode. Both of these features are back in Flash 8, and are called Script Assist (normal mode) and object-level undo (Flash MX–style of undo).
Note: Script Assist and object-level undo are available in both Flash Basic 8 and Flash Professional 8.
If you worked with Flash MX and then upgraded to Flash MX 2004, you might have noticed that the authoring tool handled the undo action (Edit > Undo or Control + Z [Windows] or Command+Z [Mac OS X]) differently. In Flash MX 2004, you could undo your steps for each object in your FLA file separately, whereas Flash MX handled “undo” for the entire FLA document in order (regardless of each object).
In Flash 8 you have an option where you can toggle between each mode. You can now choose to keep track of the changes you make in Flash on a per-object basis (Flash MX style) or on a document-level basis (Flash MX 2004 style). When you use object-level undo, each object on the Stage and in the library has its own undo list. This enables you to undo the changes you make to an object without having to undo changes to any other object. Noting how the History panel tracks your changes helps you understand the differences between these two undo modes.
To change your undo mode, select Edit > Preferences (Windows) or Flash > Preferences (Mac OS X) and then choose an option from the Undo pop-up menu.
Note: You can switch between undo modes in Flash 8, so select the mode you’re most comfortable with. When you switch undo modes, you lose the contents of your History panel.
In Flash MX or earlier, you might have used a feature called normal mode to help you add interactivity to your applications without writing code. Normal mode wasn’t available in Flash MX 2004. However, in Flash 8 normal mode returns with improvements and a new name. Script Assist is an assisted mode in the Actions panel, letting you easily create scripts without having detailed knowledge of ActionScript (see Figure 5). Script Assist helps you build scripts by selecting items from the Actions toolbox in the Actions panel and provides an interface of text fields, radio buttons, and check boxes that prompt you for strings, parameters, variables, and other scripting language constructs.
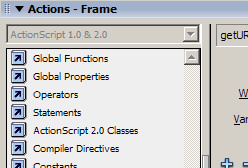
Figure 5. Don’t want to worry about ActionScript syntax? Use Script Assist mode in the Actions panel.
Flash Help includes directions and tutorials that show you how to use assisted scripting. To find the tutorial on Script Assist, search “use script assist mode” (with quotes) in Flash Help (F1).
Comments